Migrating from Jenkins to GitHub Actions is a strategic move for many DevOps teams looking to streamline their CI/CD workflows, improve scalability, and simplify the integration process. This guide walks you through the key differences between the two, common challenges, best practices, and a step-by-step migration process.
Key Differences Between Jenkins and GitHub Actions
While both Jenkins and GitHub Actions automate CI/CD workflows, they differ in architecture, pipeline setup, and plugin management. Let’s understand each of these differences here:
Architecture Comparison: Jenkins vs. GitHub Actions
Both Jenkins and GitHub Actions aim to automate workflows—building, testing, publishing, and deploying code—but their approaches differ significantly. Here are their key differences:
Pipeline as Code: Groovy vs. YAML
One of the major differences you’ll encounter in the migration is the shift from Groovy to YAML. Below is a comparison that highlights the strengths and limitations of each.
Plugin Management and Ecosystem Differences
Jenkins has a rich library of plugins that can integrate with tools like Docker, Atlassian, and Slack, giving you a lot of flexibility to customize your workflows. However, this flexibility comes with a downside—managing all these plugins can get a bit overwhelming, and you’ll need to make sure everything stays up-to-date and has compatibility. On the plus side, Jenkins plugins offer useful features like caching, which can help speed up your builds by reusing results from previous runs.
GitHub Actions, on the other hand, makes things simpler. Instead of juggling a bunch of plugins, you can tap into the Actions Marketplace, where you’ll find ready-made actions that handle most of the common tasks and integrations. This setup helps you get a GitHub workflow up and running faster and with less maintenance.

Common Challenges in Migrating from Jenkins to GitHub Actions
Switching from Jenkins to GitHub Actions comes with its fair share of challenges. From handling complex multi-branch pipelines to dealing with custom plugins and scripts, you’ll find hurdles on every turn. But with the right approach, you can easily manage these challenges.
Handling Complex Multi-Branch Pipelines
In Jenkins, managing multi-branch pipelines can be complex, often requiring a Jenkinsfile in each branch. GitHub Actions, however, simplifies this process. You can define your workflows to trigger on multiple branches with just a few lines of YAML code.
Here's a quick comparison of how multi-branch pipelines are handled in both Jenkins and GitHub Actions.
1. Jenkins
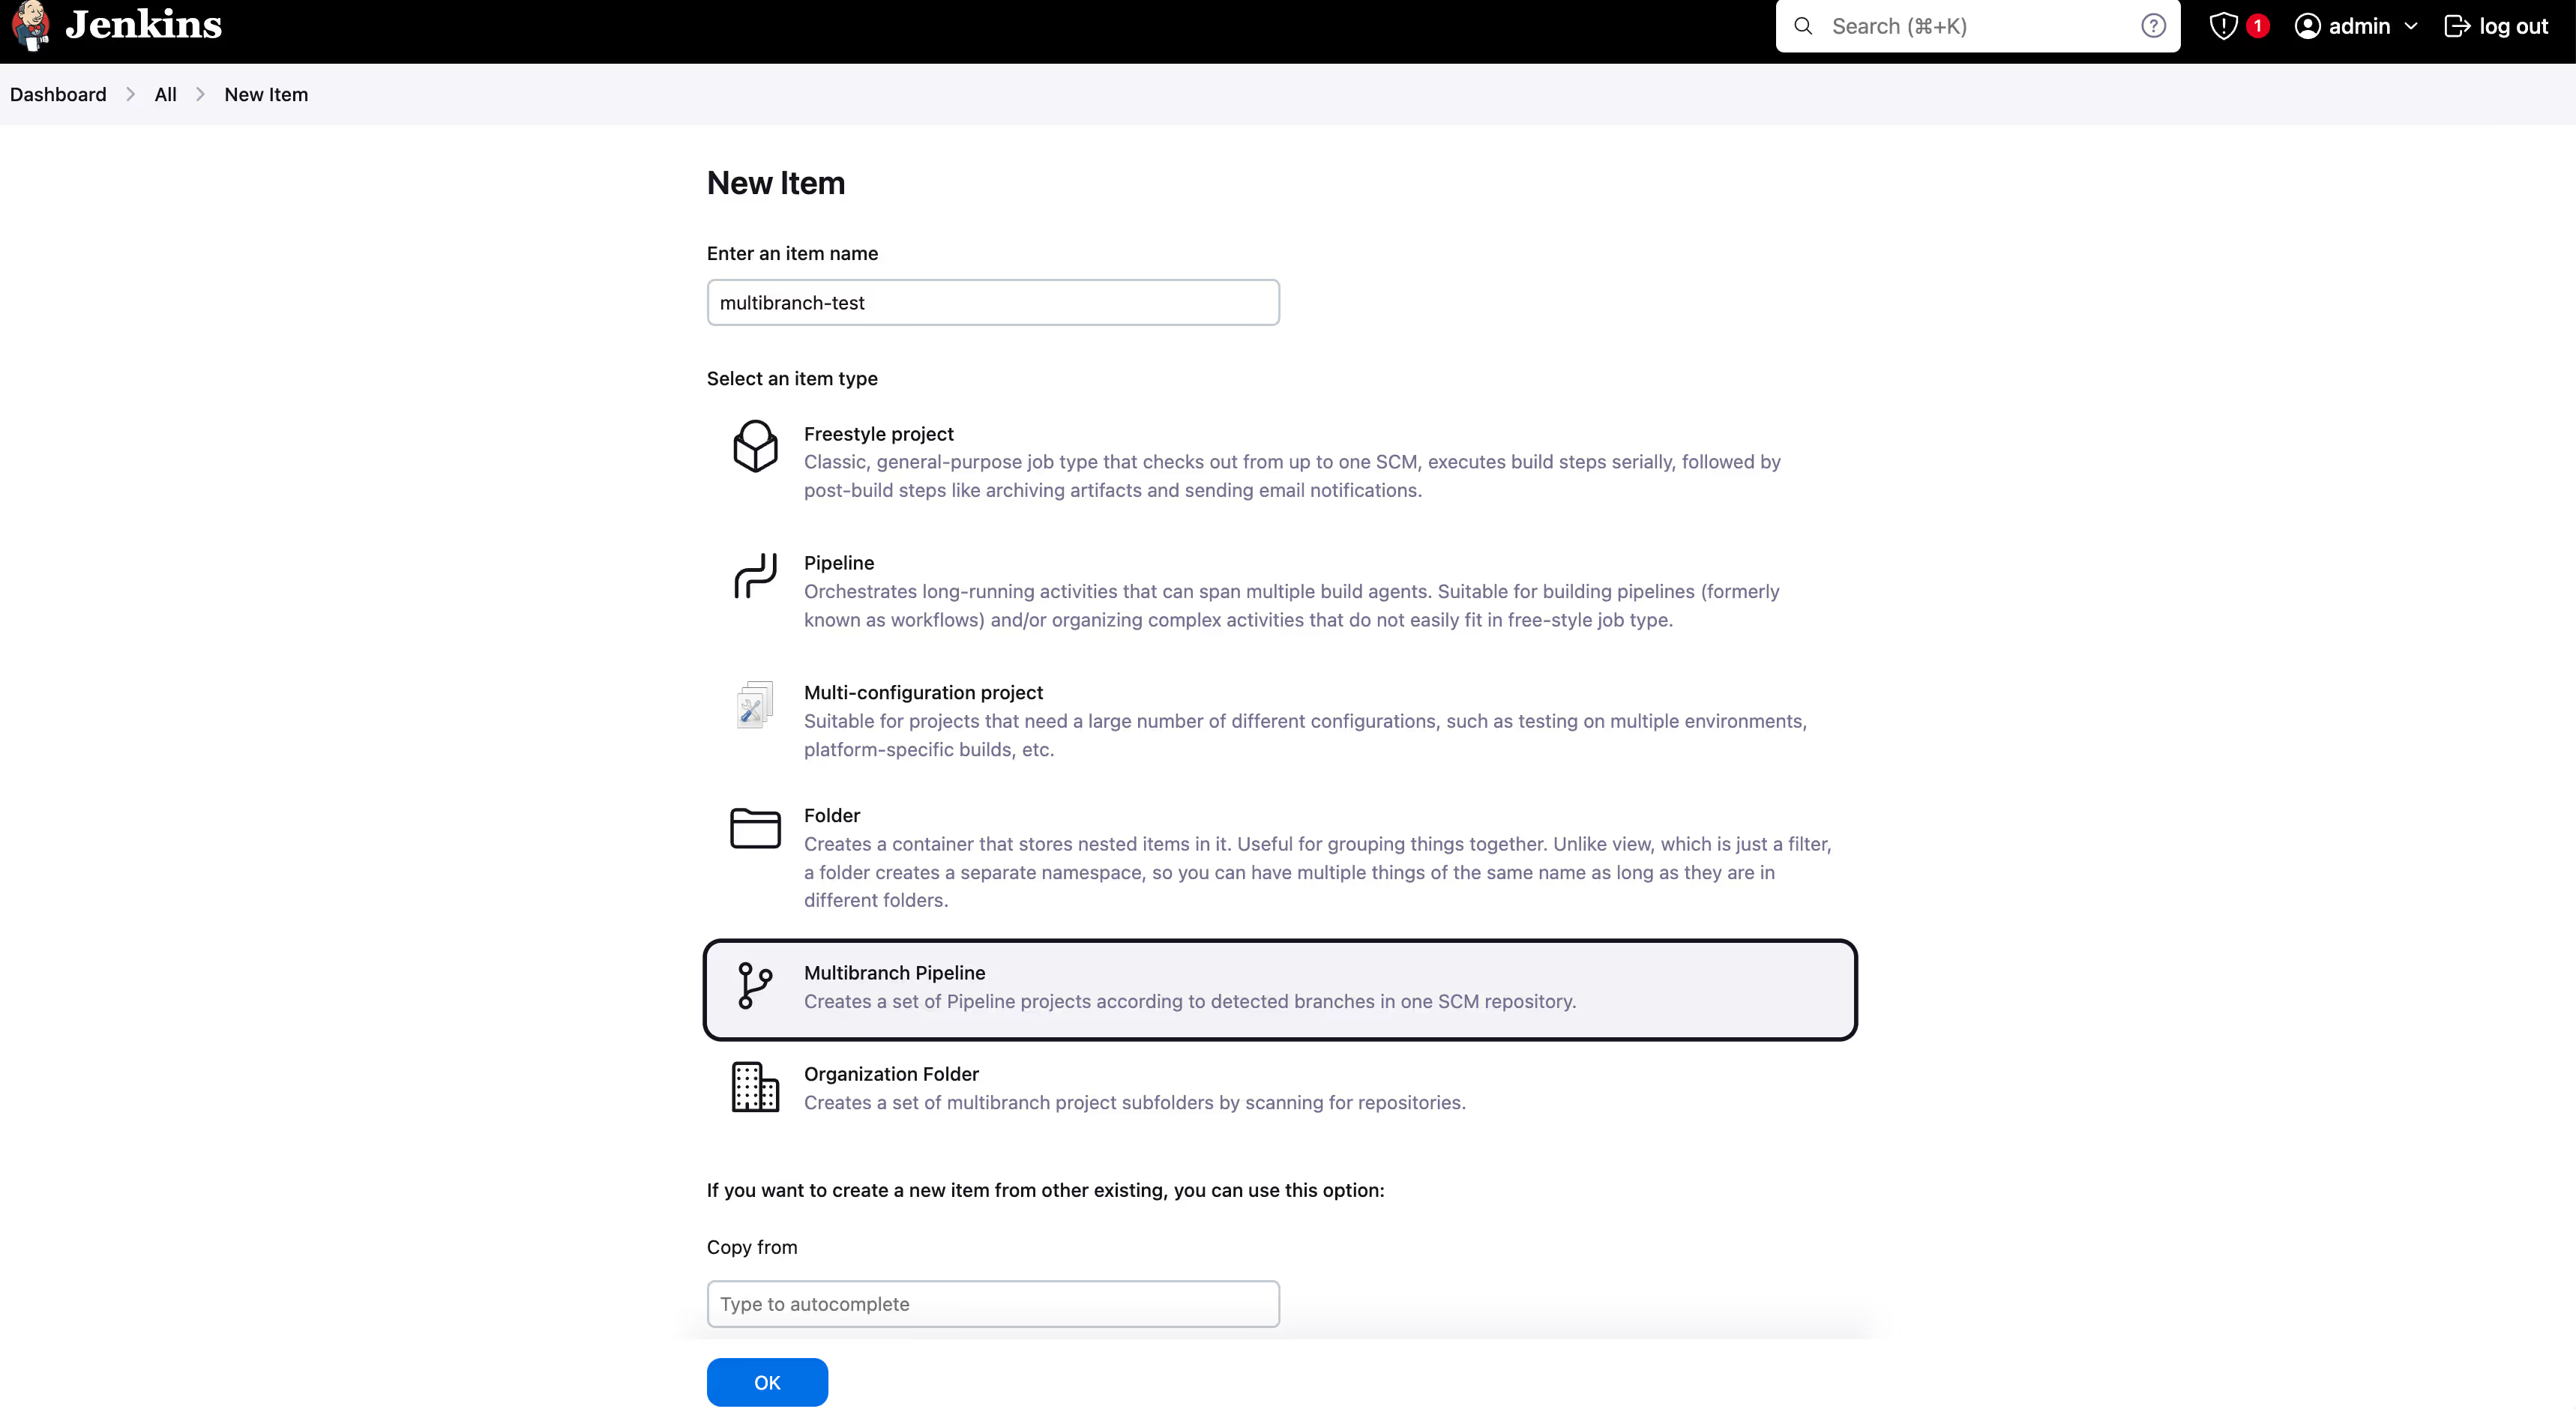
- Jenkins supports multi-branching by defining a specific project type, Multibranch Pipeline. To use Multibranch Pipeline in Jenkins, each VCS branch of your project must have a Jenkinsfile. You can create a Multibranch Pipeline by clicking on “New Item” on the Jenkins Homepage.

- Then enter the name of your project and select “Multibranch Pipeline”. Click “OK” at the bottom.
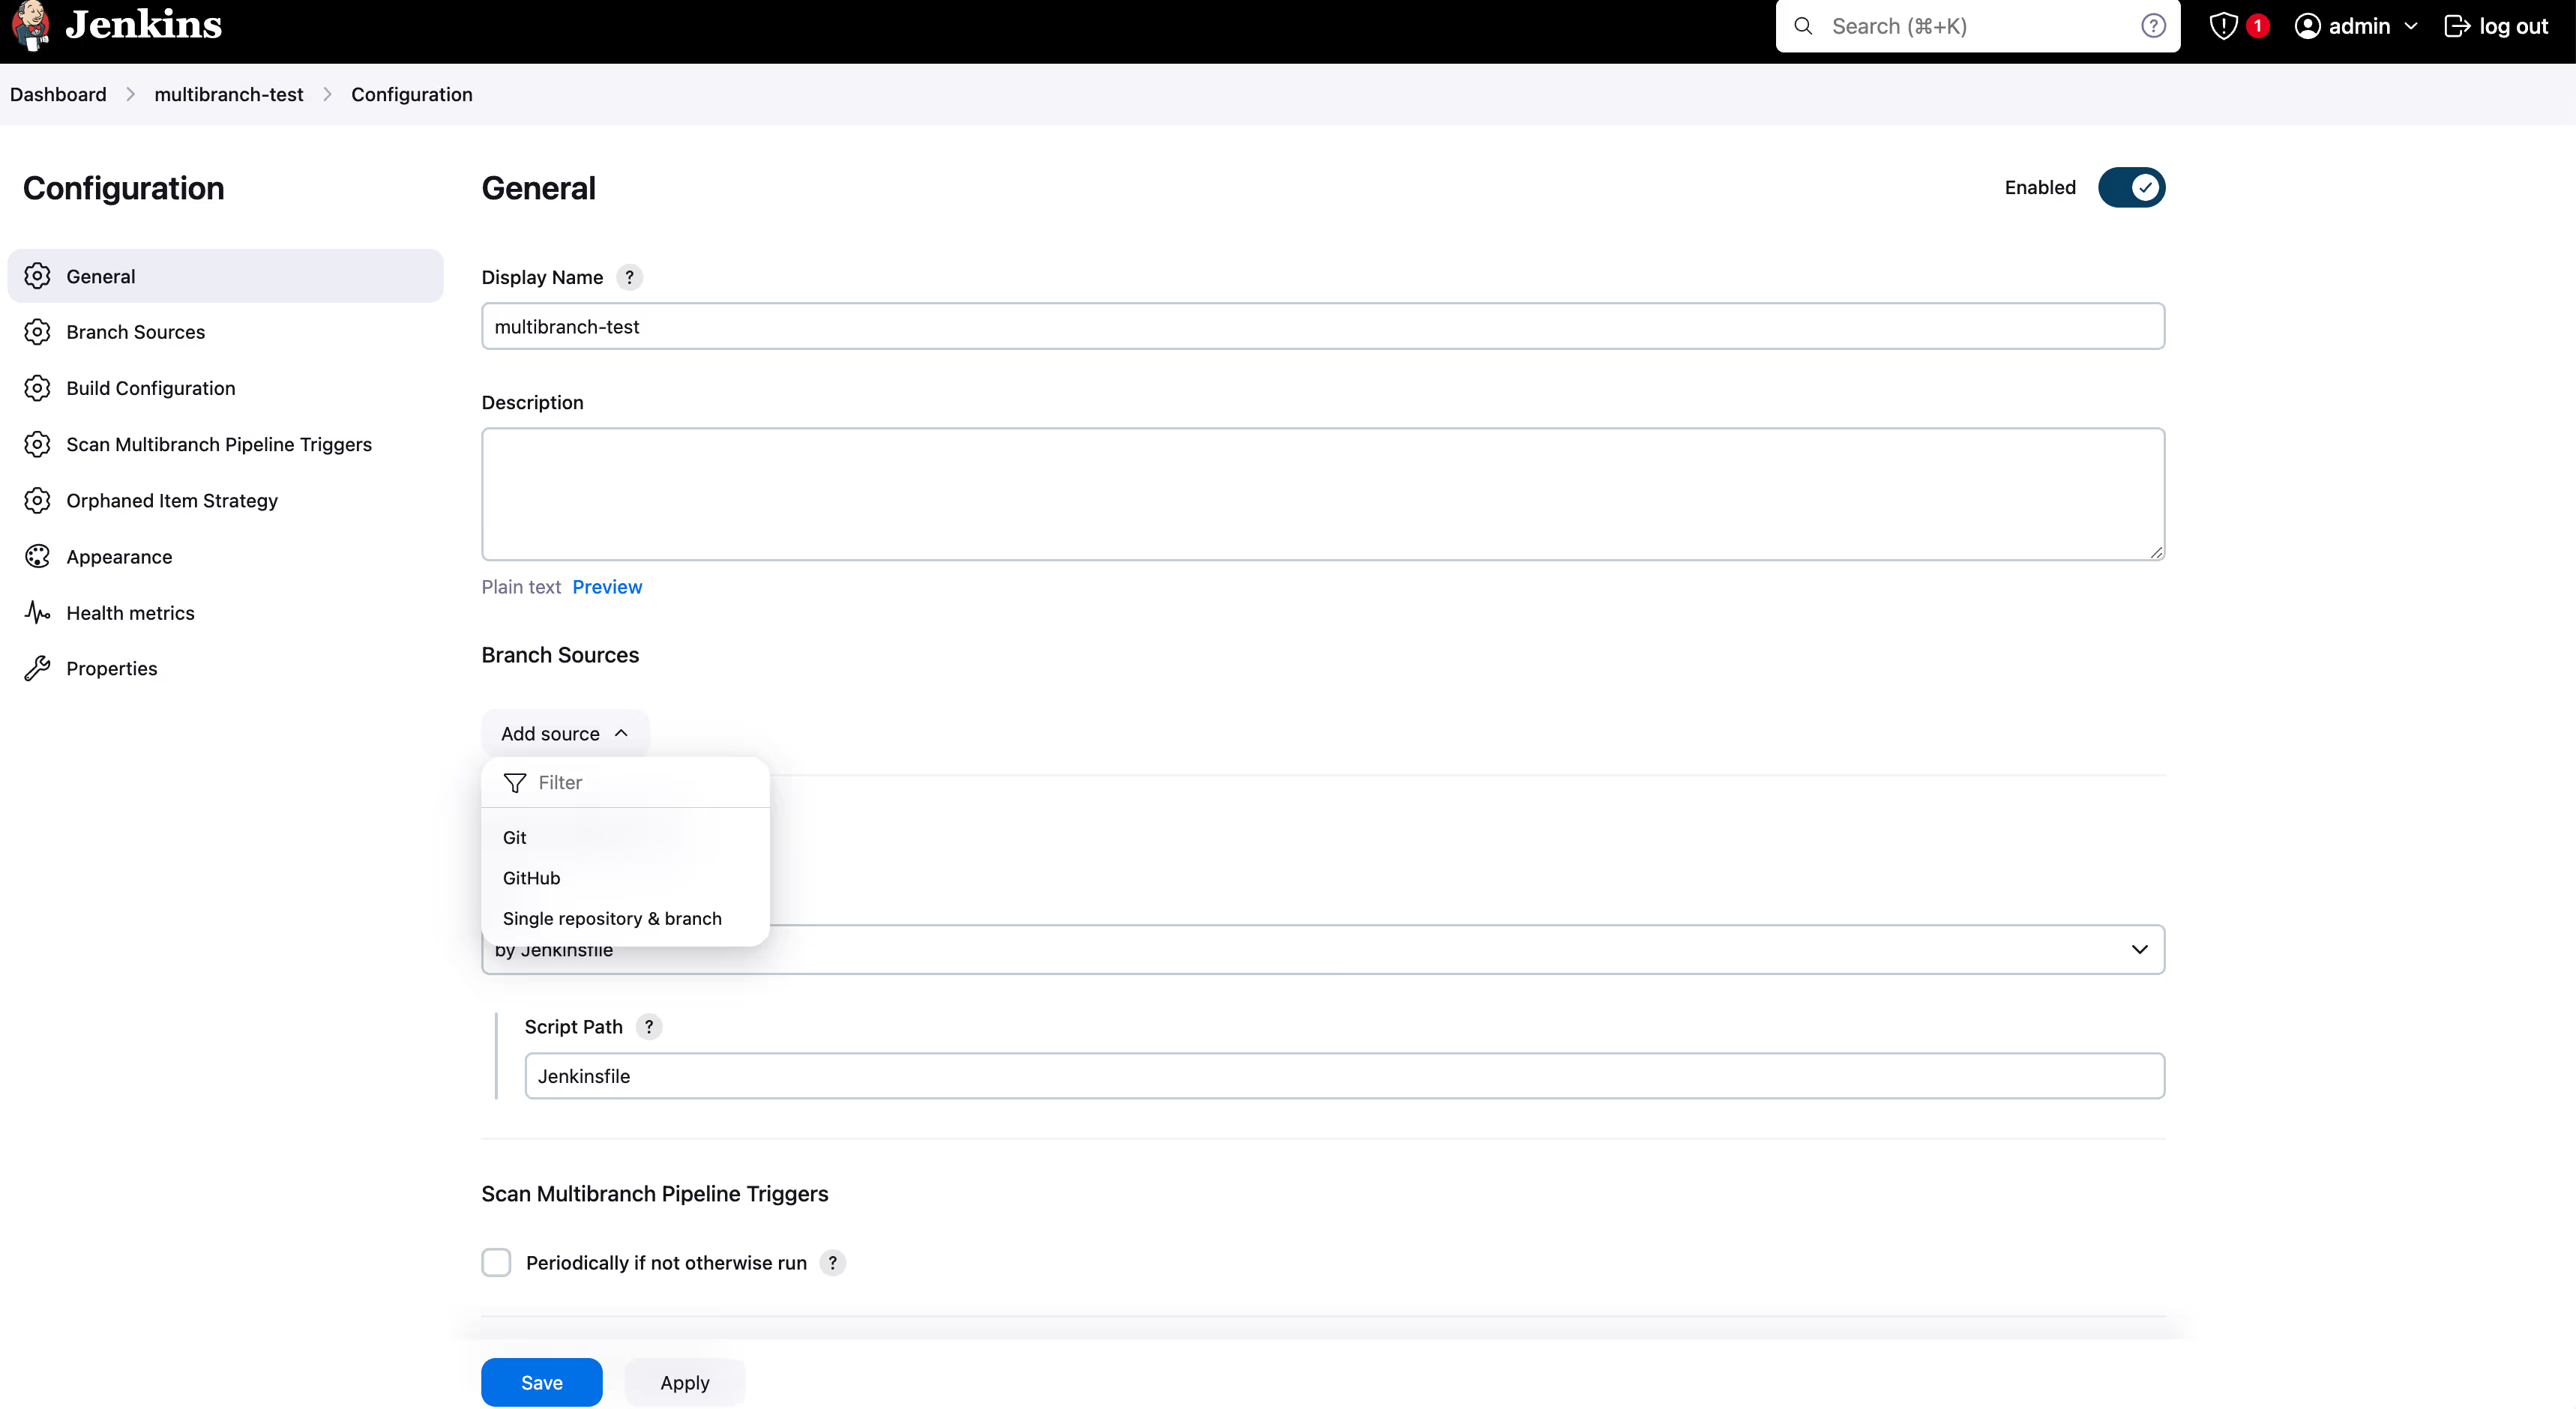
- You will be greeted by the Multibranch Pipeline Configuration page. Under Branch Source, click Git and enter git:///.git under Project Repository. Such as for github.com/example repo, enter git://github.com/example.git. Under Credentials, enter the saved Git credentials in case you have a pre-configured one or add a new one by clicking Add.
- It is useful to configure the branch scanning period for your repo, so that Jenkins will pull up new branches upon their creation. Enter the appropriate time for your project from the dropdown, such as 30 minutes.
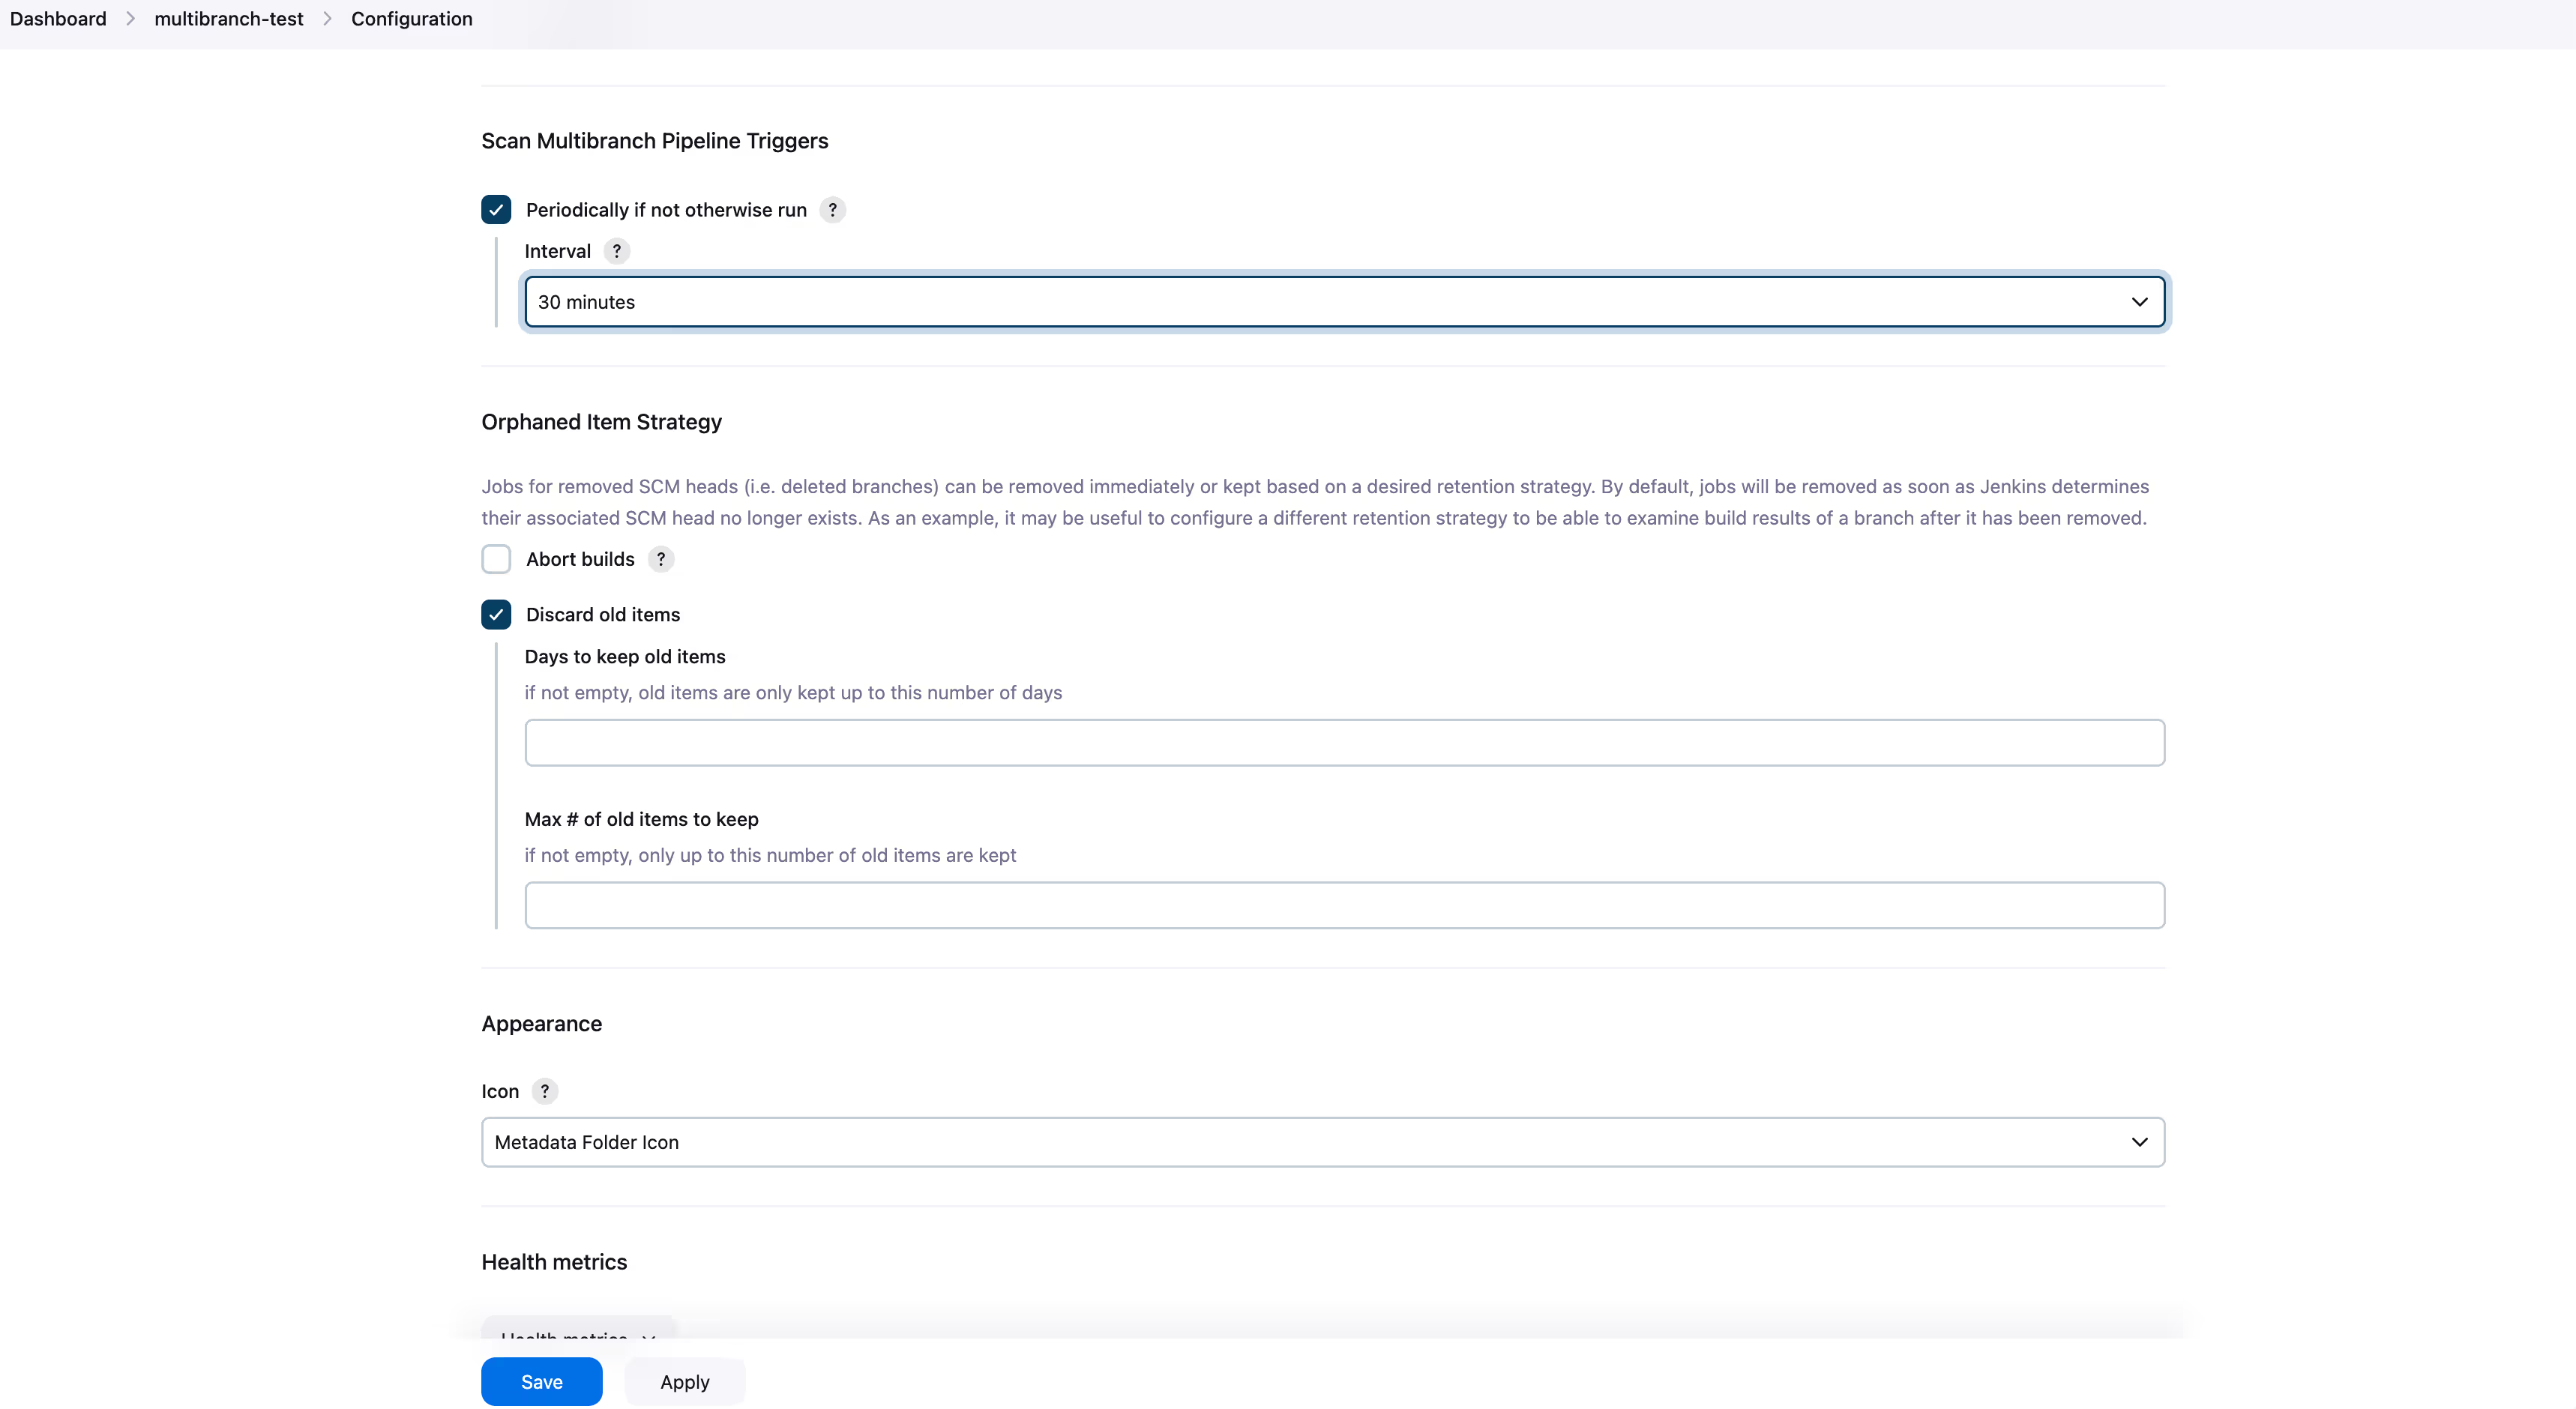
- Click “Save” at the bottom. Now for each branch of your project, that contains a Jenkinsfile, Jenkins will create a separate branch entry under “Status” menu of your project.
2. GitHub Actions
You can specify all the branches in GitHub Actions by the following directive:
name: test-multibranch
on:
  push:
    branches:
      - '**'
You can also compose a fine list of branches to include or exclude by using this tutorial.
Migrating Custom Jenkins Plugins and Scripts
Migrating your custom Jenkins plugins and scripts to GitHub Actions might seem like a big task, but it doesn’t have to be overwhelming. GitHub provides a handy tool called the GitHub Actions Importer, which helps automate the process. The GitHub Actions Importer can help you import your Jenkins configuration directly into GitHub Actions. For a full guide on how to do this, check out this official doc.
Not all Jenkins plugins are automatically supported, but don’t worry—you can still check the list of officially supported Jenkins plugins. If you don’t see your plugin listed, or if you’re migrating a custom script, you can create a custom action in a GitHub workflow. Here’s more information on how to create your own custom action.
Once your custom action is ready, you can easily use it in your workflows. Here’s the basic syntax to include it in your GitHub Actions workflow file:
run: |
  -uses: ./.github/actions/my-action
For more details on the syntax for defining custom actions, refer to this guide.
Ensuring Secure and Efficient Secret Management
One of the critical aspects of any CI/CD pipeline is secret management. Both Jenkins and GitHub Actions offer robust solutions for storing and using secrets securely. While Jenkins uses global and repo-wide secrets, GitHub Actions workflow file simplifies secret management by integrating it directly into the repository settings. Here's how you can ensure that your sensitive data remains secure during the migration:
- To set up a global secret, such as a Docker Registry username and password, you can navigate to Manage Jenkins > Credentials, then click System, and select Username and Password. Select “Global” under Scope and enter the username and password, along with the ID that will be used as secret name like in this Jenkins instance:
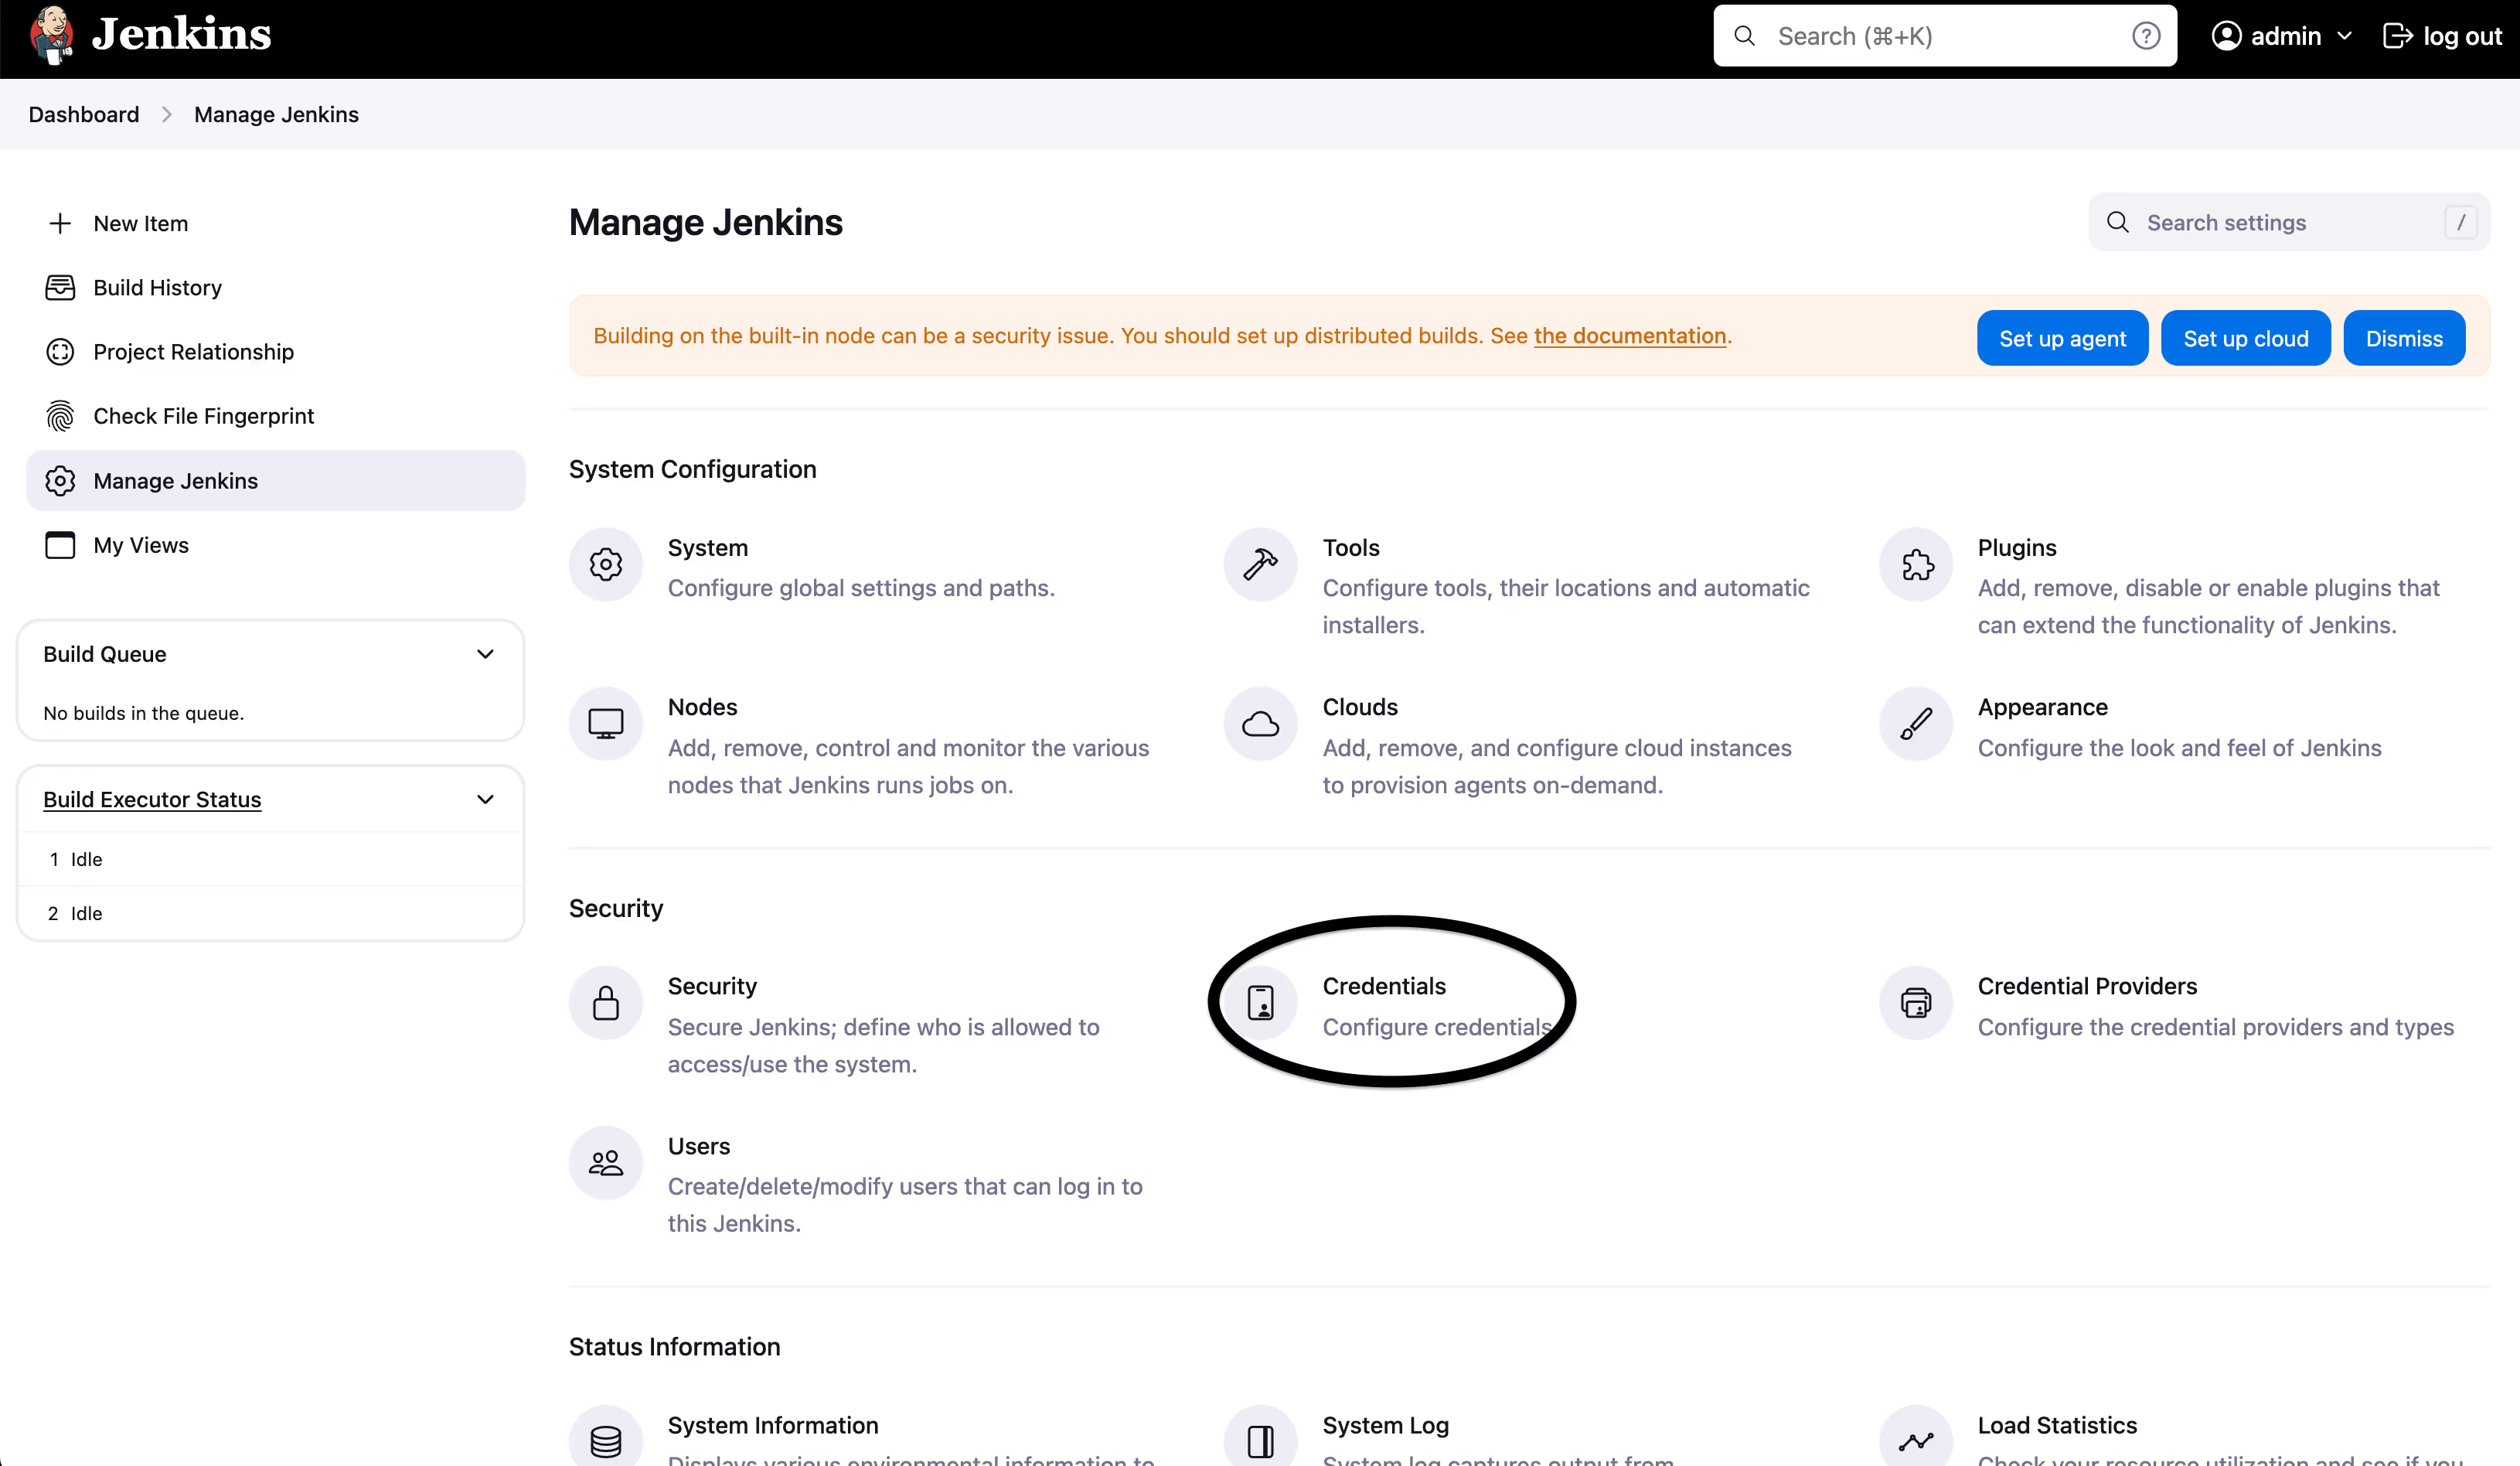
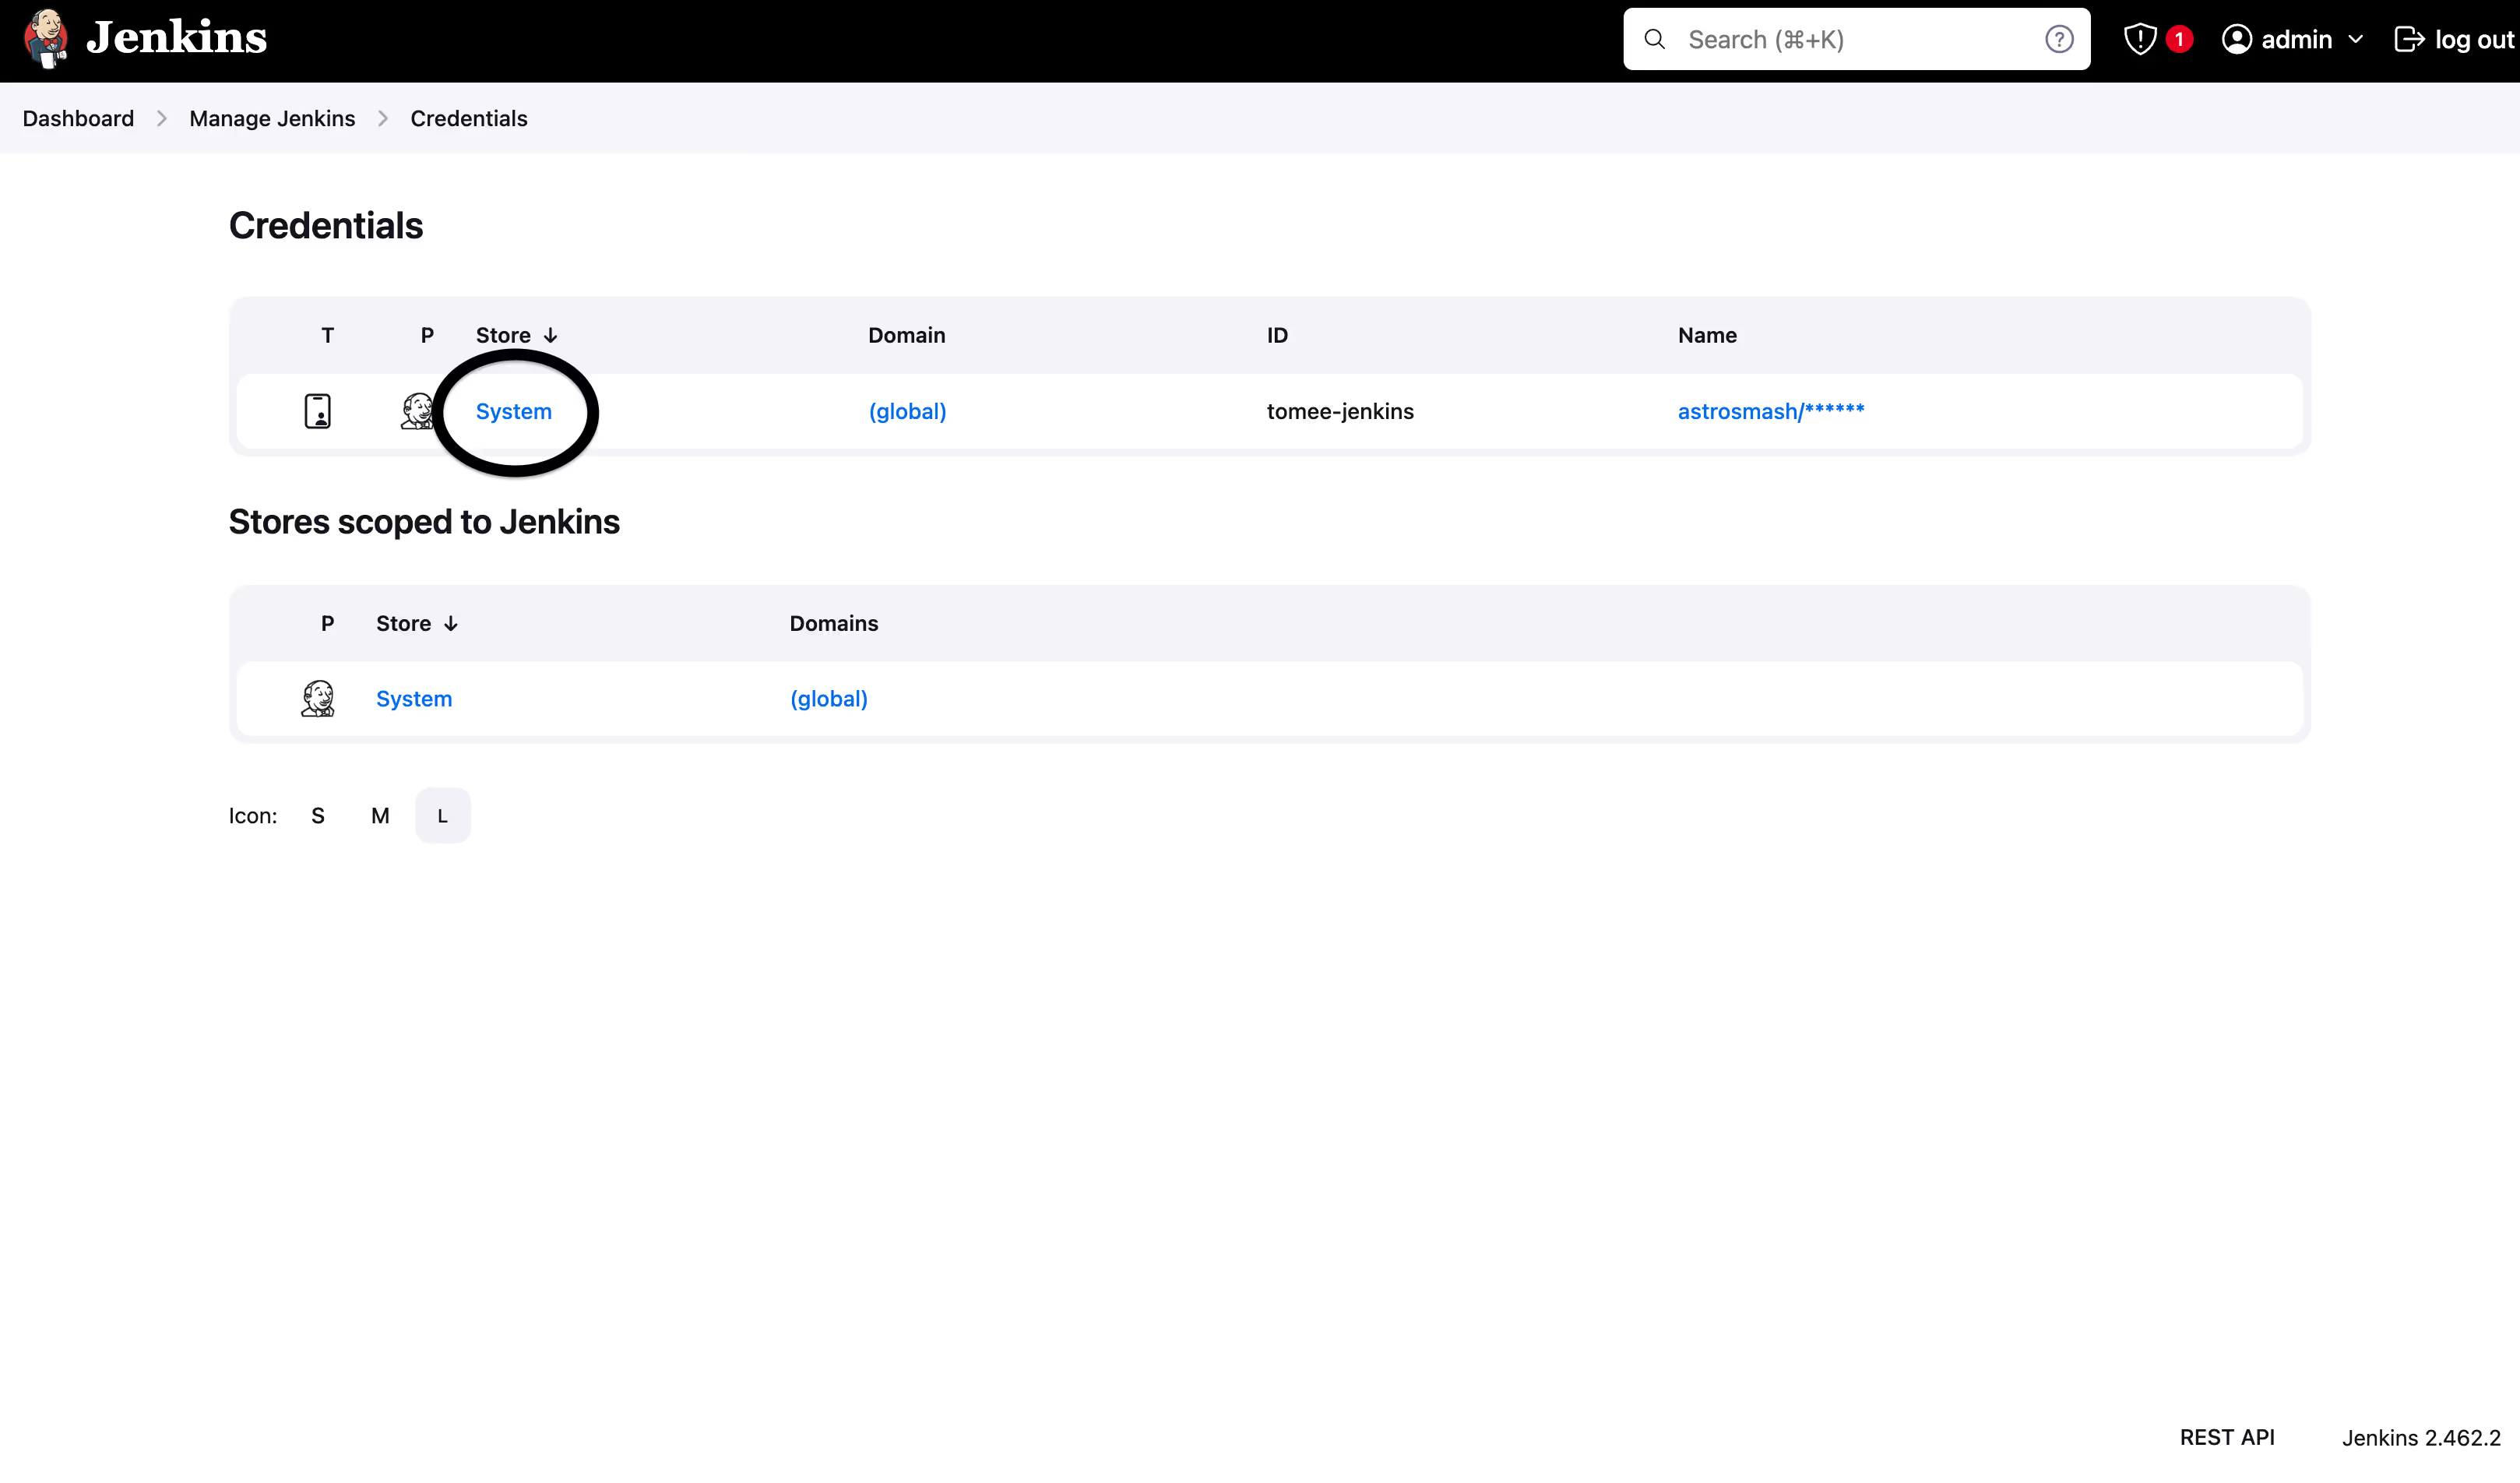
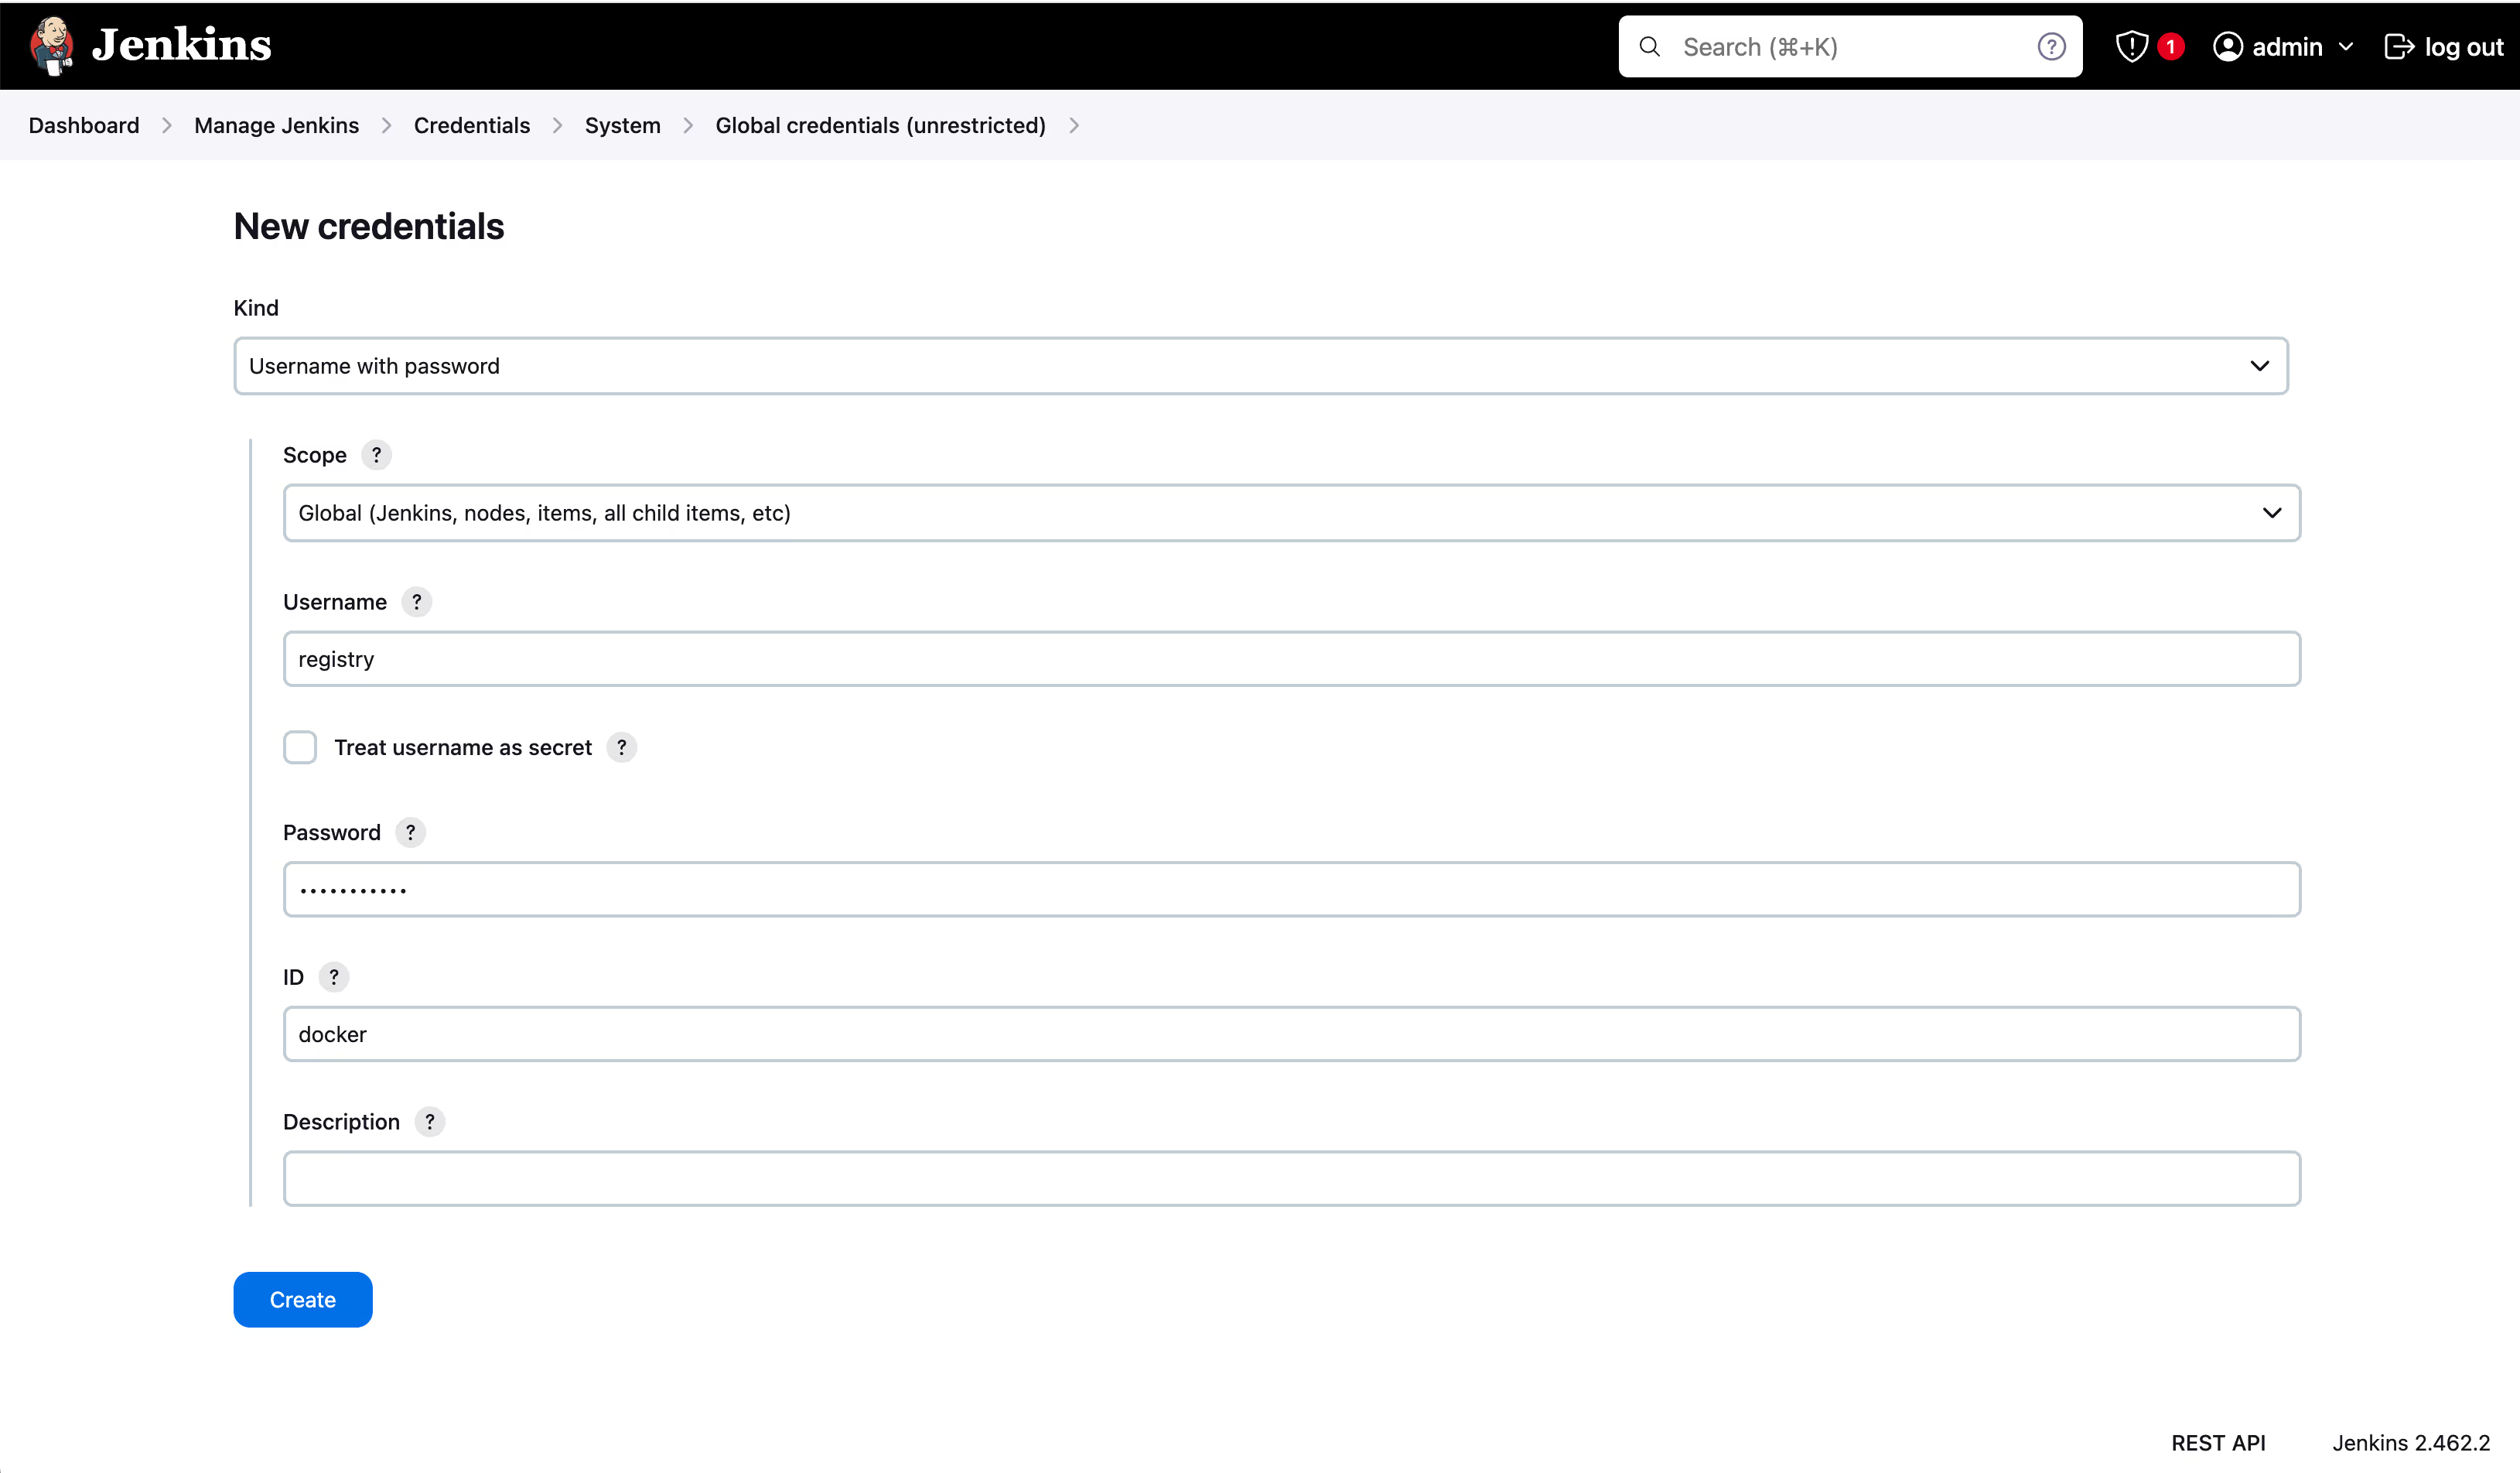
This secret could be used by various plugins, such as Docker plugin.
- For GitHub Actions, to add a secret, navigate to Repo > Settings > Secrets and Variables on the right > Actions, and click on “New Repository Secret”.
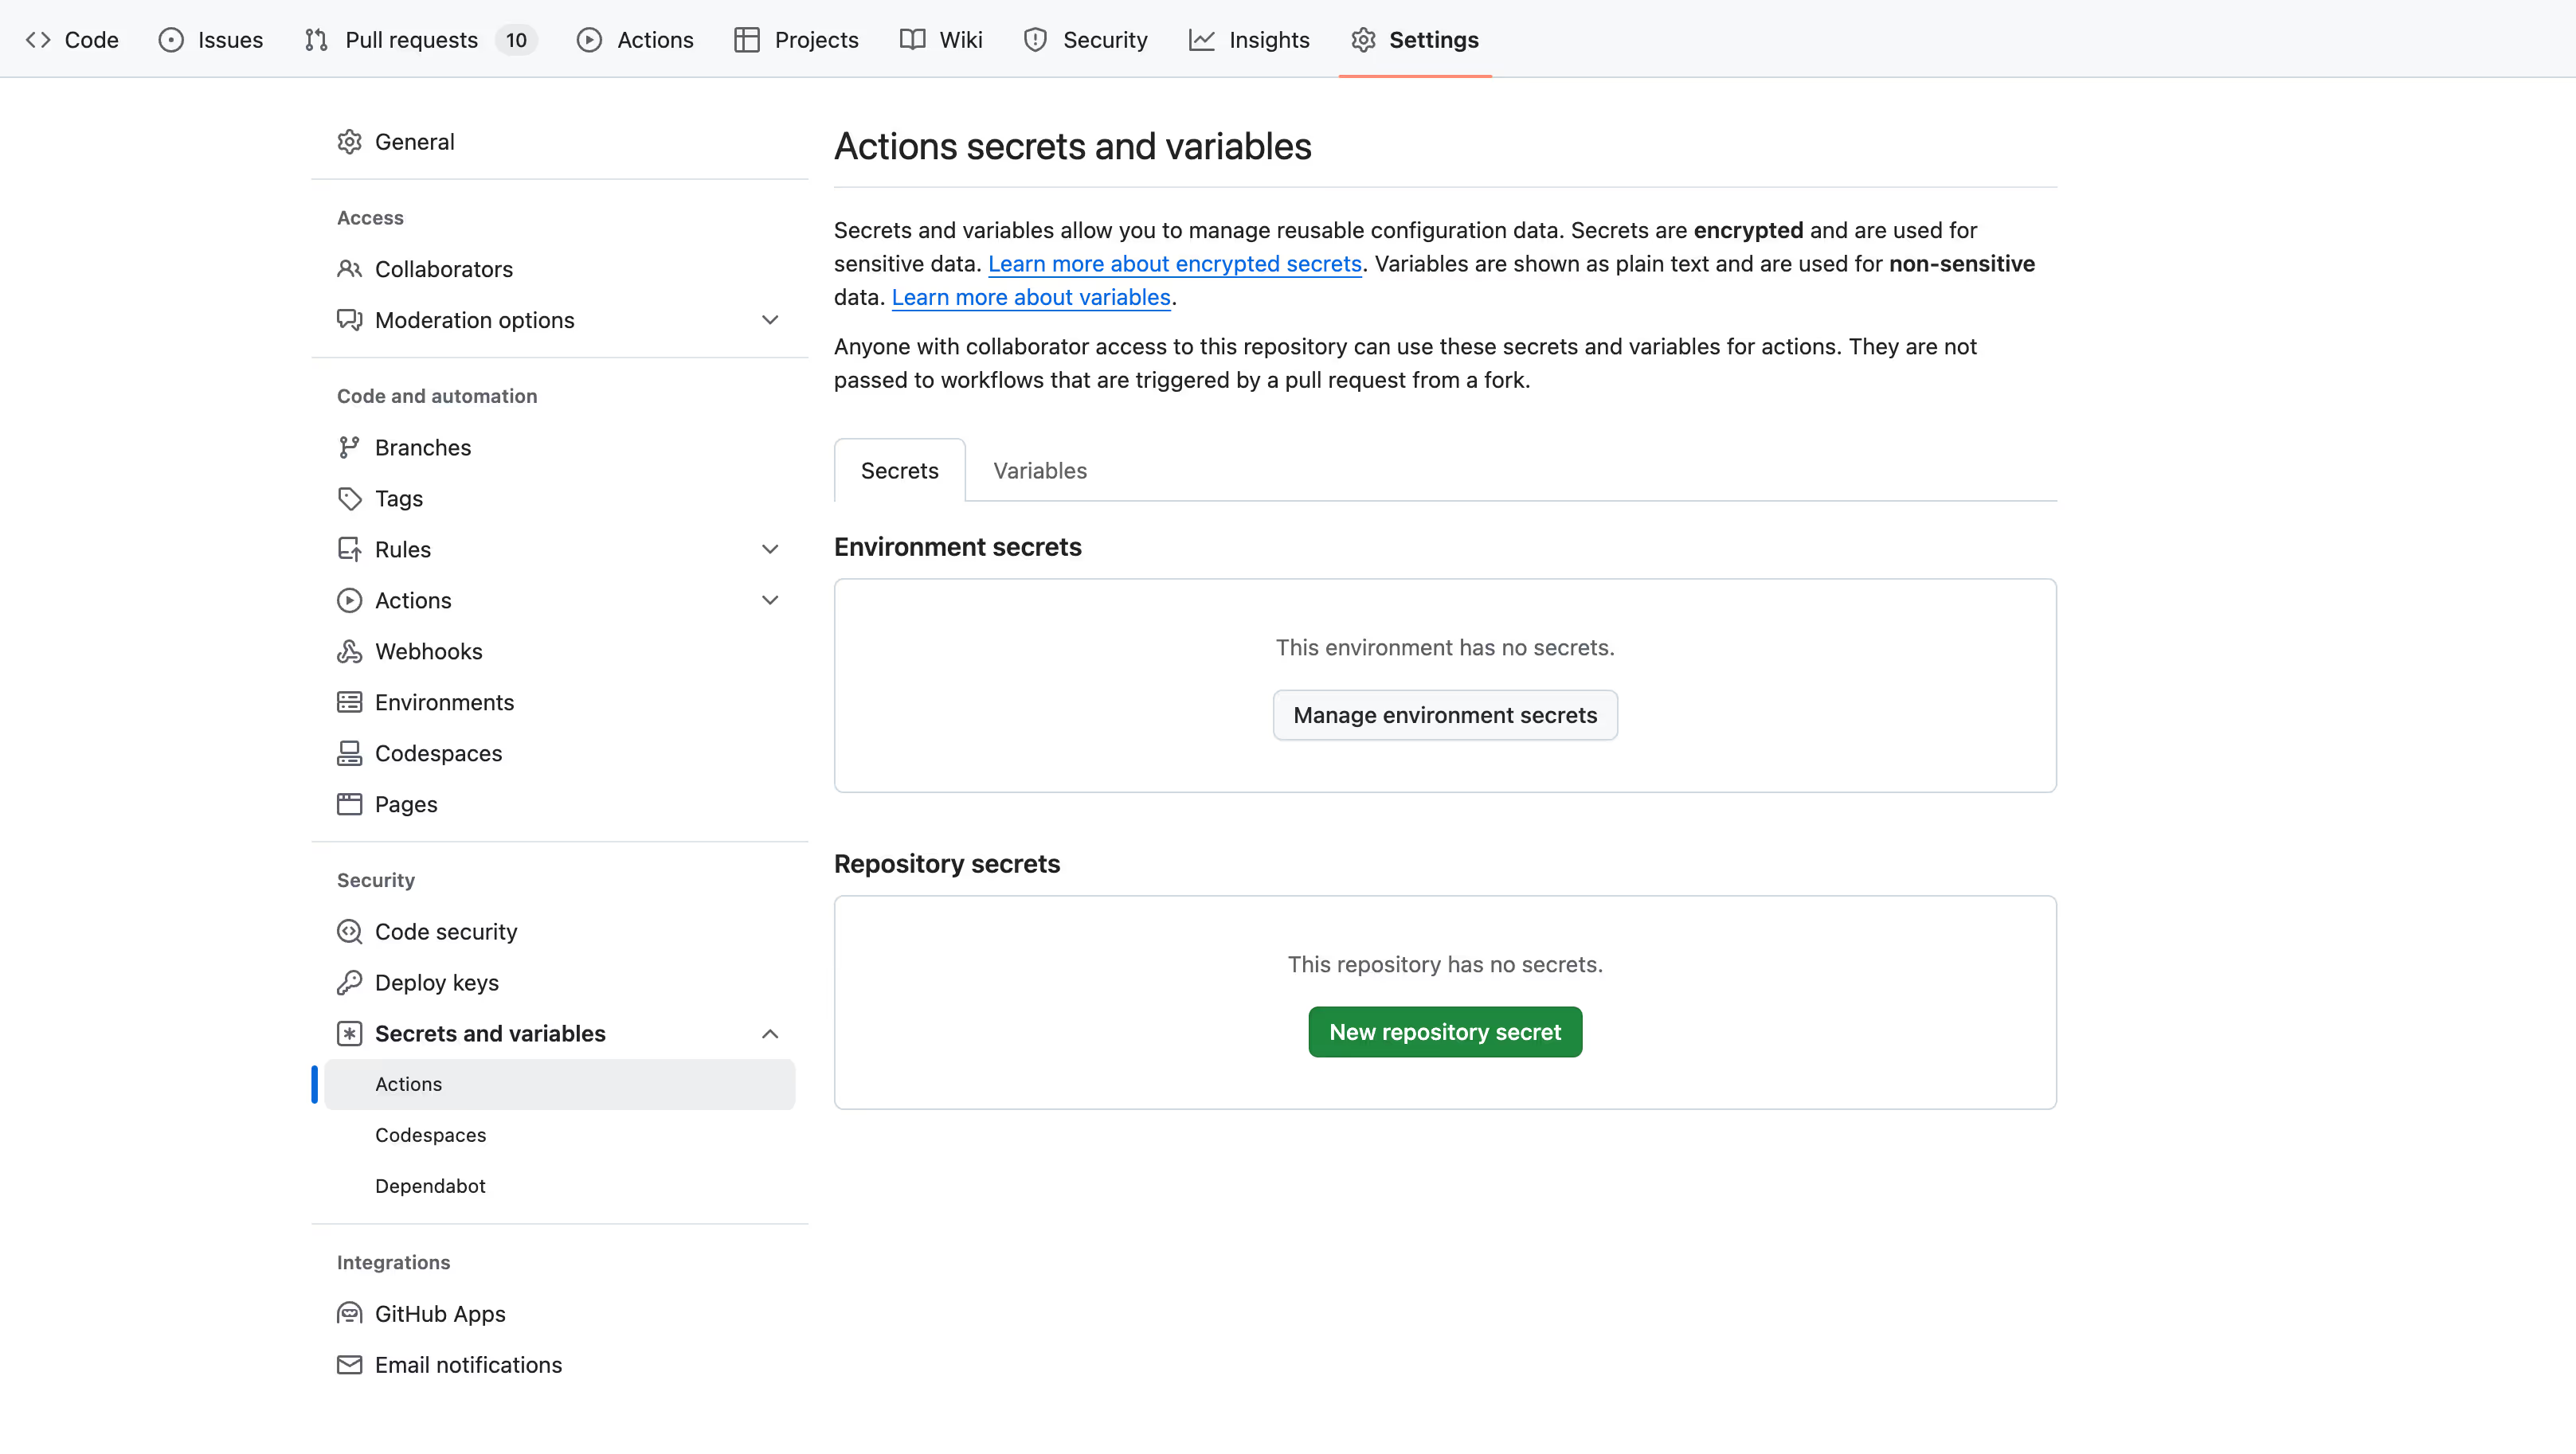
You can add multiple secrets, such as the same Docker Registry credentials under “DOCKER_USER” and “DOCKER_PASS” names. Secret names are arbitrary.
- To use a secret in your GitHub Actions Workflow file, you can reference them using the ${{ secrets. }} template, such as ${{ secrets.DOCKER_USER }} and ${{ secrets.DOCKER_PASS }}. Example of such a step would be:
run: |
  -name: Login to Docker Registry

uses: docker/login-action@v3

with:

  registry:  username: ${{ secrets.DOCKER_USER }}

  password: ${{ secrets.DOCKER_PASS }}
Dealing with Job Orchestration and Dependency Management
Managing job orchestration and dependencies can be one of the more complex challenges when migrating from Jenkins to GitHub Actions. Luckily, both platforms offer tools to help streamline these processes.
1. In Jenkins
- Use Organization Folders to manage a large number of repositories. When a new repository with a Jenkinsfile is created under an organization (e.g., GitHub or Bitbucket), Jenkins will automatically set up a Multibranch Pipeline for it. Learn more about this in this Jenkins documentation.
- Handle job dependencies using a Post Section in your pipeline to trigger other jobs after a successful build. Read more in Jenkins Pipeline Syntax.
- For more complex dependencies, use the Parameterized Trigger Plugin, which allows you to define dependencies between jobs. More details can be found here.
- Reduce redundant build steps across projects using Jenkins' Build Matrix, which helps reuse common steps. Learn how to set this up in the Build Matrix plugin.
2. In GitHub Actions:
- The recommendation for GitHub Actions is to create reusable workflows and use them to call the CI/CD pipeline from multiple entry points. For example:
run: |
  -
run: |
  -name: DependentWorkflow

name: Reusable Workflow

on:
  workflow_call:
    inputs:
      greeting:
        description: 'Greeting message'
        required: true
        type: string
    secrets:
      token:
        description: 'GitHub Token'
        required: true

jobs:
  greet:
    runs-on: ubuntu-latest
    steps:
      - name: Display Greeting
        run: echo "${{ inputs.greeting }}, from the reusable workflow!"
      - name: Show Token (for demonstration)
        run: echo "Token is ${{ secrets.token }}"
run: |
  -run: |
  -name: Call Reusable Workflow

on:
  push:
    branches:
      - main

jobs:
  call-reusable-workflow:
    uses: ./.github/workflows/reusable-workflow.yml
    with:
      greeting: "Hello World"
    secrets:
      token: ${{ secrets.GITHUB_TOKEN }}
Another potential solution is to use leverage workflow_run trigger, more details can be found here. Note that insecure use of workflow_run can lead to Pwn Request vulnerabilities. In general, you should avoid workflow_run. If you have to use this trigger, you must take all the necessary precautions.
Pre-Migration Checklist for a Smooth Transition
Before migrating, ensure a detailed plan is in place. A checklist can help you account for critical pipelines, dependencies, and security considerations. Here’s everything you need to check:
Assessing Existing Jenkins Jobs: Identifying Critical Pipelines and Dependencies
The first step is to thoroughly audit your current Jenkins setup. Take time to go through every build step in each Jenkinsfile across your projects, documenting the tools and their respective versions. This will give you a clear understanding of which pipelines are critical to your operations and need special attention.
To streamline this process, you can use the GitHub Actions Importer to draft an import of your Jenkins configurations into GitHub Actions. Once the draft is generated, review and make any necessary adjustments. To learn how to use the GitHub Actions Importer, you can follow the detailed steps provided in this guide.
As you begin configuring your builds in GitHub Actions, keep your Jenkins configurations active in parallel. This way, you can test the performance and accuracy of a new GitHub Actions workflow while ensuring there’s no downtime. Only after confirming everything works smoothly should, you consider disabling the Jenkins configurations for rollback purposes.
Auditing Jenkins Plugins and Mapping to GitHub Actions Equivalents
When migrating from Jenkins to GitHub Actions, it’s essential to audit all the plugins you’re currently using in Jenkins. Not all Jenkins plugins have a direct equivalent in GitHub Actions, but many common functionalities are already supported through pre-built actions available in the GitHub Actions Marketplace.
Start by reviewing your existing Jenkins plugins, identifying which ones are critical to your pipelines. Then, map them to their corresponding actions in GitHub. You can refer back to the Migrating Custom Jenkins Plugins and Scripts section above for detailed instructions on how to migrate plugins.
If any of your Jenkins plugins don’t have a direct equivalent in GitHub Actions, you can always create a custom action to replicate the necessary functionality. More information on how to create custom actions can be found in this GitHub's documentation.
Security Considerations
Given the potential exposure of sensitive data and system vulnerabilities during the transition, it is important you prioritize security in this process. Both Jenkins and GitHub Actions provide robust security mechanisms, but they differ in how security features are implemented. Let’s look at key considerations for both platforms.
Network Security
Jenkins, by default, operates over port tcp/8080, which poses certain risks. It's recommended to change this port using the httpPort/httpsPort settings, as outlined in Jenkins’ initial settings documentation. Additionally, you can increase security by setting up a VPN for Jenkins server access and ensuring the httpListenAddress/httpsListenAddress is set to a private IP within the VPN tunnel. For extra protection, close all unnecessary ports on your Jenkins server firewall.
In contrast, a self-hosted GitHub Actions runner does not require an open inbound port, as it maintains an outgoing connection to GitHub servers. This means you can close all unnecessary ports on your self-hosted GitHub Actions runner’s firewall, reducing the attack surface even further.
Authentication and Authorization
Jenkins supports various authentication methods through plugins, including GitHub OAuth, Active Directory, and SSO. For enhanced security, it is highly recommended to use SSO combined with MFA (multi-factor authentication) to safeguard against unauthorized logins. Moreover, enabling matrix-based security or project-based matrix authorization provides granular control over user permissions, allowing you to specify which users or groups have access to specific projects. Do this by going to- Manage Jenkins > Security > Authorization
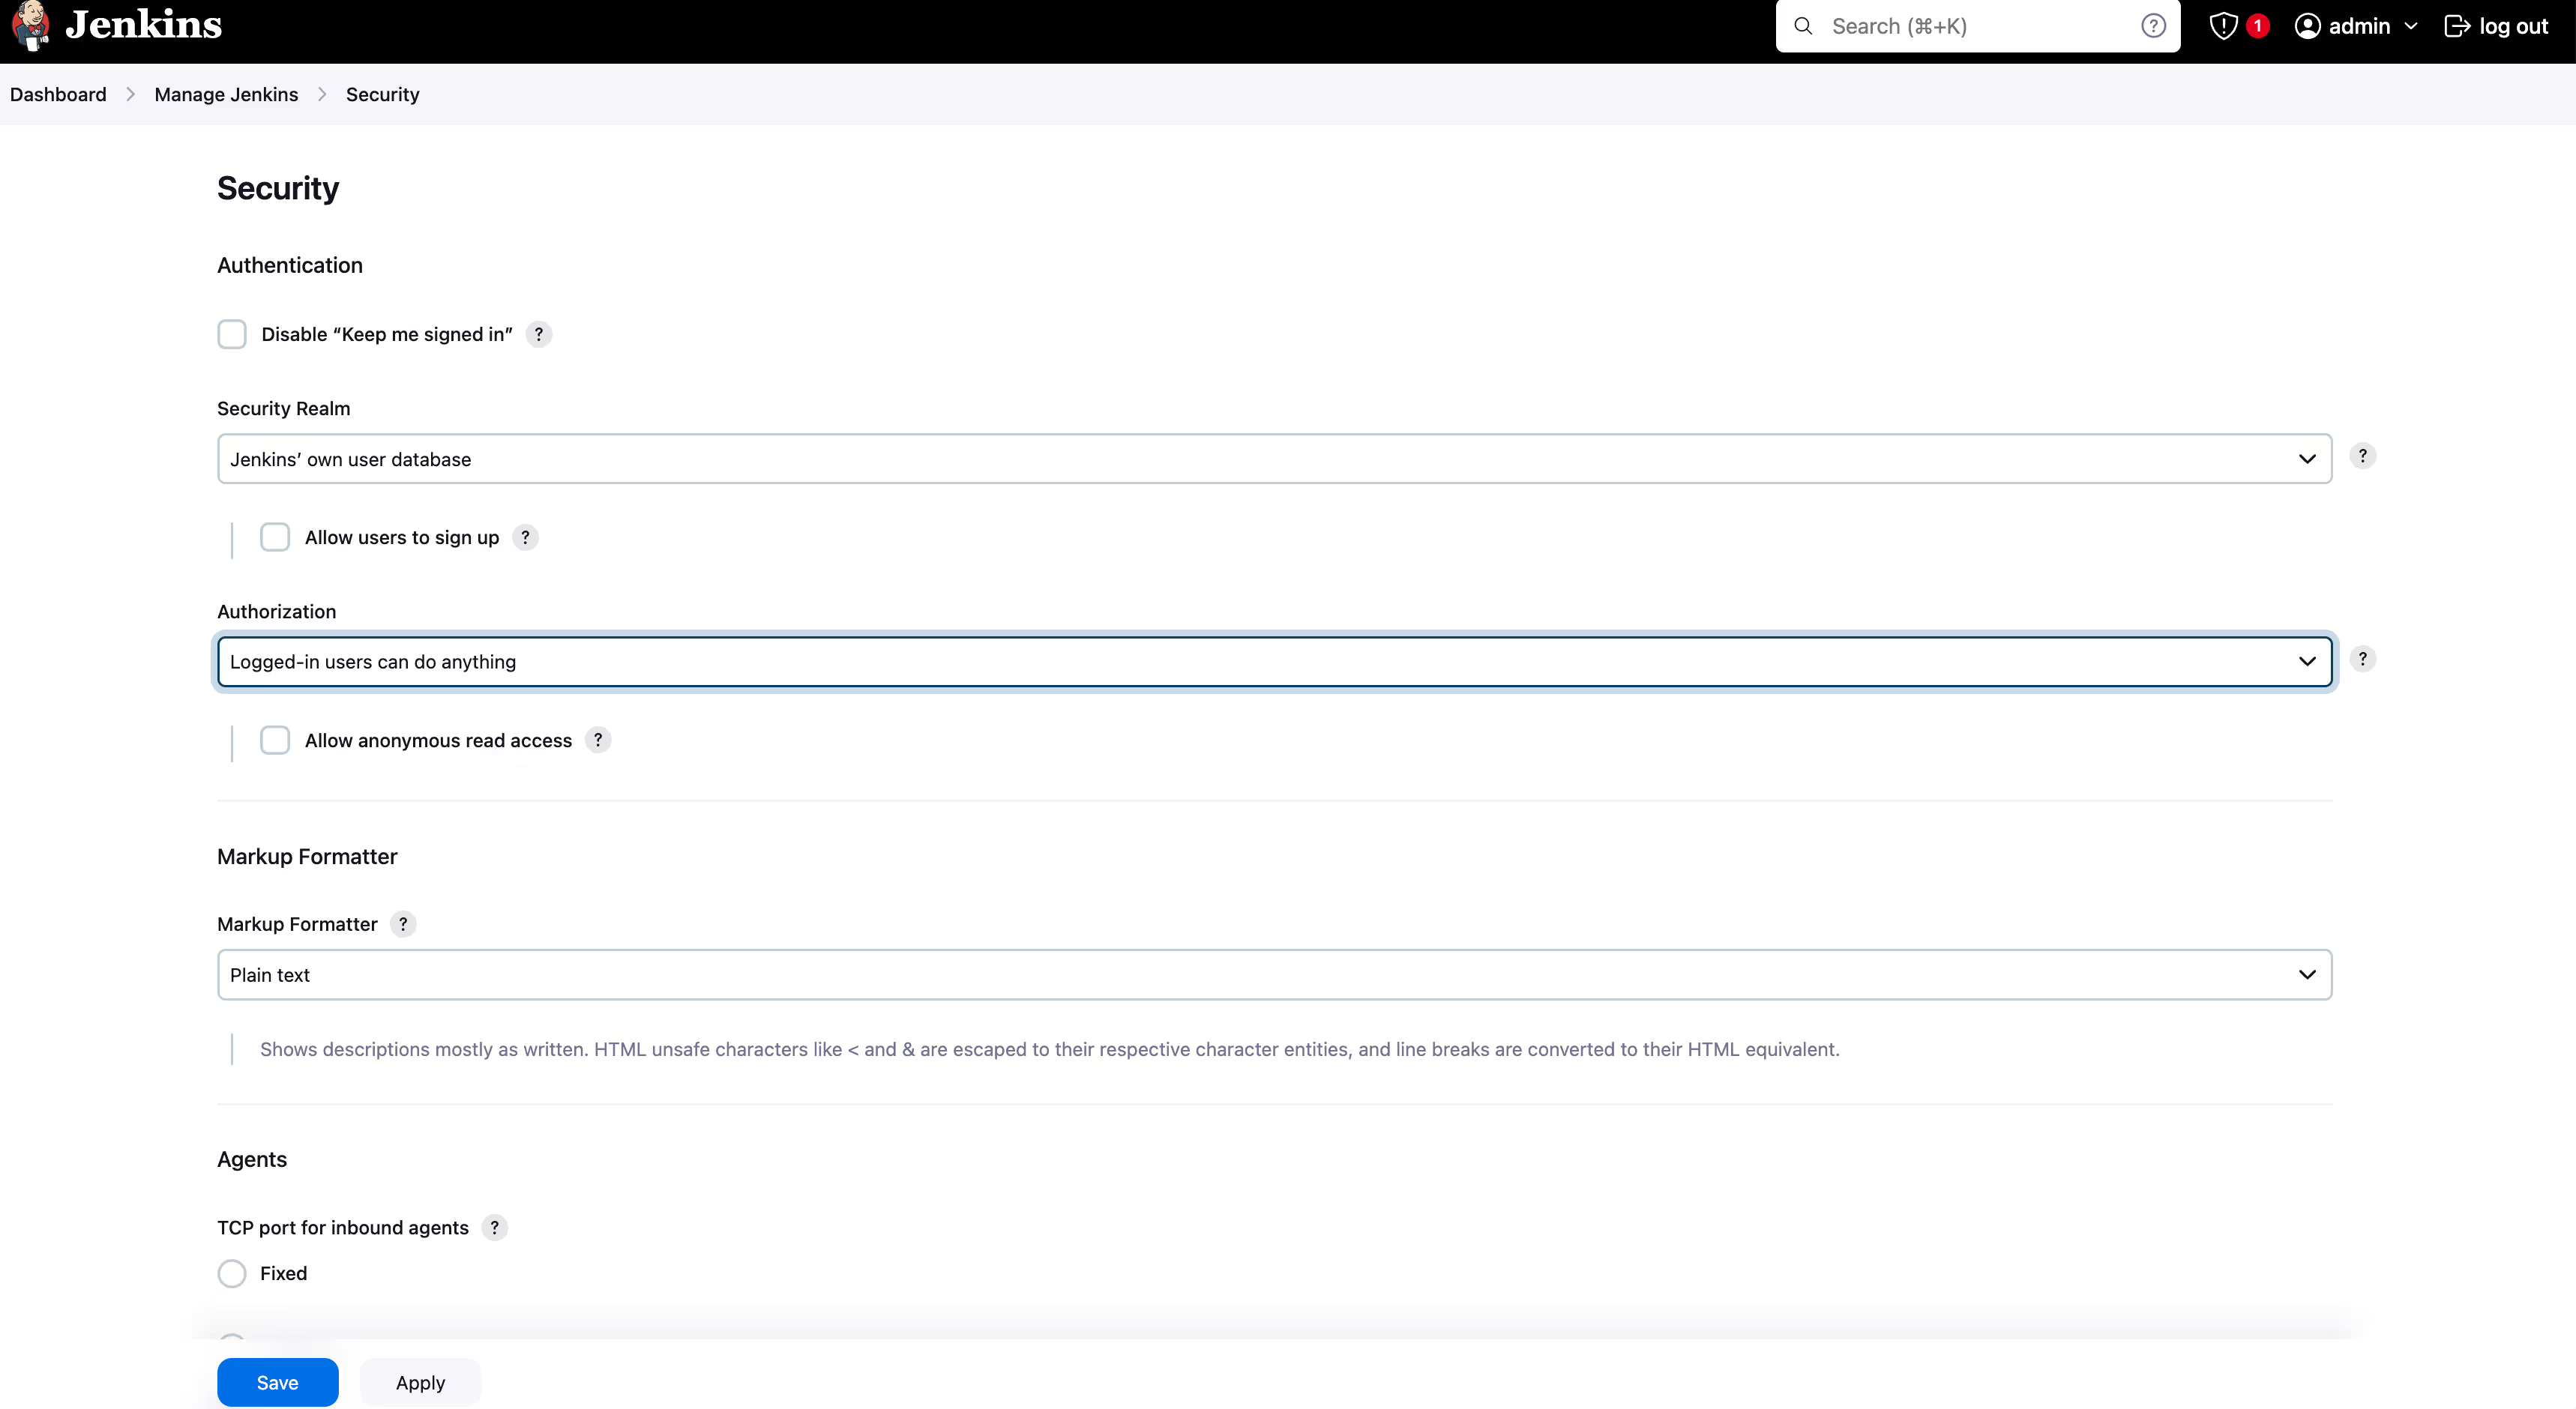
Change “Logged in users can do anything” to “Matrix-based security” or “Project-based Matrix Authorization Strategy”.
GitHub Actions offers built-in authentication features, but if you're using self-hosted runners, you should carefully manage access and ensure they are not exposed to unauthorized users.
Secrets Management
Both Jenkins and GitHub Actions support secure management of sensitive data, but they handle secrets differently. In Jenkins, global and repository-specific secrets can be managed under Manage Jenkins > Credentials, where you can store sensitive information like Docker credentials. It's crucial to regularly audit your credentials and ensure they’re only accessible by authorized users or jobs.
For GitHub Actions, secrets are managed directly within the repository settings. You can add repository secrets under Settings > Secrets and Variables to securely store sensitive data like API keys or Docker credentials. When defining a GitHub workflow, these secrets can be referenced securely within your YAML file using the ${{ secrets.YOUR_SECRET_NAME }} template.
Third-Party Integrations
In Jenkins, third-party integrations are commonly achieved through plugins. For example, integrating with tools like Docker or Slack requires installing and managing the relevant Jenkins plugins. This setup offers flexibility, but it comes with the burden of regular plugin updates and compatibility checks. It is also possible to call third-party tools directly from the Jenkinsfile, such as using a shell operator.
GitHub Actions simplifies third-party integrations by leveraging the Actions Marketplace where pre-built actions are available for common services and tools. Additionally, for custom needs, you can create composite actions to bundle multiple steps into a reusable action.
Compliance and Auditing
Maintaining compliance and auditing standards is a critical aspect of any CI/CD pipeline. In Jenkins, it’s important to:
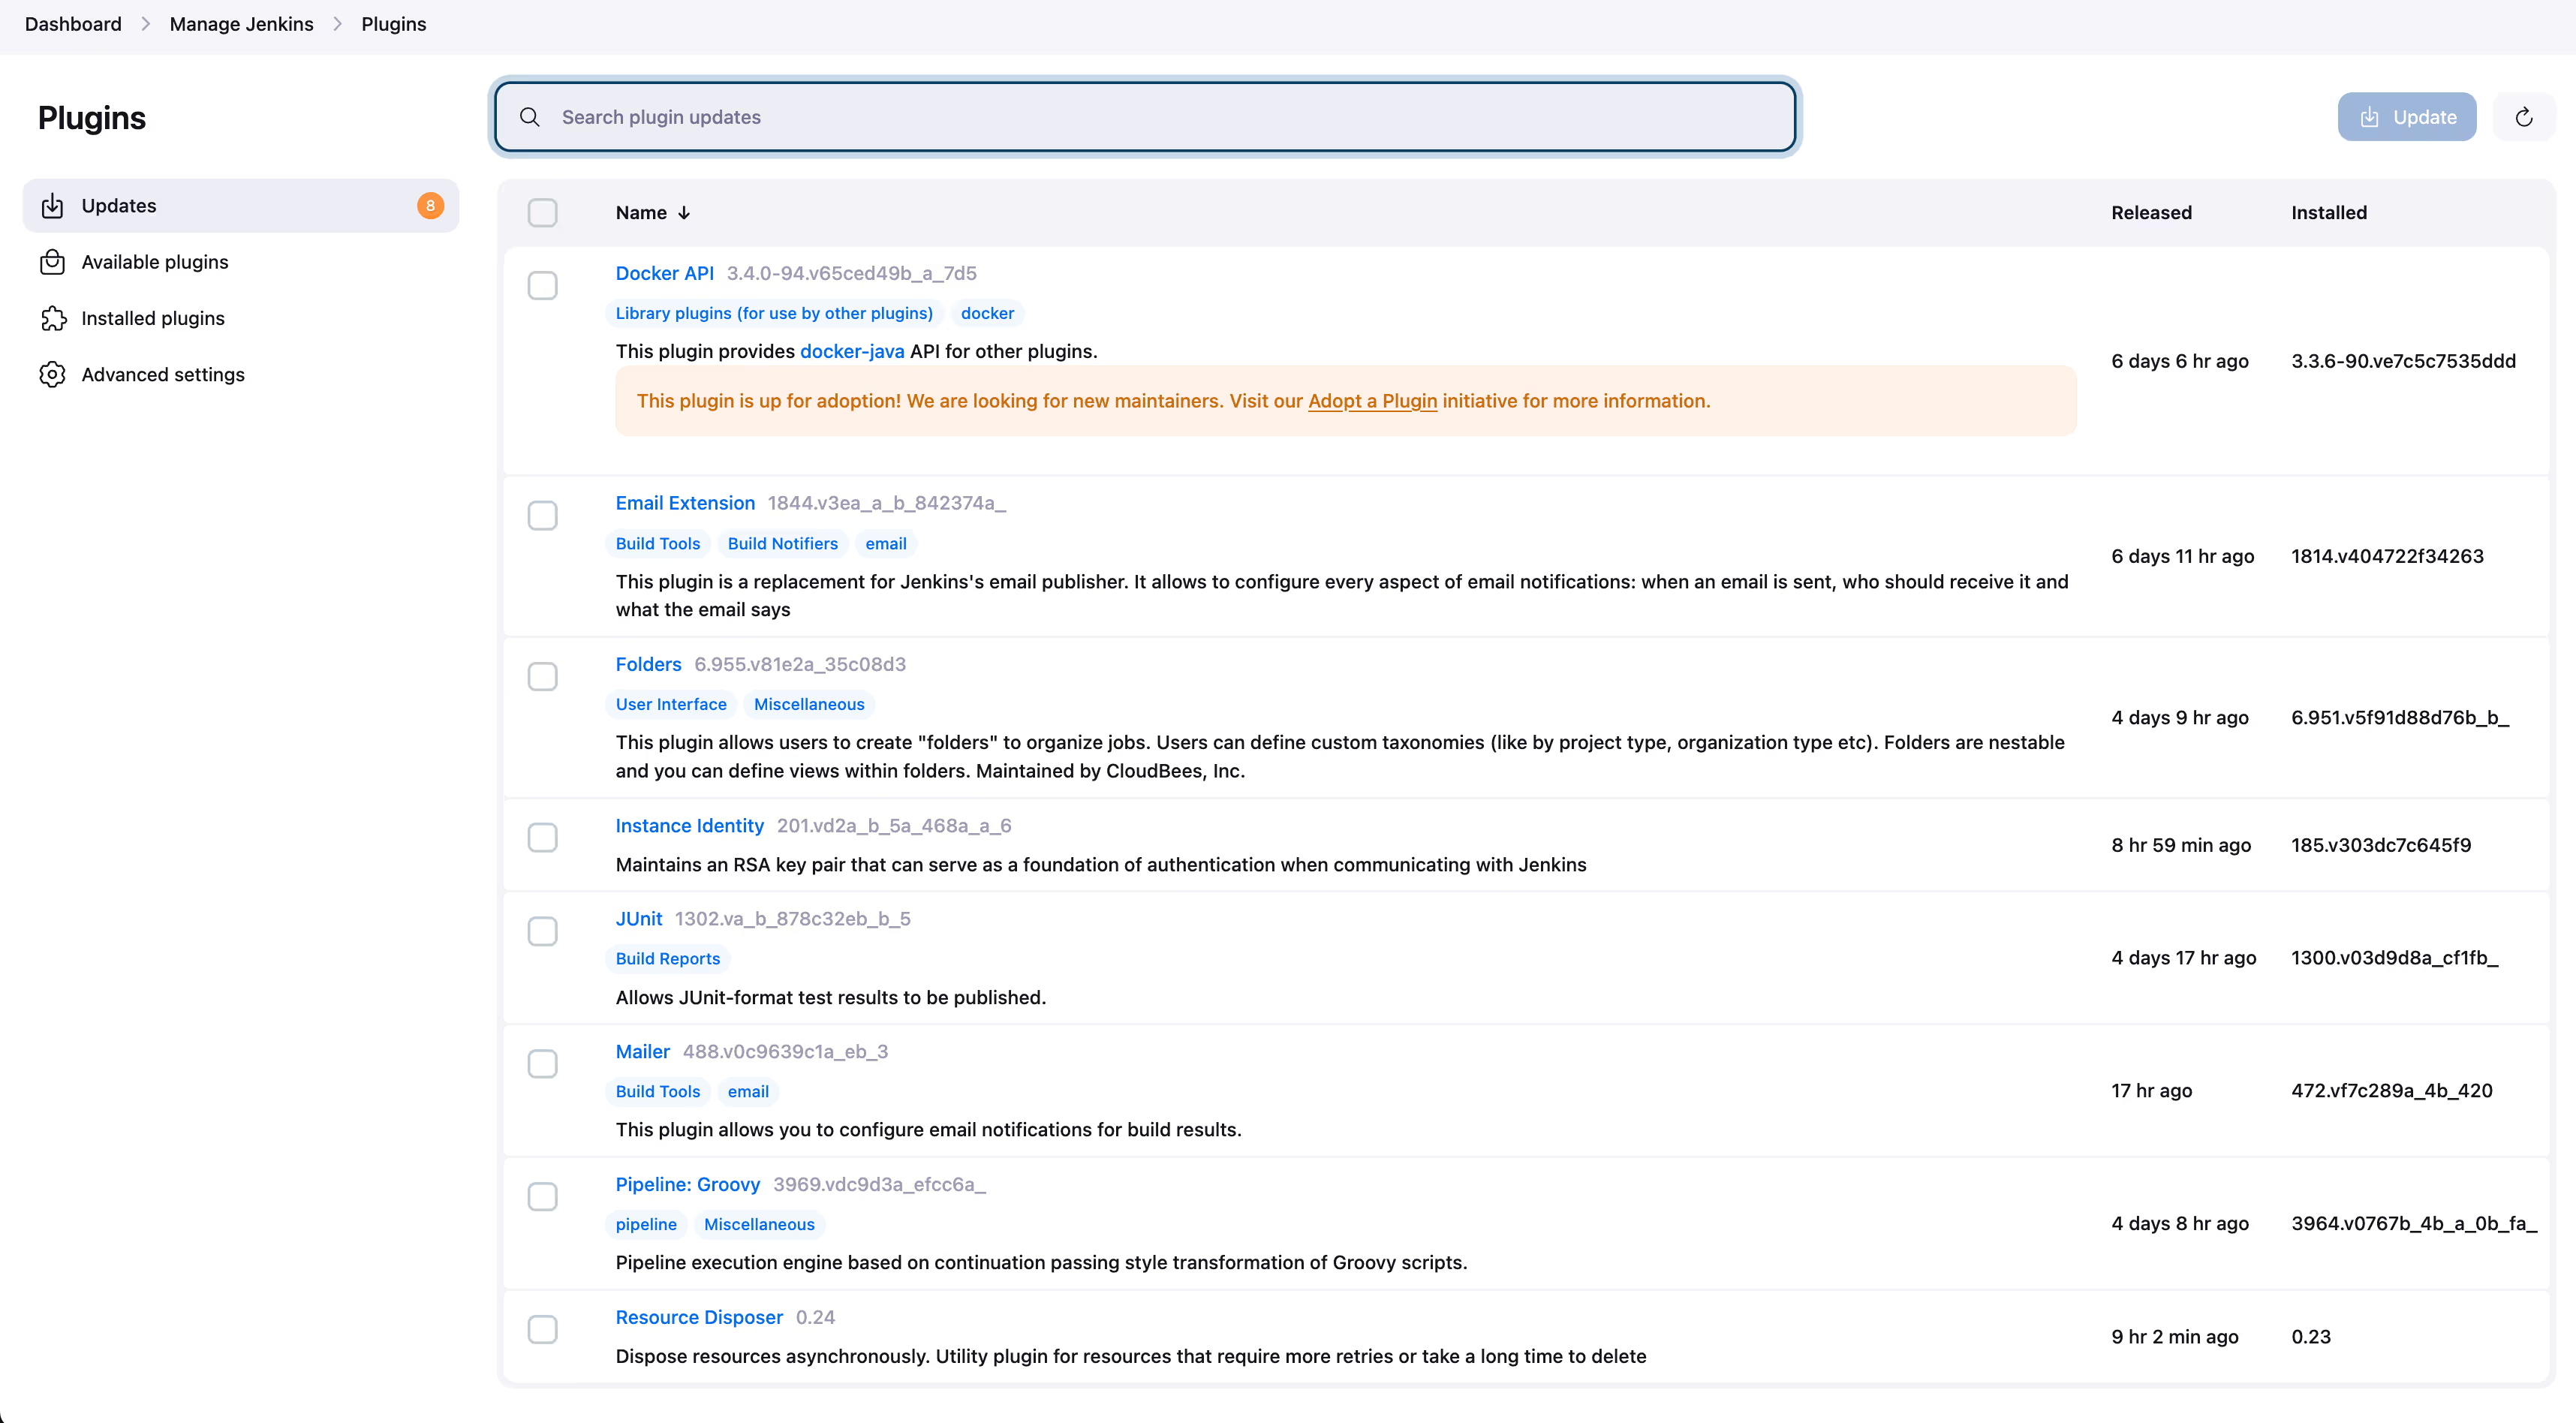
- Regularly update both Jenkins and its plugins. Update plugins using the Manage Jenkins > Manage plugins > Updates menu
- Enable CSRF protection to prevent unauthorized actions. You can do this in the Manage Jenkins > Configure Global Security > CSRF Protection menu.
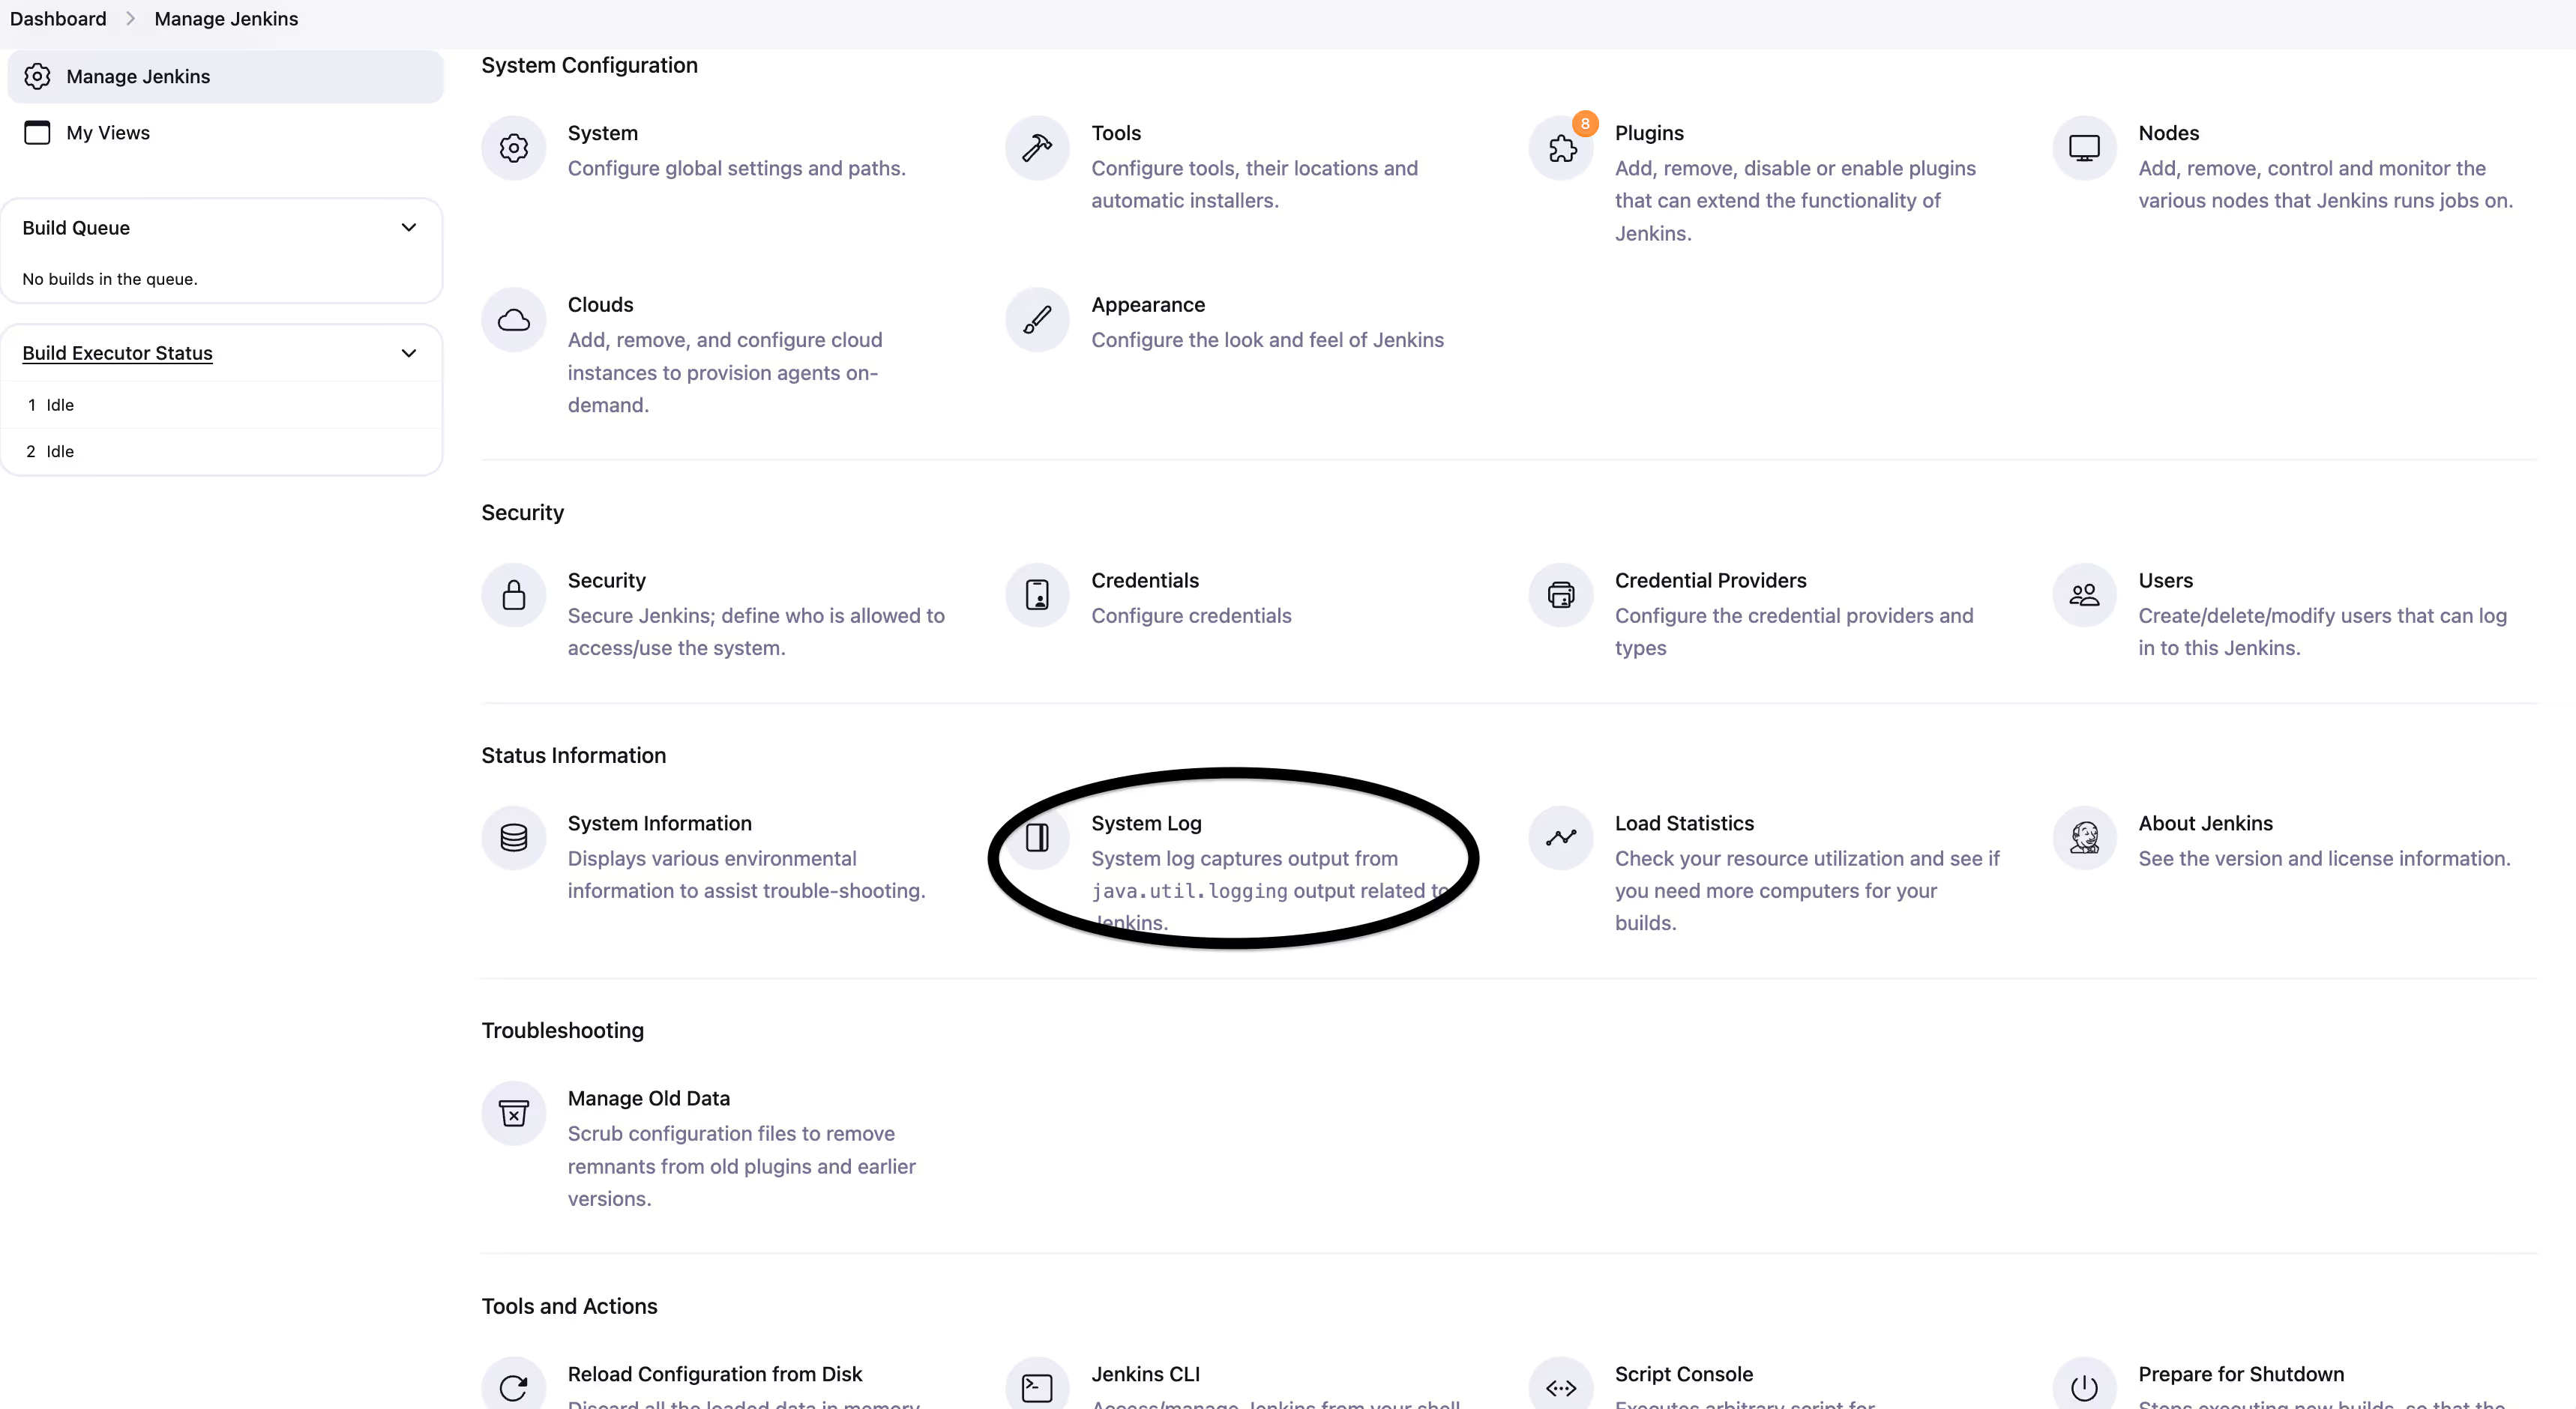
- Activate Jenkins audit logs and review them regularly for any anomalies. (Manage Jenkins > System Logs)
- Secure communication between the Jenkins controller and its agents with SSL/TLS encryption. (Manage Jenkins > Configure Global Security > Agent > Agent protocols menu). Disable all other ports on the server, such as ssh/22
- Have separate nodes for your build runners
- Verify the environment variables defined and move them to Secrets if they disclose a sensitive information
- Enable Credentials masking for Jenkins configuration and Console output, such as using the “Mask passwords and Credentials Binding” plugin
GitHub Actions offers several built-in security features, including:
- Dependabot Vulnerability Alerts, which notify you of security issues in your dependencies.
- Code Scanning for identifying vulnerabilities within your code.
- The Workflow Dependency Graph, which helps you understand and secure the dependencies in your GitHub Actions workflows.
- For deeper insights into securing your GitHub Actions workflows, refer to GitHub’s comprehensive guide on security hardening.
Project Scoping: Estimating Migration Effort and Timeline
The time and effort required for your migration will depend on the level of customization in your Jenkins setup. Simple configurations can be quickly migrated using the GitHub Actions Importer, while more complex setups may require custom actions in the GitHub Actions workflow. To help you manage this process, follow these steps:
- Start with simple configurations: Begin by migrating the least complex pipelines first. Once they are working correctly in GitHub Actions, you can move on to more complex setups.
- Take an incremental approach: Migrating in stages minimizes disruption and allows for thorough testing at each stage.
- Plan for custom configurations: Define a clear plan for migrating any custom configurations, such as custom Jenkins plugins or scripts.
- Communicate with stakeholders: Make sure to align with stakeholders on timelines and expectations before starting the migration.
- Use custom composite actions when needed: For Jenkins build scenarios and plugins that can’t be replicated with GitHub Actions Marketplace, create custom composite actions. (See more in the Migrating Custom Jenkins Plugins and Scripts section.)
- Thoroughly test in development environments: Always conduct testing in a dev environment to avoid any disruptions in production. Allow extra time for your DevOps team to test custom plugins and scripts, as they often require more effort.
Step-by-Step Guide to Migrating from Jenkins to GitHub Actions
Let’s break down the migration from Jenkins to GitHub Actions in easy steps:
1. Infrastructure Preparation
Start by preparing your infrastructure. In this example, we use Google Cloud to create a Jenkins instance.
- Set the Google Cloud Project:
run: |
  -gcloud config set project
- Create a VPC Network:
run: |
  -gcloud compute networks create jenkins --subnet-mode custom gcloud compute networks subnets create jenkins-subnet --network jenkins --range 10.200.0.0/24 --region us-central1
- Set Up Firewall Rules:
- Internal communication for TCP, UDP, ICMP:
run: |
  -gcloud compute firewall-rules create jenkins-allow-internal --allow tcp,udp,icmp --network jenkins --source-ranges 10.200.0.0/24
- External communication for SSH, ICMP, ports 5000 and 8080:
run: |
  -run: |
  -gcloud compute firewall-rules create jenkins-allow-external --allow tcp:22,tcp:5000,tcp:8080,icmp --network jenkins --source-ranges 0.0.0.0/0
- Create a Jenkins Instance:
run: |
  -gcloud compute instances create jenkins   --async --boot-disk-size 100GB --image-family ubuntu-2404-lts-amd64 --image-project ubuntu-os-cloud --machine-type n1-standard-2 --subnet jenkins-subnet --zone us-central1-c --tags jenkins
2. Jenkins Deployment
Once the infrastructure is ready, SSH into your instance and begin Jenkins installation.
- Install Jenkins:
run: |
  -gcloud compute ssh --project=windy-smoke-434622-q4 --zone=us-central1-c jenkins

sudo wget -O /usr/share/keyrings/jenkins-keyring.asc \
  https://pkg.jenkins.io/debian-stable/jenkins.io-2023.key
echo "deb [signed-by=/usr/share/keyrings/jenkins-keyring.asc]" \
  https://pkg.jenkins.io/debian-stable binary/ | sudo tee \
  /etc/apt/sources.list.d/jenkins.list > /dev/null
sudo apt-get update
sudo apt-get -y install jenkins
- Install Java
run: |
  -sudo apt update
sudo apt install -y fontconfig openjdk-17-jre
# Verify (should see: openjdk version ...)
java -version
- Install Maven:
run: |
  -sudo chown -R `whoami` /opt

cd /opt; wget https://archive.apache.org/dist/maven/maven-3/3.9.2/binaries/apache-maven-3.9.2-bin.tar.gz
tar -xzvf apache-maven-3.9.2-bin.tar.gz

cat <
export JAVA_HOME=/usr/lib/jvm/java-17-openjdk-amd64/
export M2_HOME=/opt/apache-maven-3.9.2
export MAVEN_HOME=/opt/apache-maven-3.9.2
export PATH=${M2_HOME}/bin:${PATH}
EOF

sudo ln -s /opt/apache-maven-3.9.2/bin/mvn /usr/bin/mvn
sudo chmod +x /etc/profile.d/mymavenvars.sh
source /etc/profile.d/mymavenvars.sh

# Verify Maven
mvn -version
- Start Jenkins and Enable Autostart:
run: |
  -sudo systemctl enable jenkins
sudo systemctl start jenkins

# Verify (should see: Loaded: loaded and Active: active (running))
sudo systemctl status jenkins
- Activate Jenkins:
- Browse to the http://<external_ip_of_your_server>:8080 External IP of your instance could be found with the following command: curl ifconfig.me
- Execute the following command on the server: sudo cat /var/lib/jenkins/secrets/initialAdminPassword
- Copy the password and enter it on the web page. Click “Install suggested plugins”.
- Configure the Jenkins Administrator User After the plugins installation finishes, you will be prompted with the “Create First Admin User” window. Enter the desired details of your Administrator user.
3. Setting Up a Local Docker Registry
To store and manage your artifacts, create a local Docker registry on the same Jenkins instance.
- Install Docker:
run: |
  -# Add Docker's official GPG key:
sudo apt-get update
sudo apt-get install ca-certificates curl
sudo install -m 0755 -d /etc/apt/keyrings
sudo curl -fsSL https://download.docker.com/linux/ubuntu/gpg -o /etc/apt/keyrings/docker.asc
sudo chmod a+r /etc/apt/keyrings/docker.asc

# Add the repository to Apt sources:
echo \
  "deb [arch=$(dpkg --print-architecture) signed-by=/etc/apt/keyrings/docker.asc] https://download.docker.com/linux/ubuntu \
  $(. /etc/os-release && echo "$VERSION_CODENAME") stable" | \
  sudo tee /etc/apt/sources.list.d/docker.list > /dev/null
sudo apt-get update
sudo apt-get install -y docker-ce docker-ce-cli containerd.io docker-buildx-plugin

# Verify:
sudo docker run hello-world
- Set Up Authentication:
Let’s now create a username and password for our registry with username: registry and password: registry123
run: |
  -sudo docker run \
  --entrypoint htpasswd \
  httpd:2 -Bbn registry registry123 > htpasswd
- Create SSL Certificates:
Let’s create a self-signed SSL certificate for our registry (make sure to change the <external_ip_of_your_server> to the actual external IP of your server):
run: |
  -mkdir -p docker_certs
openssl req  -newkey rsa:4096 -nodes -sha256 -keyout docker_certs/domain.key -x509 -days 365 -subj "/CN=" -addext "subjectAltName = IP.1:" -out docker_certs/domain.crt

sudo mkdir -p /etc/docker/certs.d/localhost:5000
sudo cp docker_certs/domain.crt /etc/docker/certs.d/localhost:5000/ca.crt
sudo cp docker_certs/domain.crt /usr/local/share/ca-certificates/ca.crt
sudo update-ca-certificates
- Run the Registry with Authentication and SSL:
run: |
  -sudo docker run -d \
  -p 5000:5000 \
  --restart=always \
  --name registry \
  -v `pwd`/htpasswd:/htpasswd \
  -e "REGISTRY_AUTH=htpasswd" \
  -e "REGISTRY_AUTH_HTPASSWD_REALM=Registry Realm" \
  -e REGISTRY_AUTH_HTPASSWD_PATH=/htpasswd \
  -v `pwd`/docker_certs:/certs \
  -e REGISTRY_HTTP_TLS_CERTIFICATE=/certs/domain.crt \
  -e REGISTRY_HTTP_TLS_KEY=/certs/domain.key \
  registry:2.7
- Verify that the registry is running: sudo docker ps -a
- Verify authentication:
docker login localhost:5000 Enter the registry/registry123 credentials. You should see the “Login Succeeded” message.
- Add Jenkins user and your user to the Docker group and restart Jenkins:
run: |
  -sudo usermod -aG docker jenkins
sudo usermod -aG docker $(whoami)
sudo systemctl restart jenkins
4. Test Project Deployment in Jenkins
Jenkins has two different pipeline modes: declarative and scripted. While declarative is the simpler and more restricted approach, the scripted pipeline has less code limitations to define in the Jenkinsfile. Both are executed by the Jenkins Pipeline plugin.
Here are some key differences between declarative and scripted modes:
- Let’s now create more production-realistic version of the above pipeline and attempt to migrate it to GitHub Actions. For this purpose, let’s build one of the open-source Java projects. The command to build the app would be: mvn package
- Let’s create a repo in GitHub, such as simple-java-maven-app-jenkins-docs, where we’d clone the app and add a Jenkinsfile which would be fetched and executed by our instance.
run: |
  -git clone https://github.com/jenkins-docs/simple-java-maven-app
git remote rename origin upstream_old
git remote add origin https://github.com//simple-java-maven-app-jenkins-docs
git push origin master
- Let’s add the following Jenkinsfile in the repo:
#!
run: |
  -/usr/bin/env groovy pipeline {   agent any    environment {       APP_NAME = "simple-java-maven-app-jenkins-docs"       DOCKER_USER = "registry"       DOCKER_PASS = "docker" // Secret name to use to sign into Docker registry       IMAGE_NAME = "${DOCKER_USER}" + "/" + "${APP_NAME}"   }    stages {     stage("Build") {       steps {         sh "mvn -B -DskipTests clean package"       }     }      stage("Test") {       steps {         sh "mvn test"       }     }      stage("Confirm Build Artifact") {       steps {         sh "ls -lah /var/lib/jenkins/workspace/simple-java-maven-app-jenkins-docs/target/my-app-1.0-SNAPSHOT.jar"         echo "Build Step Executed!"       }     }      stage('Docker Build and Push') {       steps {         script {           docker.withRegistry("https://localhost:5000", DOCKER_PASS) {             docker_image = docker.build "${IMAGE_NAME}"             docker_image.push("latest")           }         }       }     }      stage("Cleanup Artifacts") {       steps {         script {           sh "docker rmi ${IMAGE_NAME}:latest"         }       }     }   } }
- To add this file to our repo, execute:
run: |
  -git add Jenkinsfile
git commit -m 'add Jenkinsfile'
git push origin master
- Let’s now add a Dockerfile for our sample project:
run: |
  -FROM openjdk:17-jdk-slim  ENV PATH /usr/local/simple-java-maven-app-jenkins-docs/bin:$PATH RUN mkdir -p /usr/local/simple-java-maven-app-jenkins-docs  WORKDIR /usr/local/simple-java-maven-app-jenkins-docs  COPY . .  CMD ["java", "-jar", "target/my-app-1.0-SNAPSHOT.jar"]
- To save it, also execute:
run: |
  -git add Dockerfile
git commit -m 'add Dockerfile'
git push origin master
- Let’s now install the Docker plugin for our Jenkins instance:
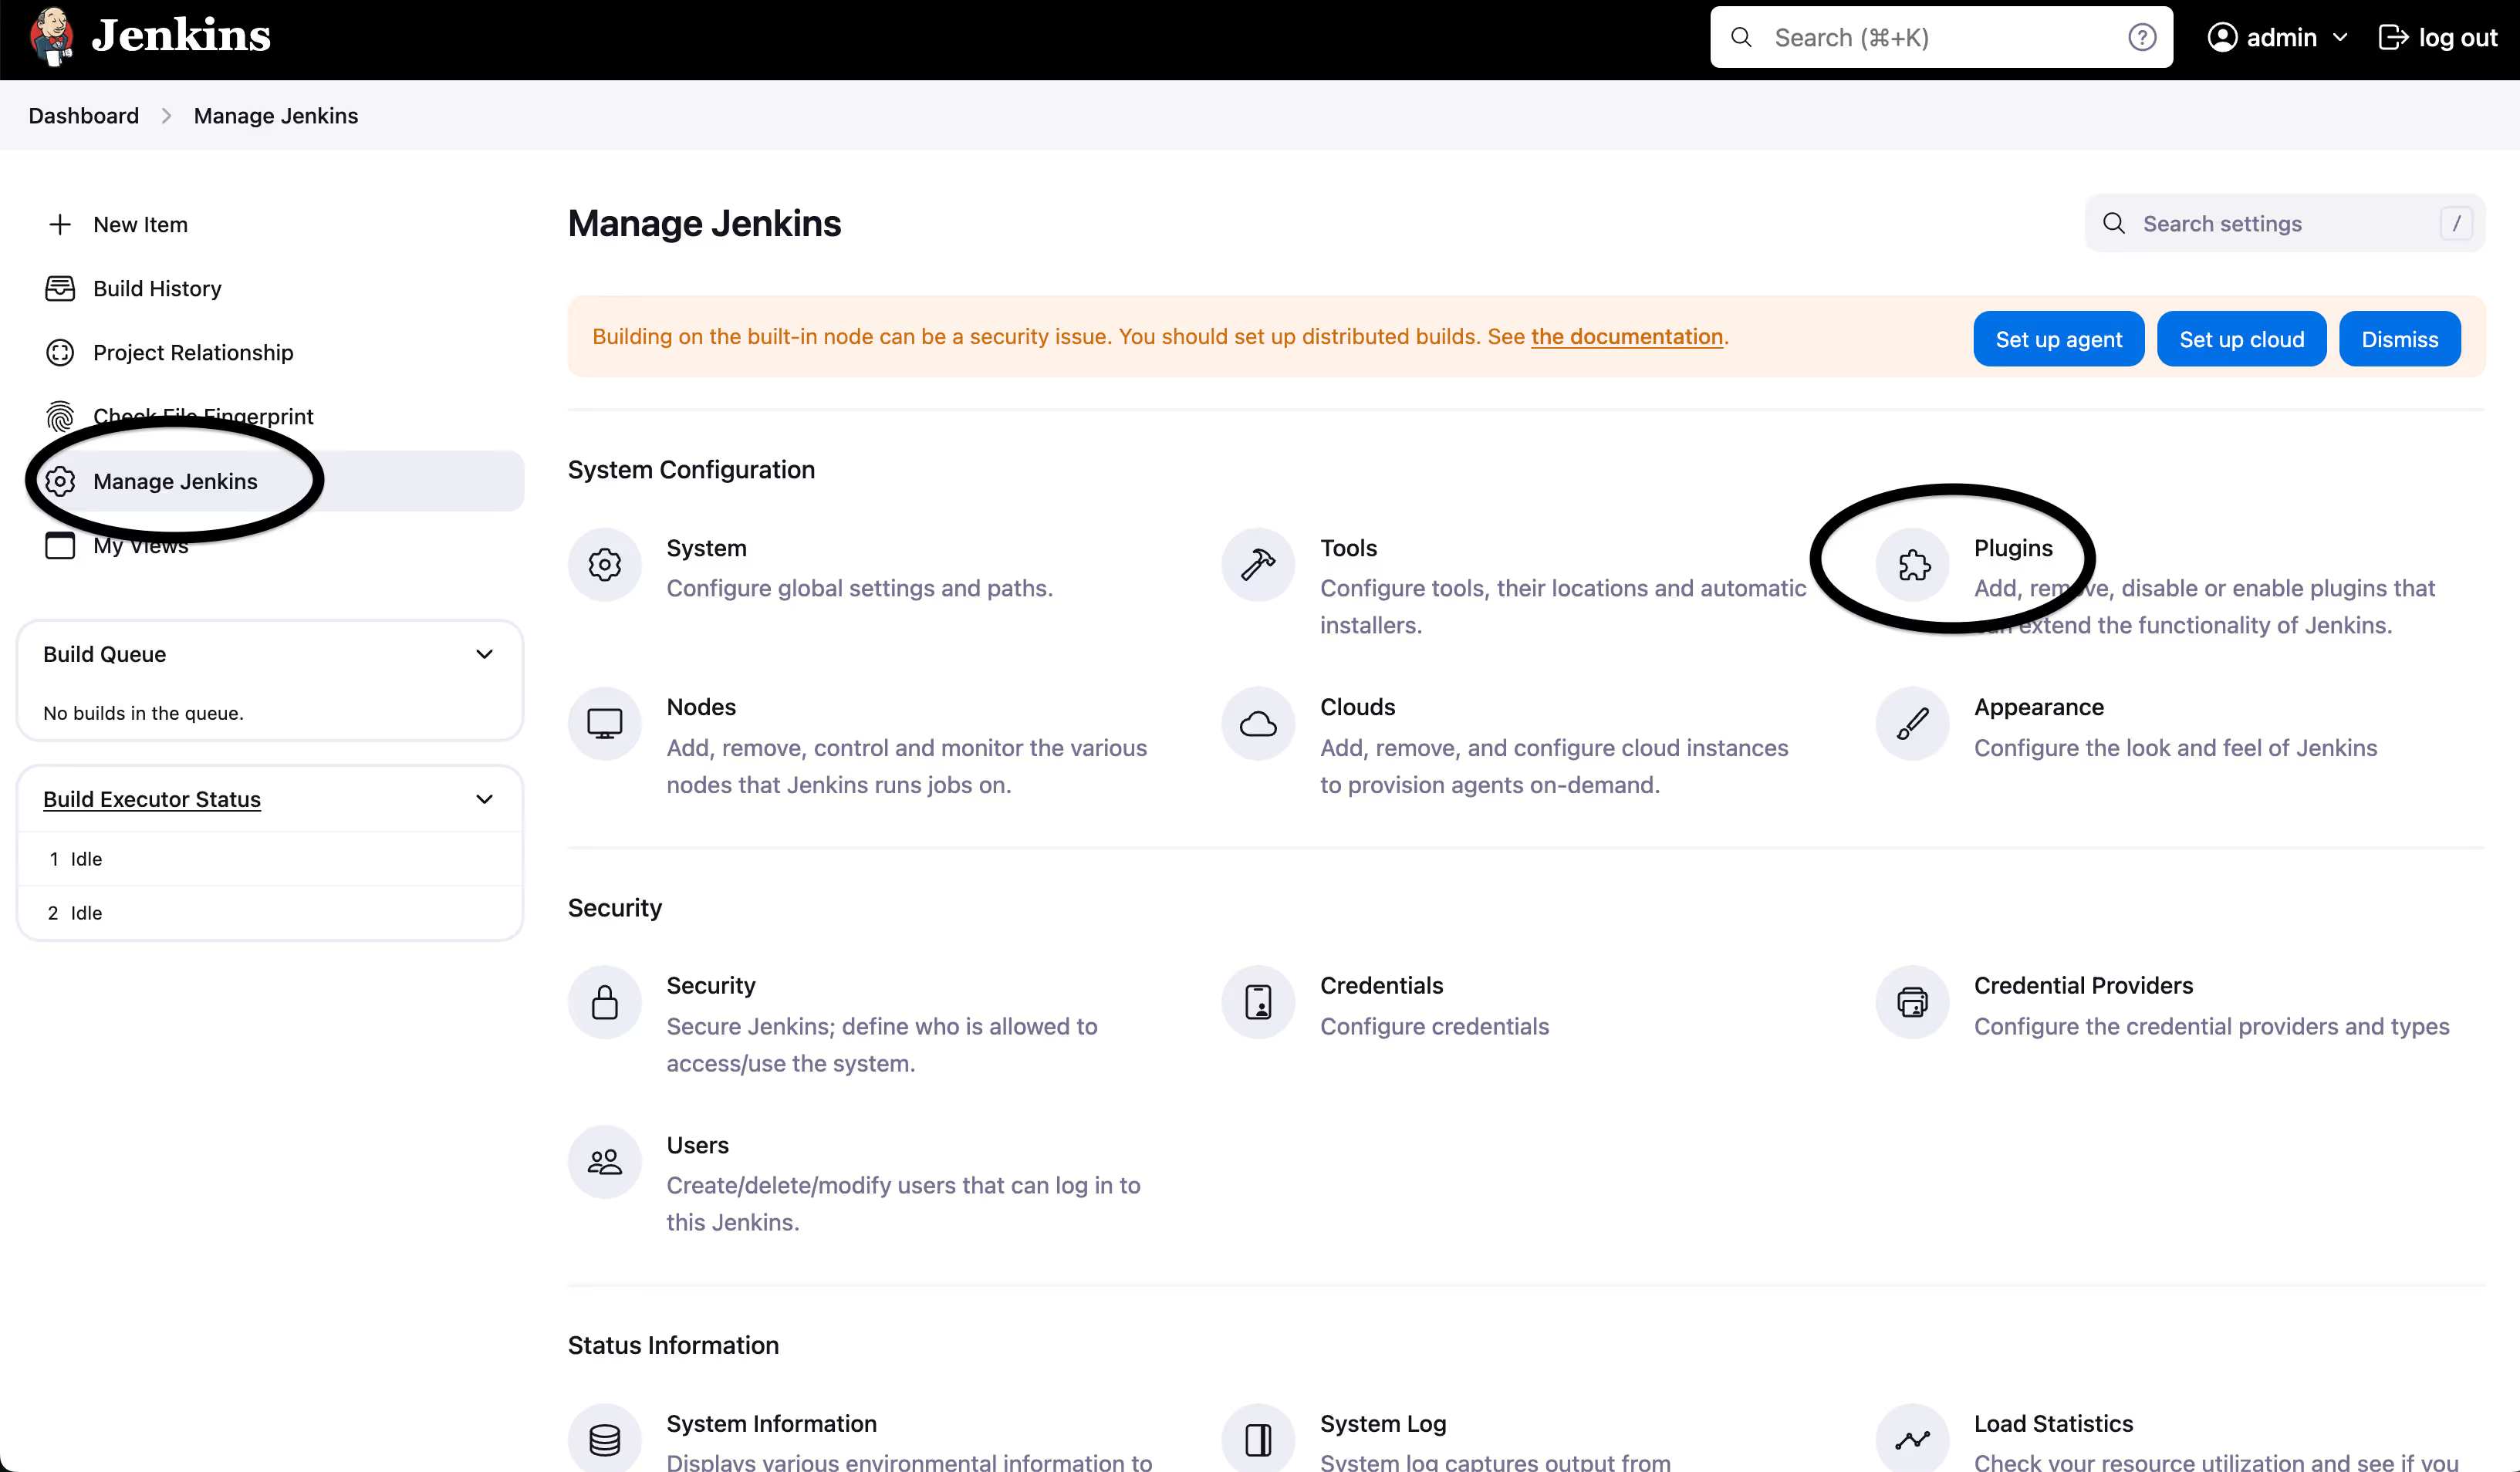
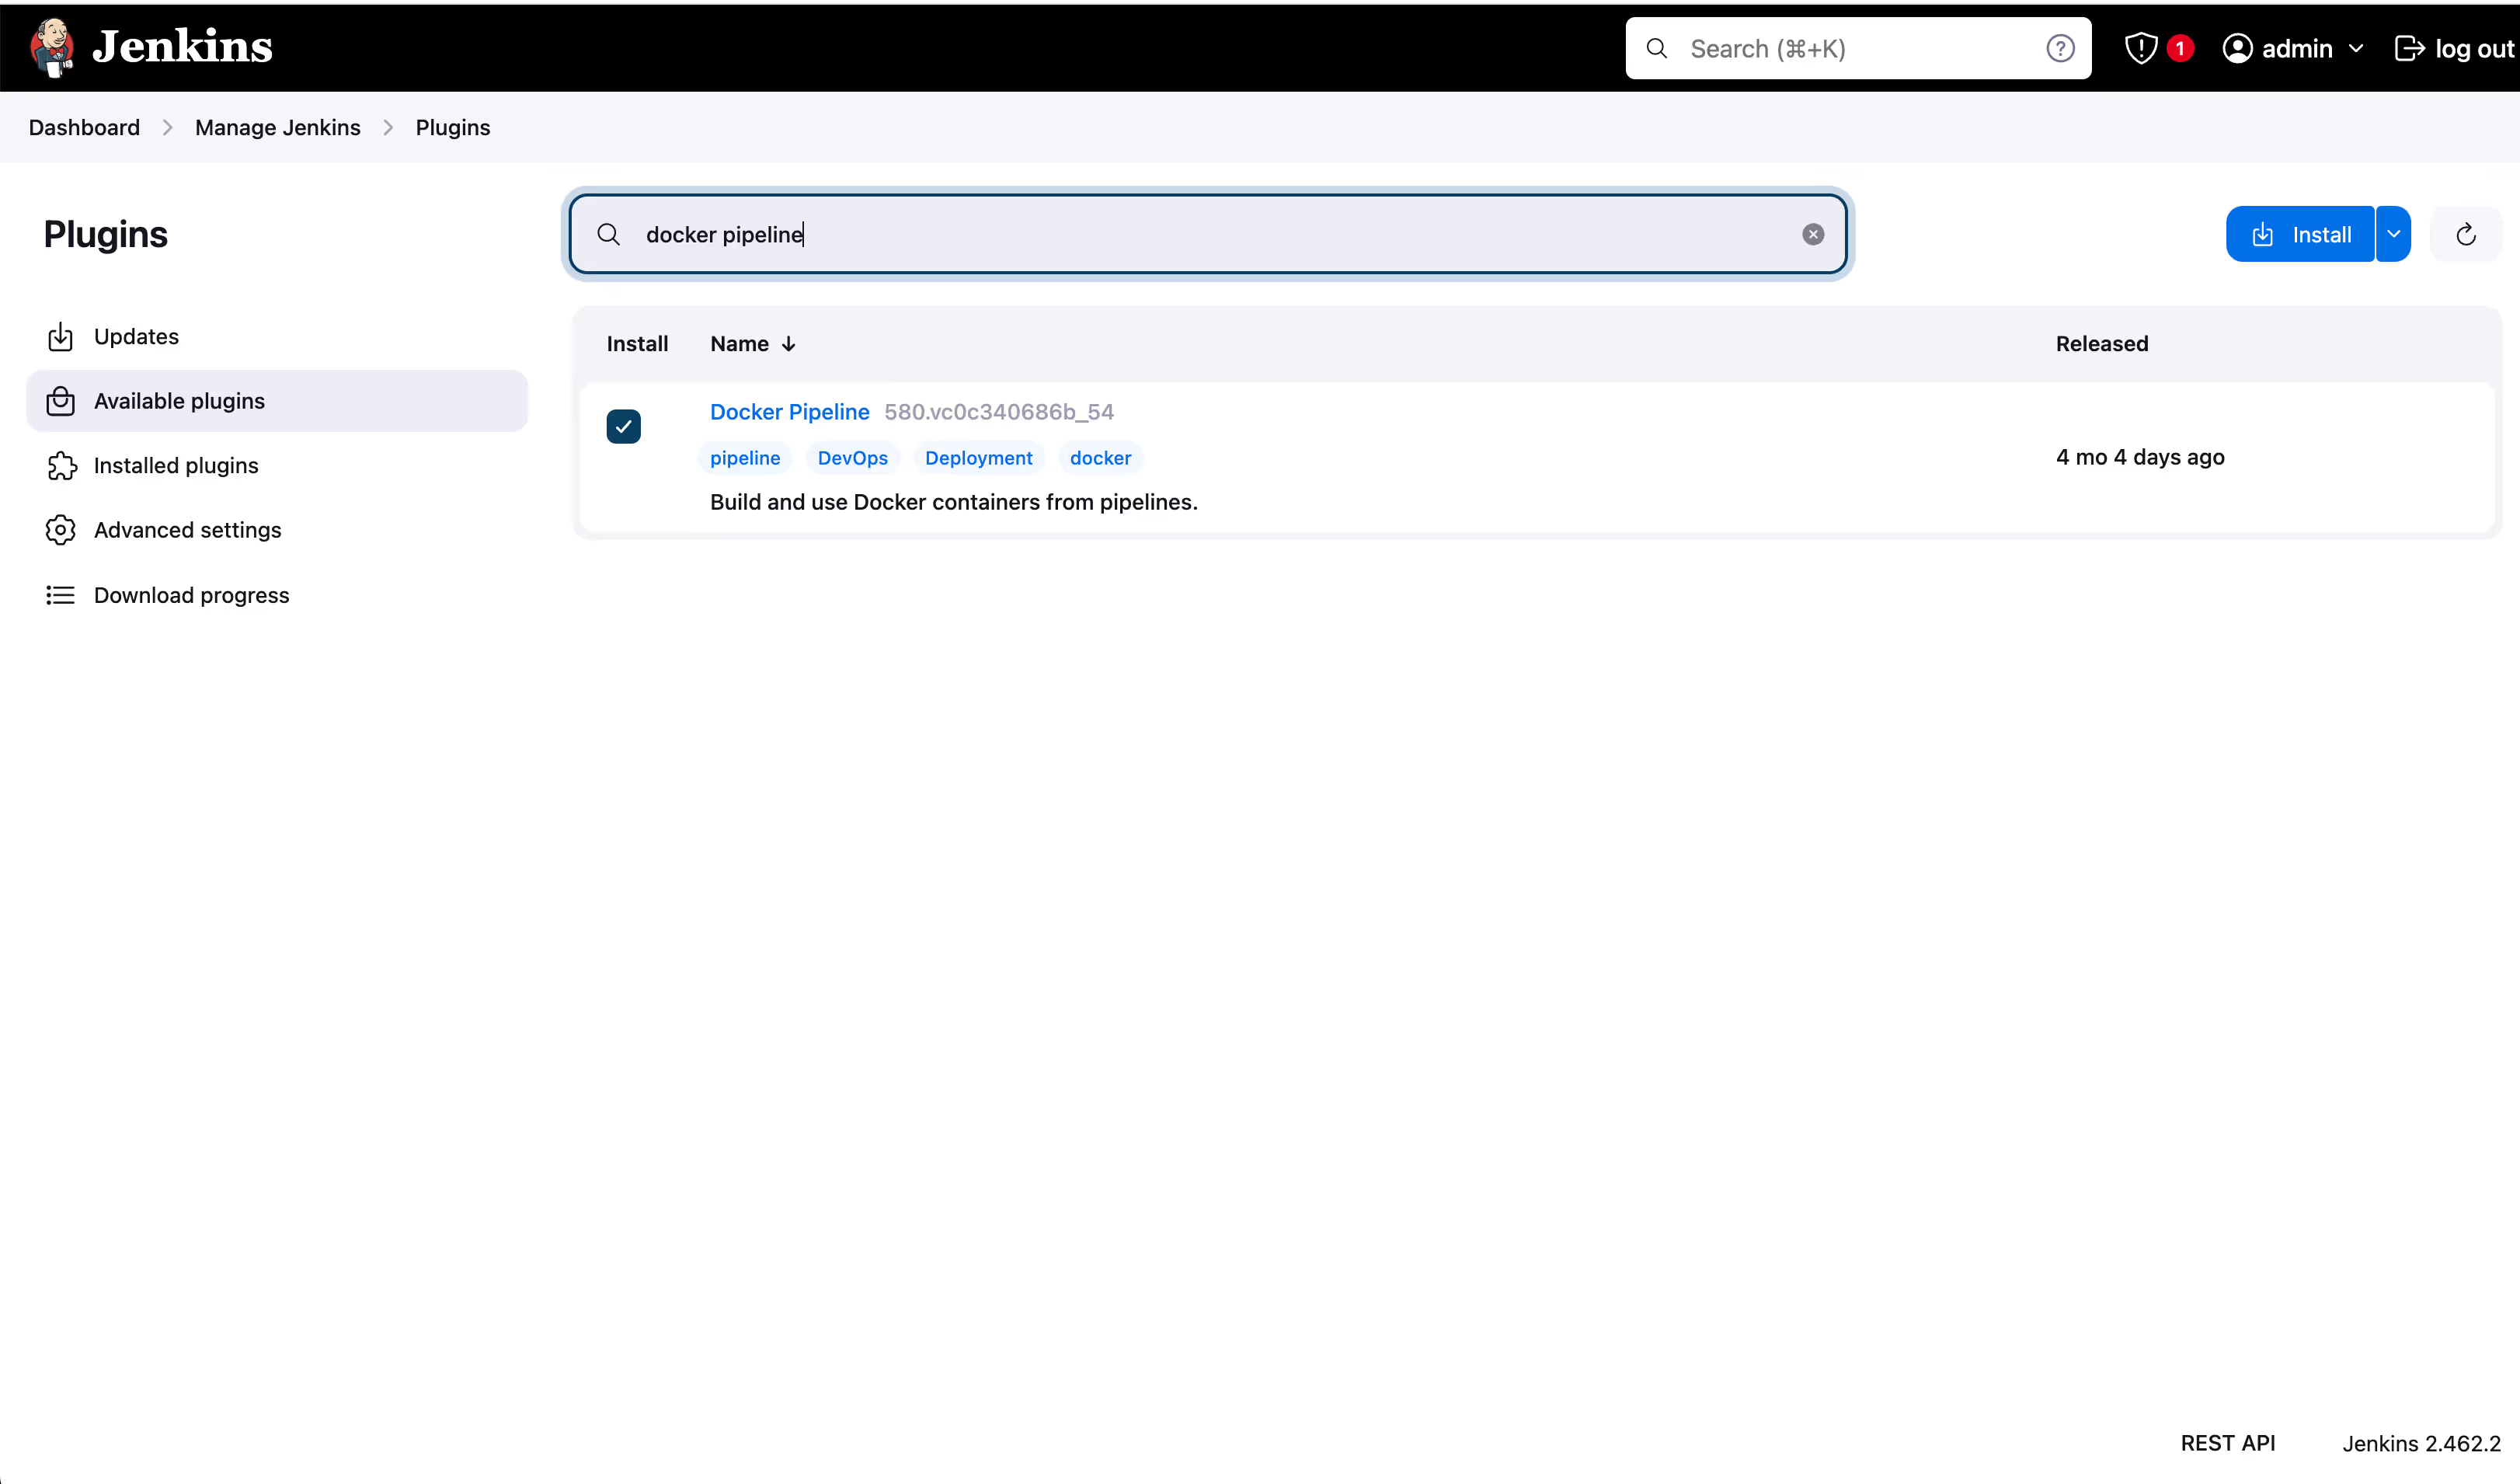
- Under “Manage Jenkins” on the left, click “Plugins”. Search for “Docker Pipeline” and install it.
- Next, under “Credentials”, click on “System”, then “Global credentials” and click the “Add credentials” on the right.
- Enter registry username and registry123 password, as was specified in the htpasswd file for the registry container. Under ID, enter “docker” as we use this secret name in the Jenkinsfile. Save the configuration.
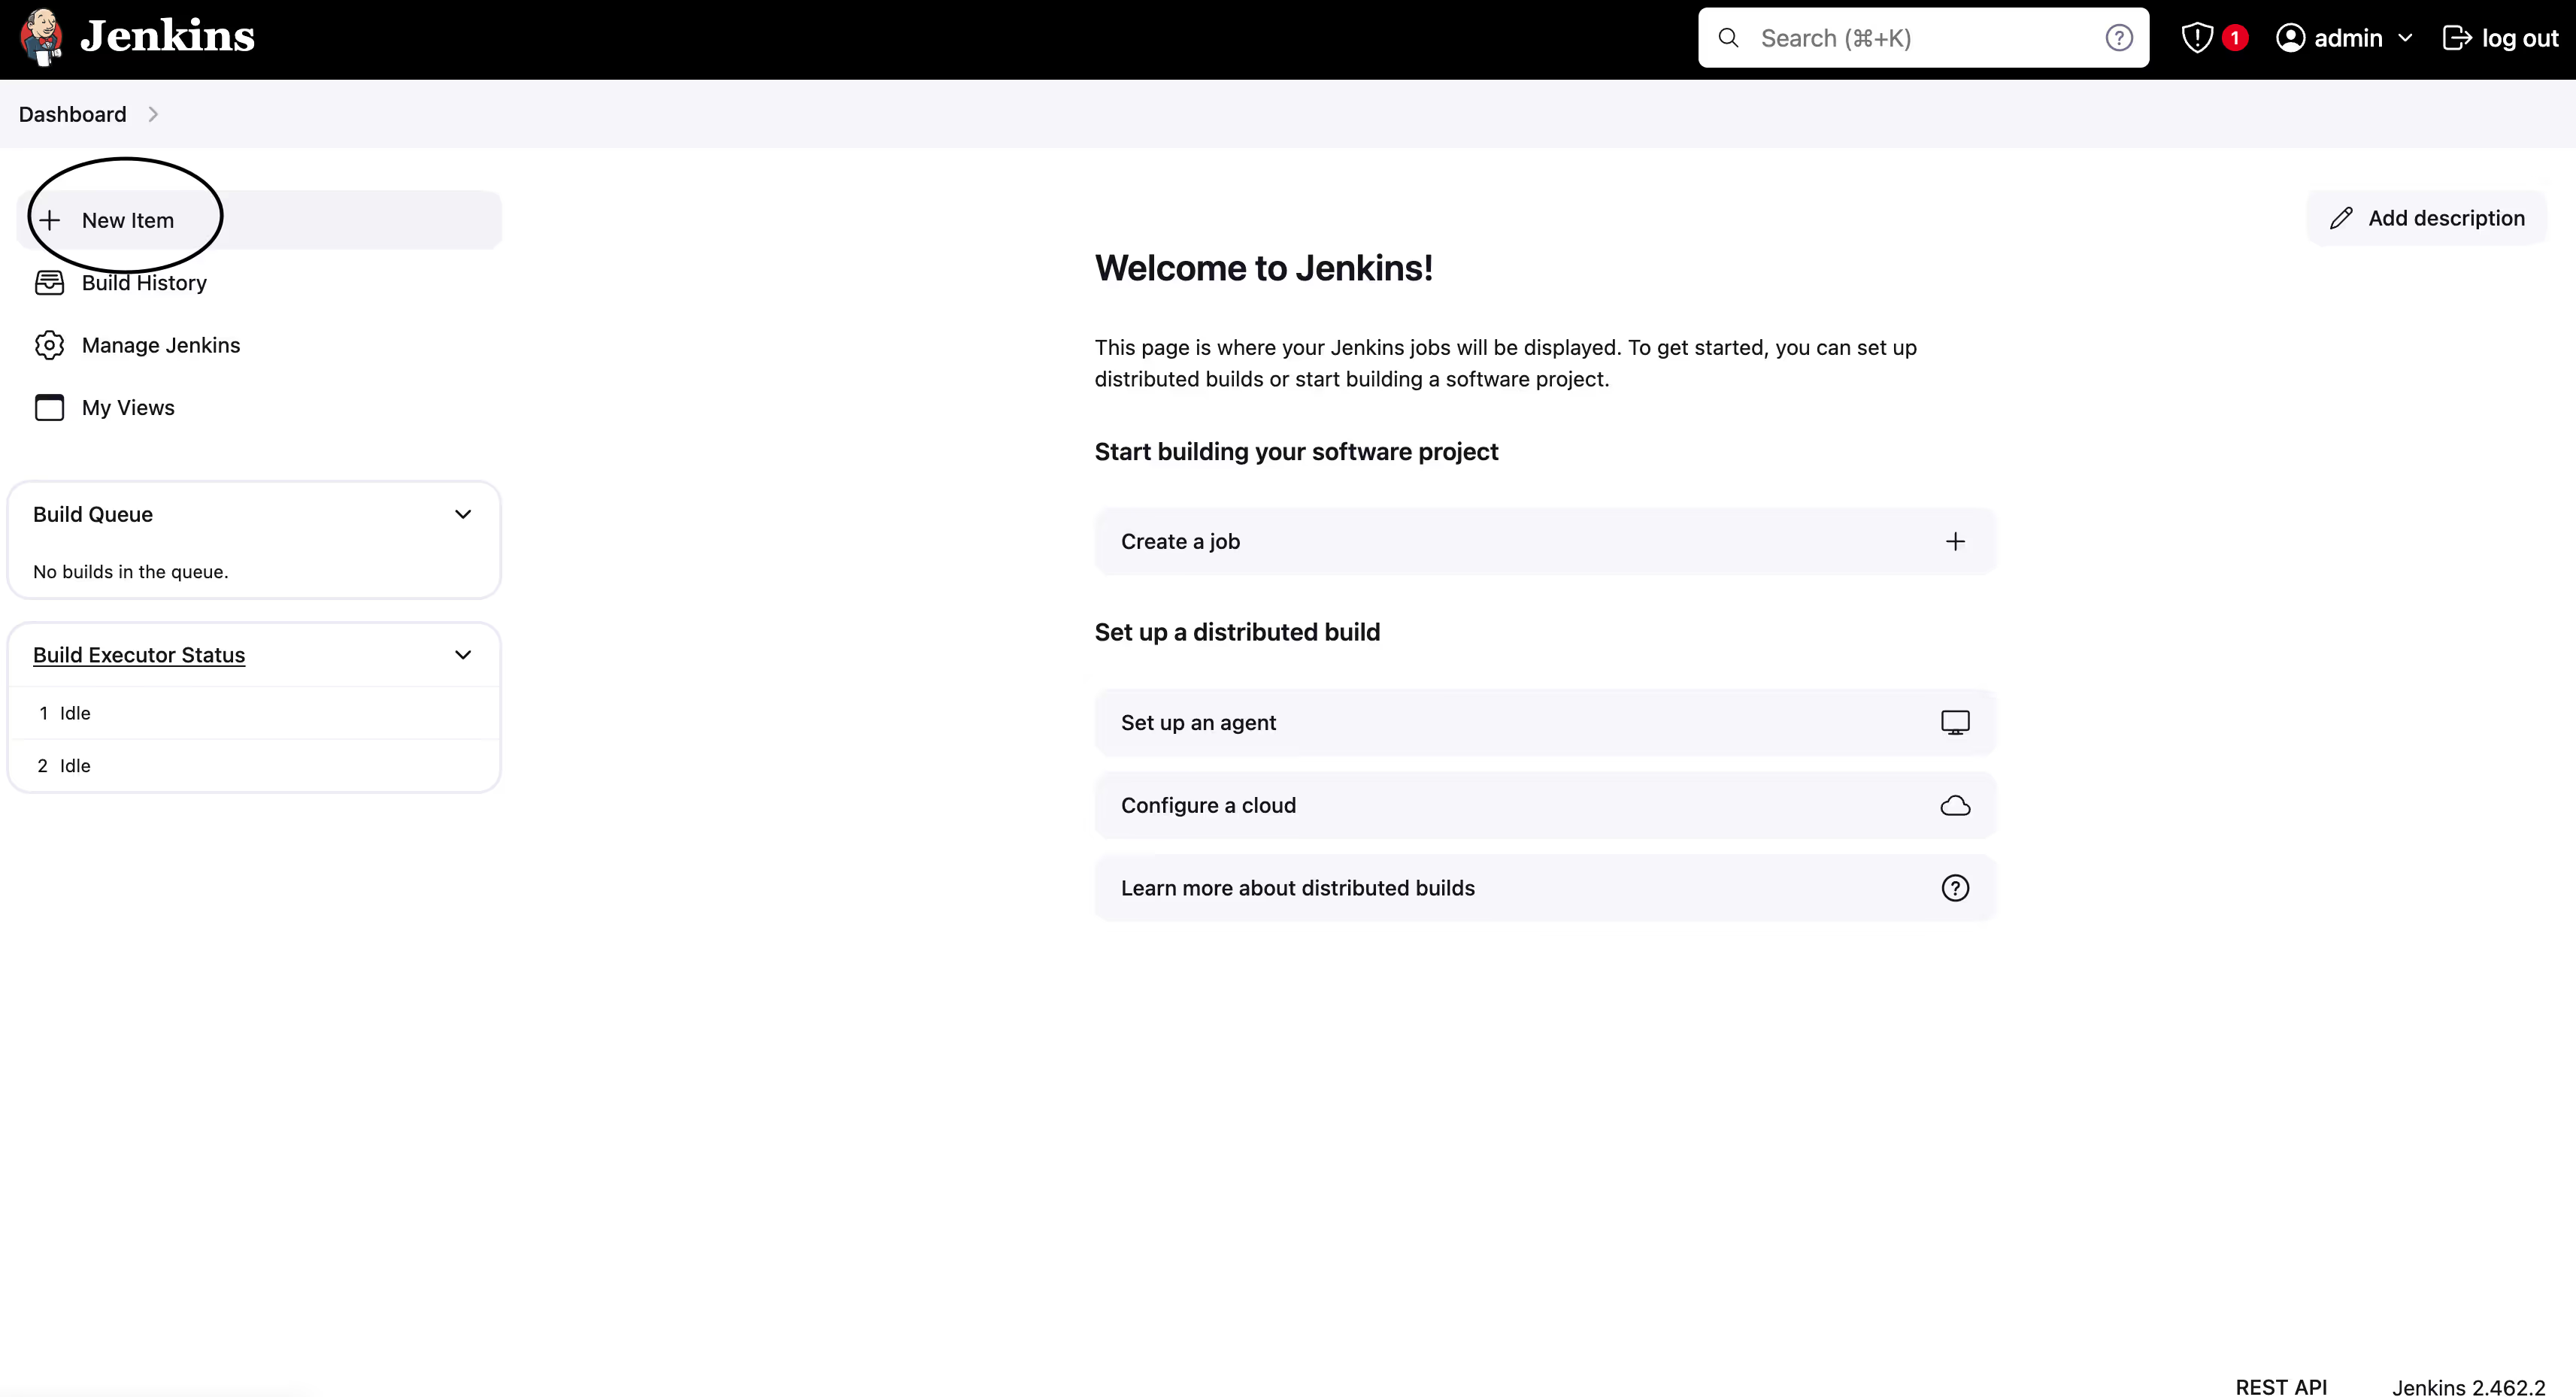
- Now, let’s configure a project in Jenkins with our repo-
- Click "New Item"
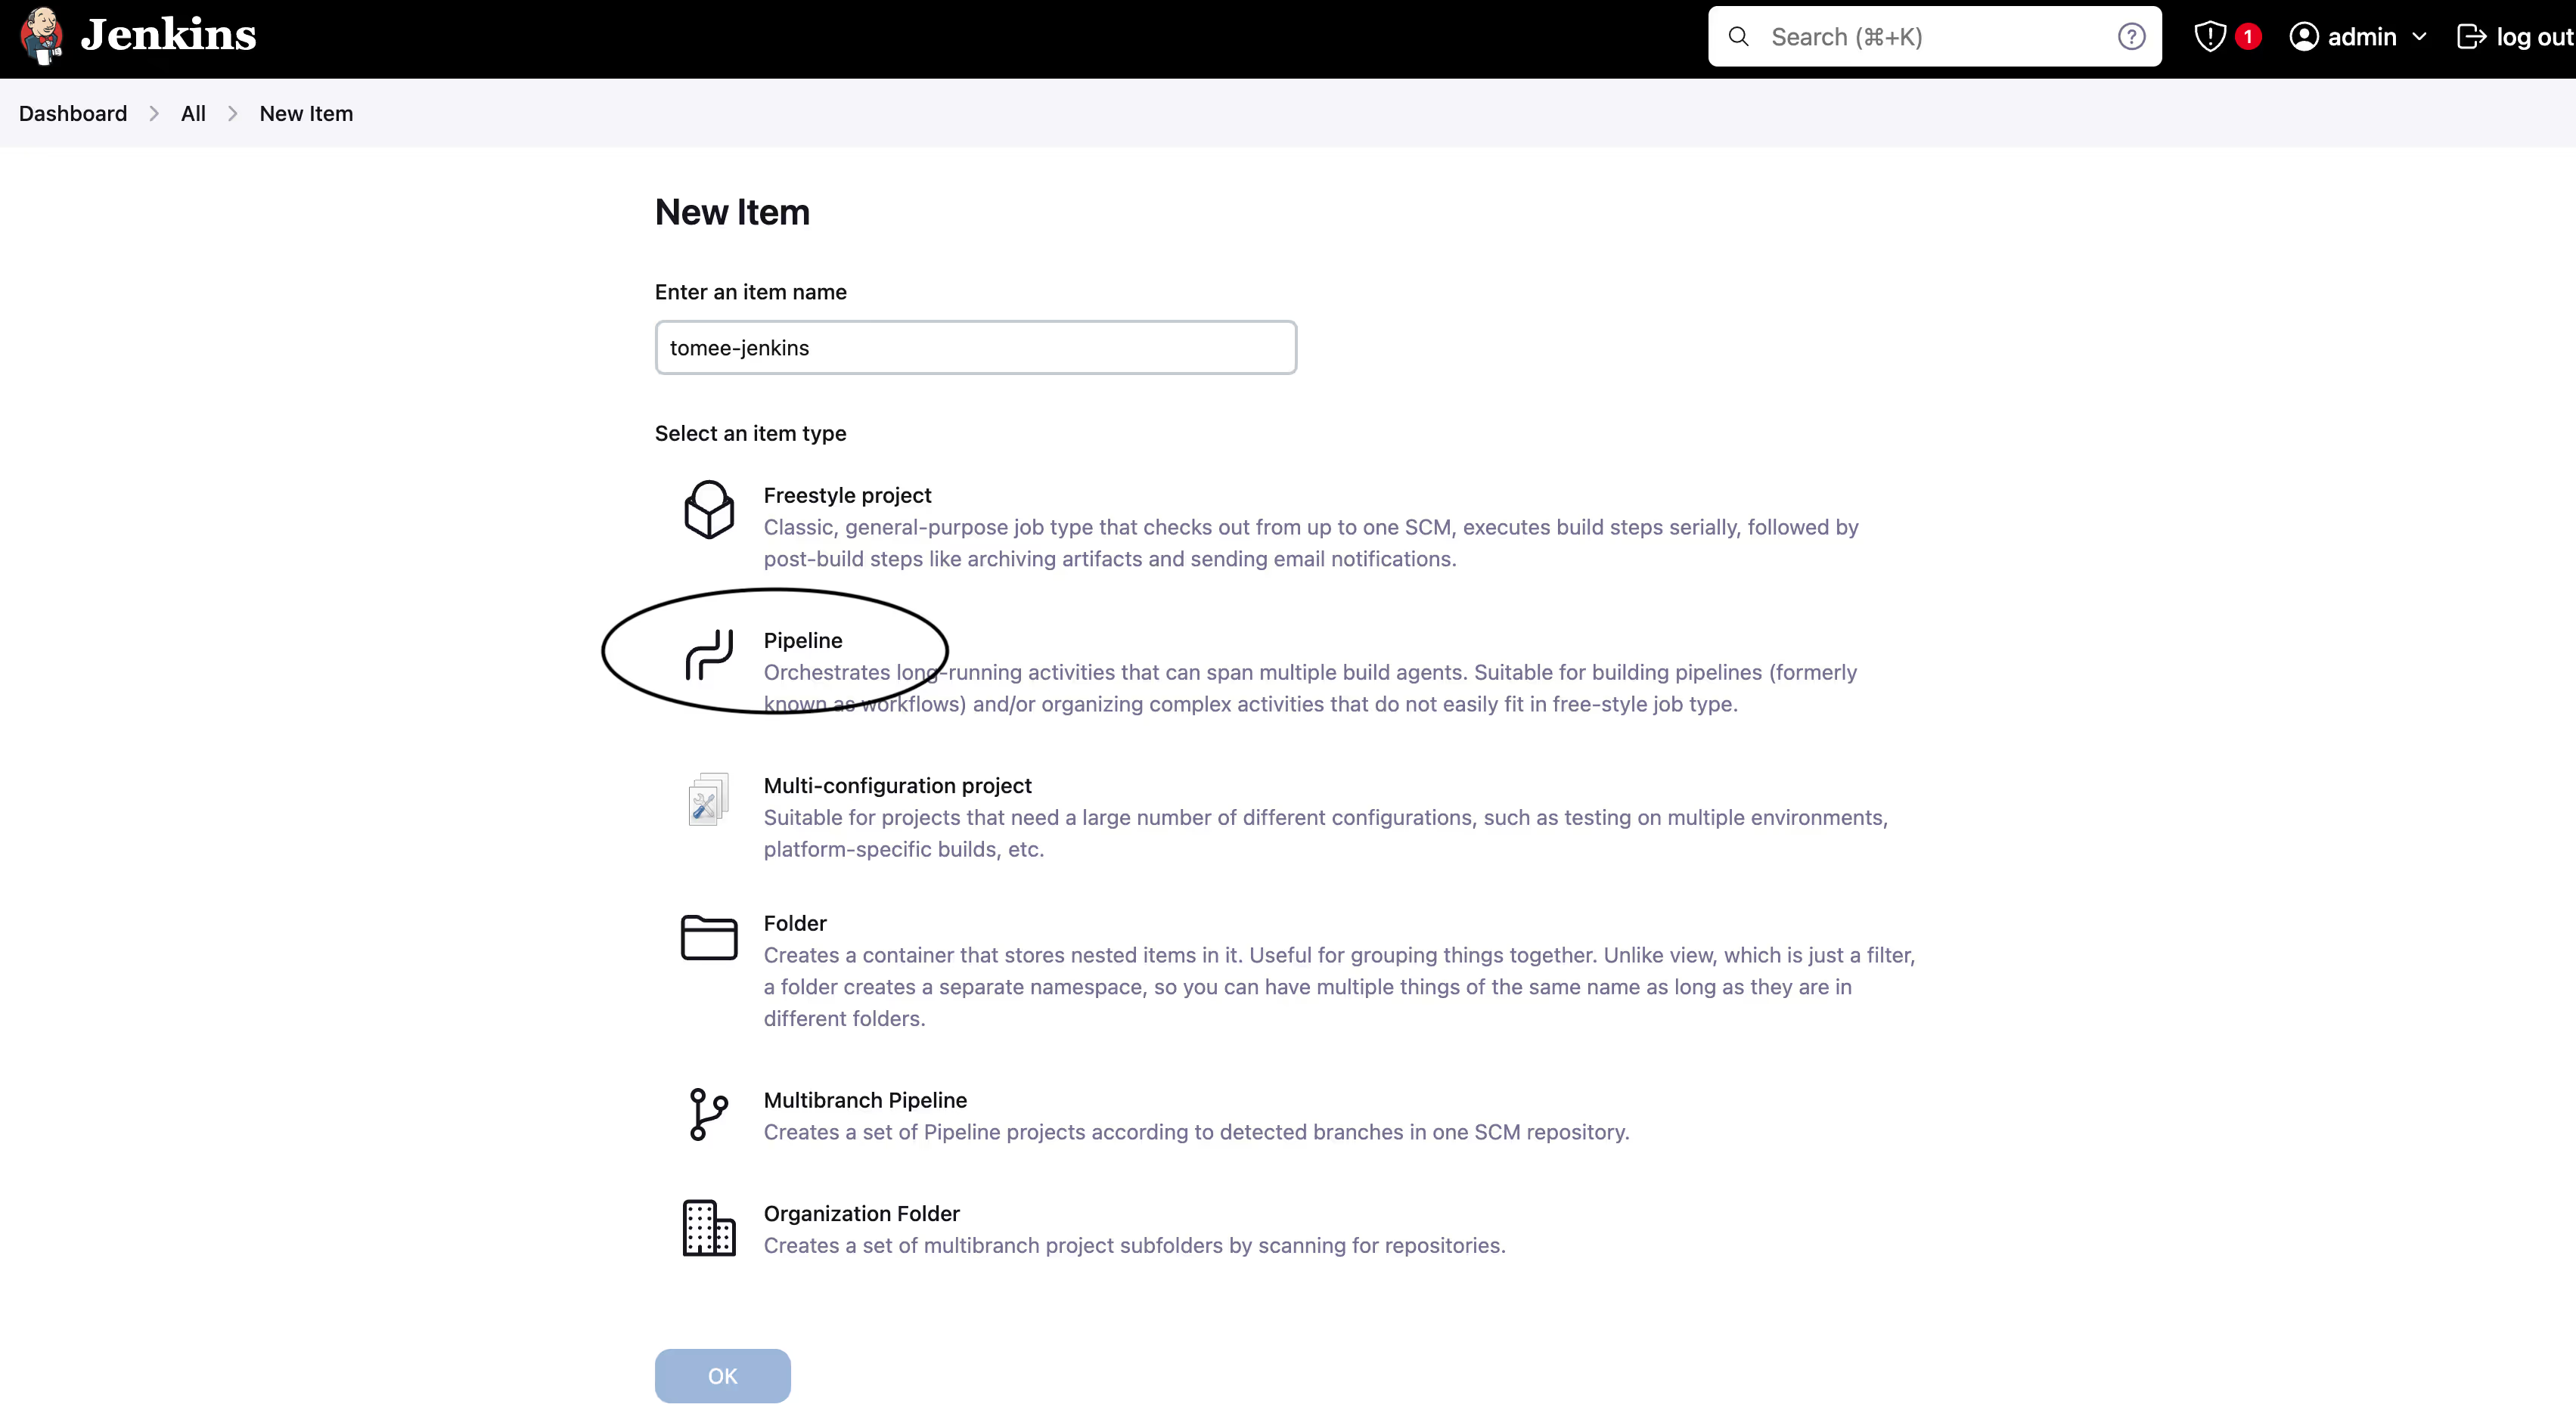
- Enter the name for the project, such as simple-java-maven-app-jenkins-docs and select Pipeline for the project type.
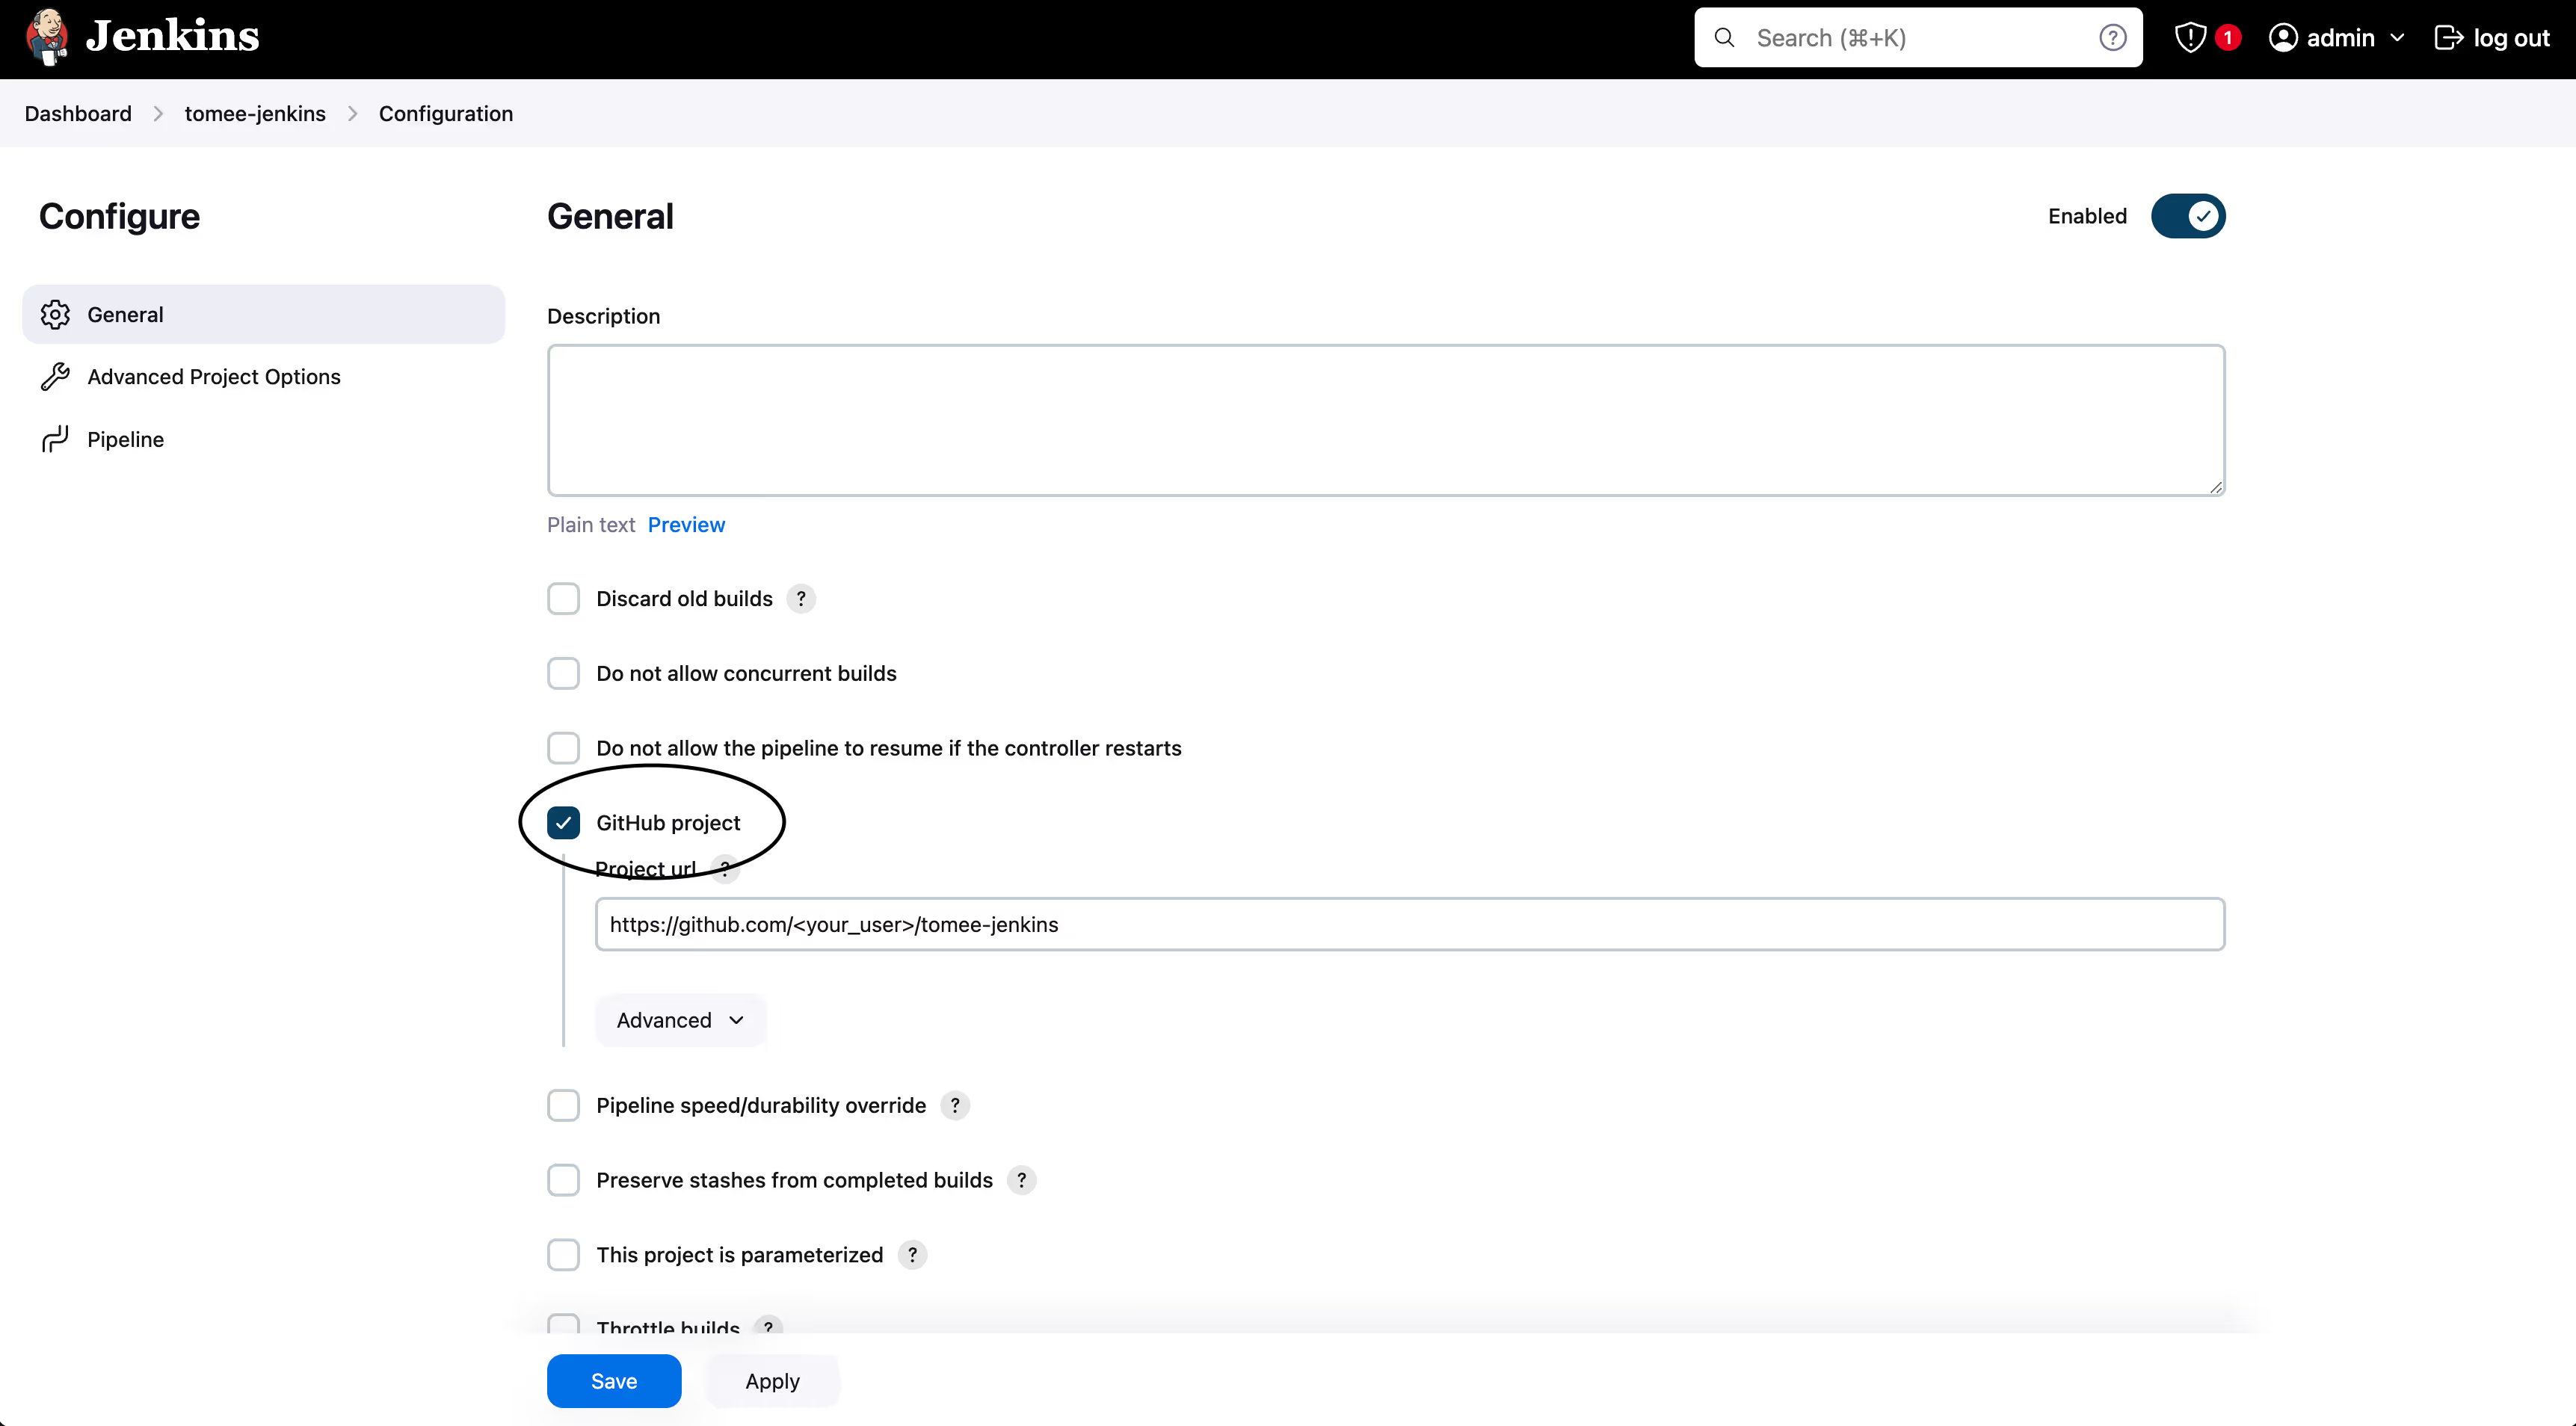
- Select “GitHub project” and enter the URL to your repo.
- Under “Pipeline”, select “Pipeline script from SCM” and enter the URL to your repo.
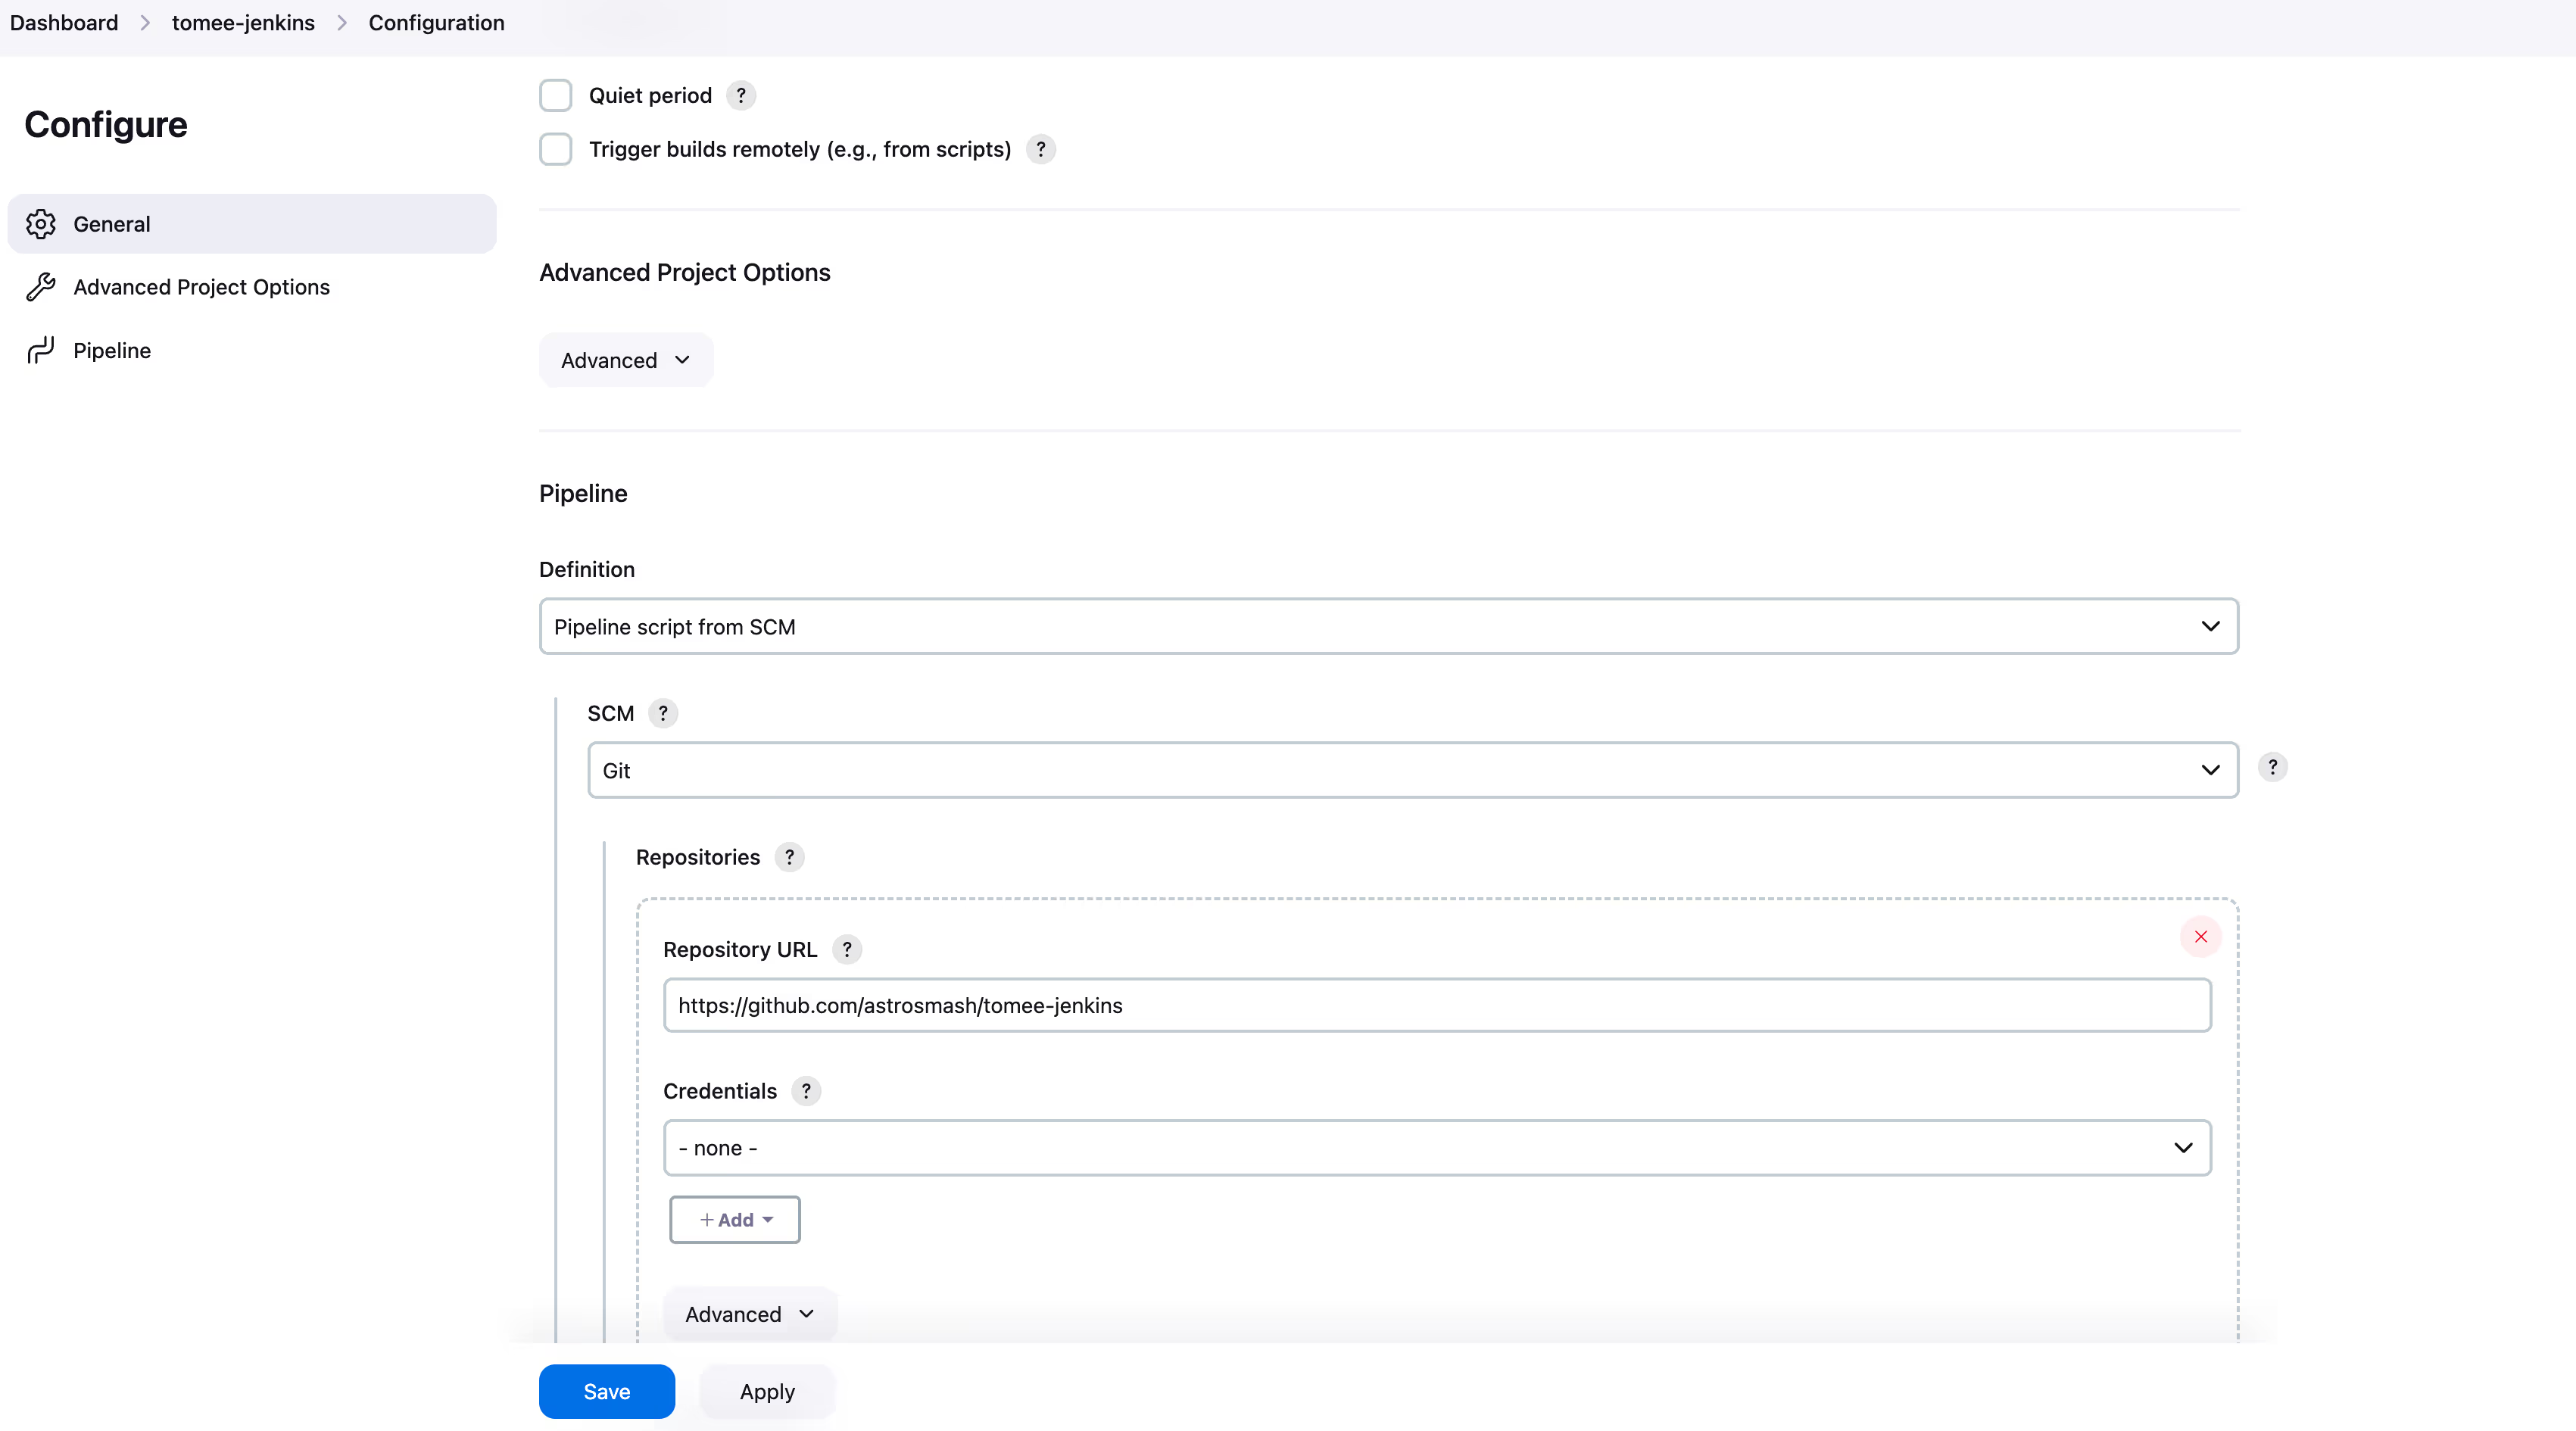
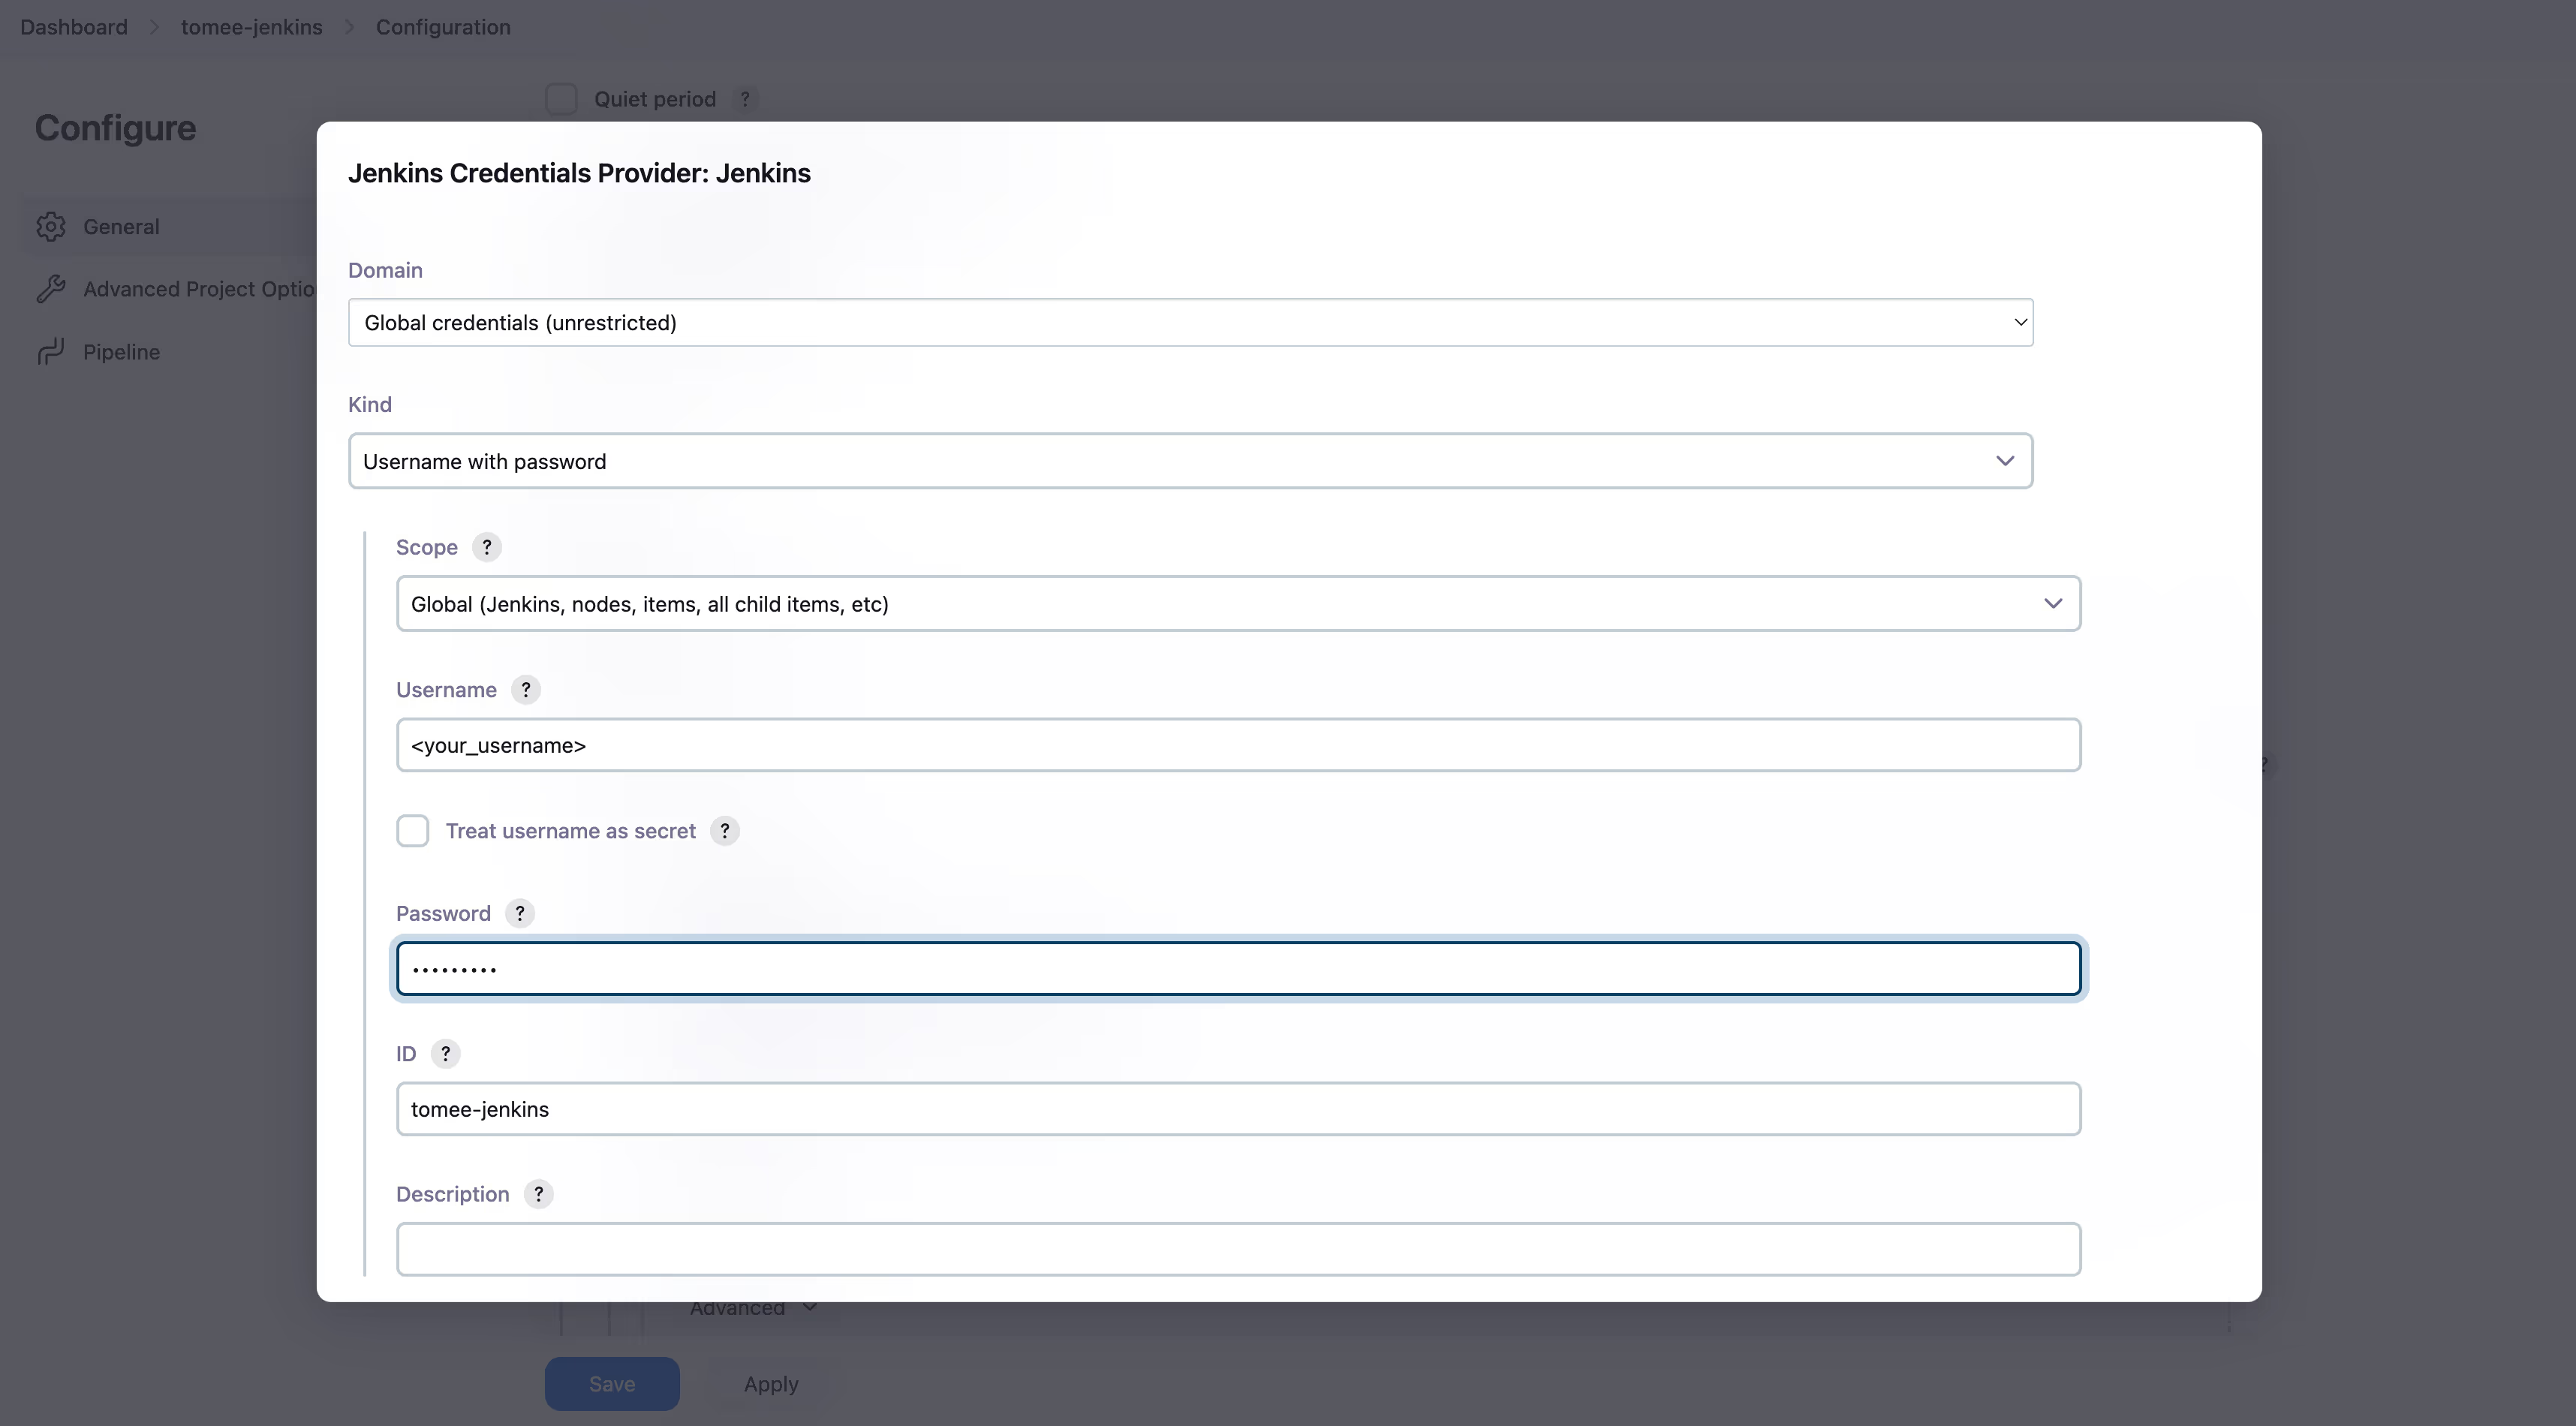
- Click “Add” under Credentials.
- Under “Kind”, select “Username and Password”. Set your username and password, and under ID enter simple-java-maven-app-jenkins-docs. It can be arbitrary. Click “Add” at the bottom.
- Then, the credentials in the Credentials dropdown.
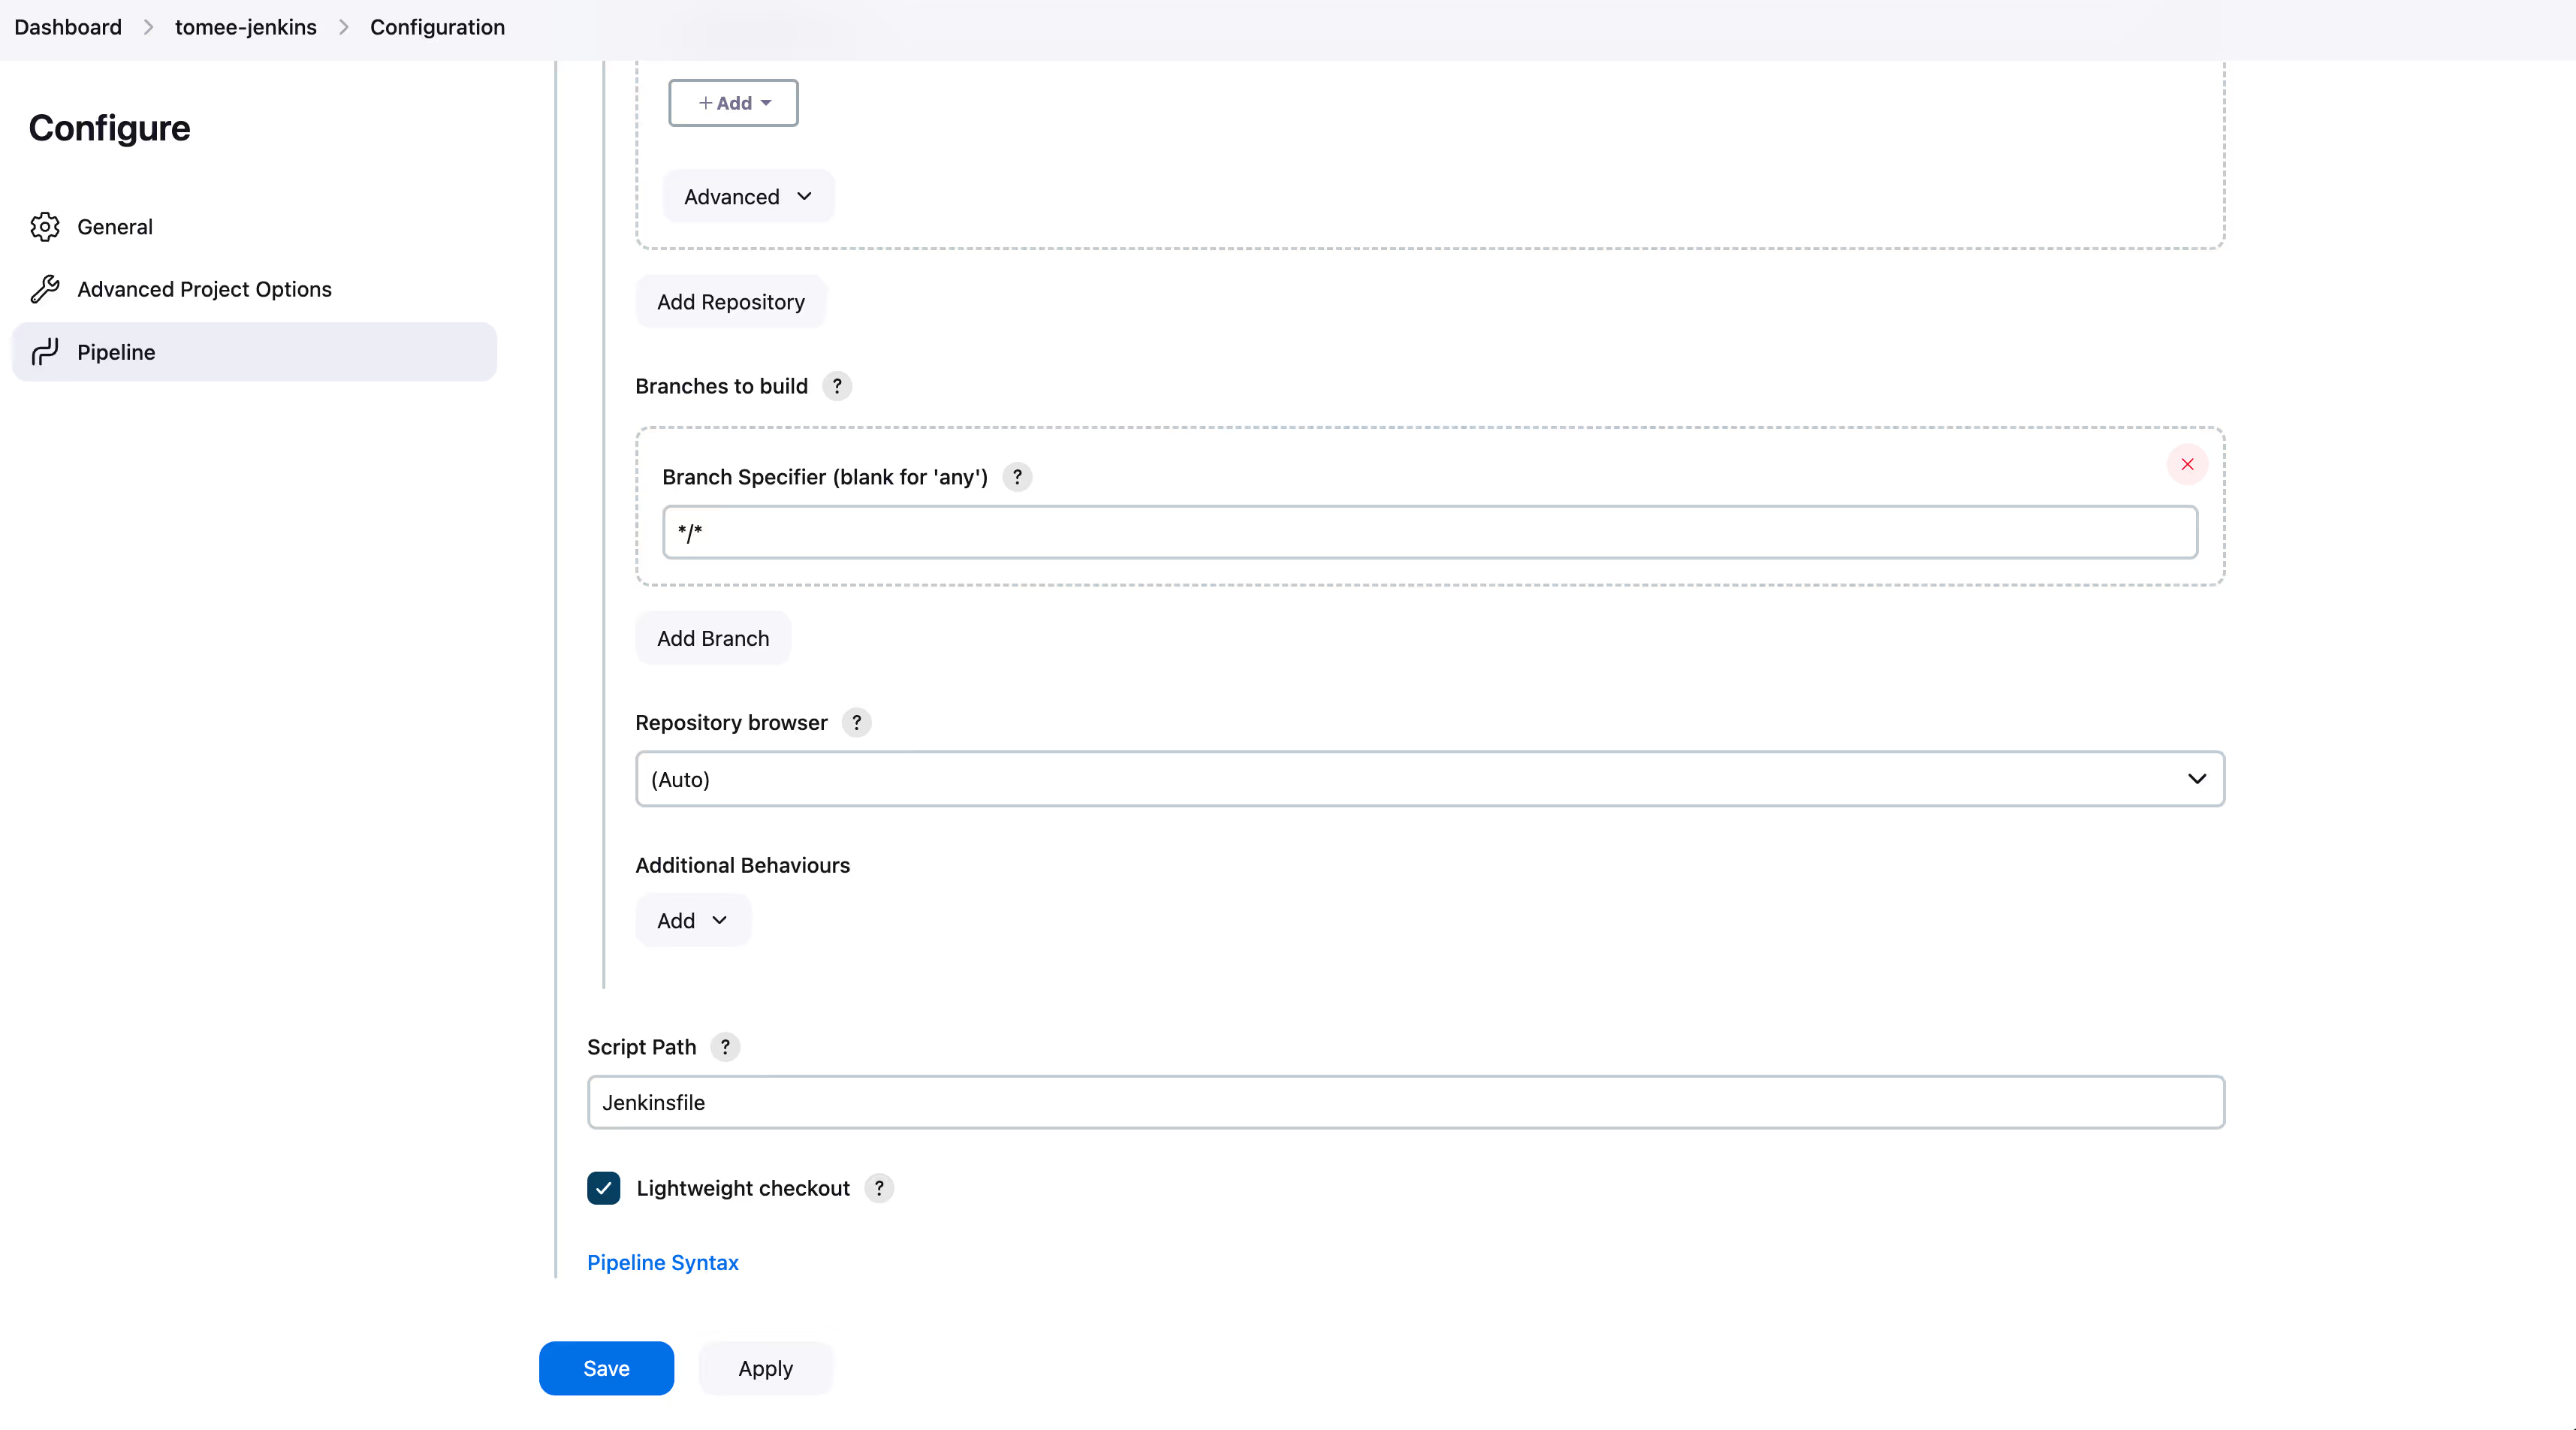
- Under “Branches to build”, specify “/” to build all branches. Click “Save”.
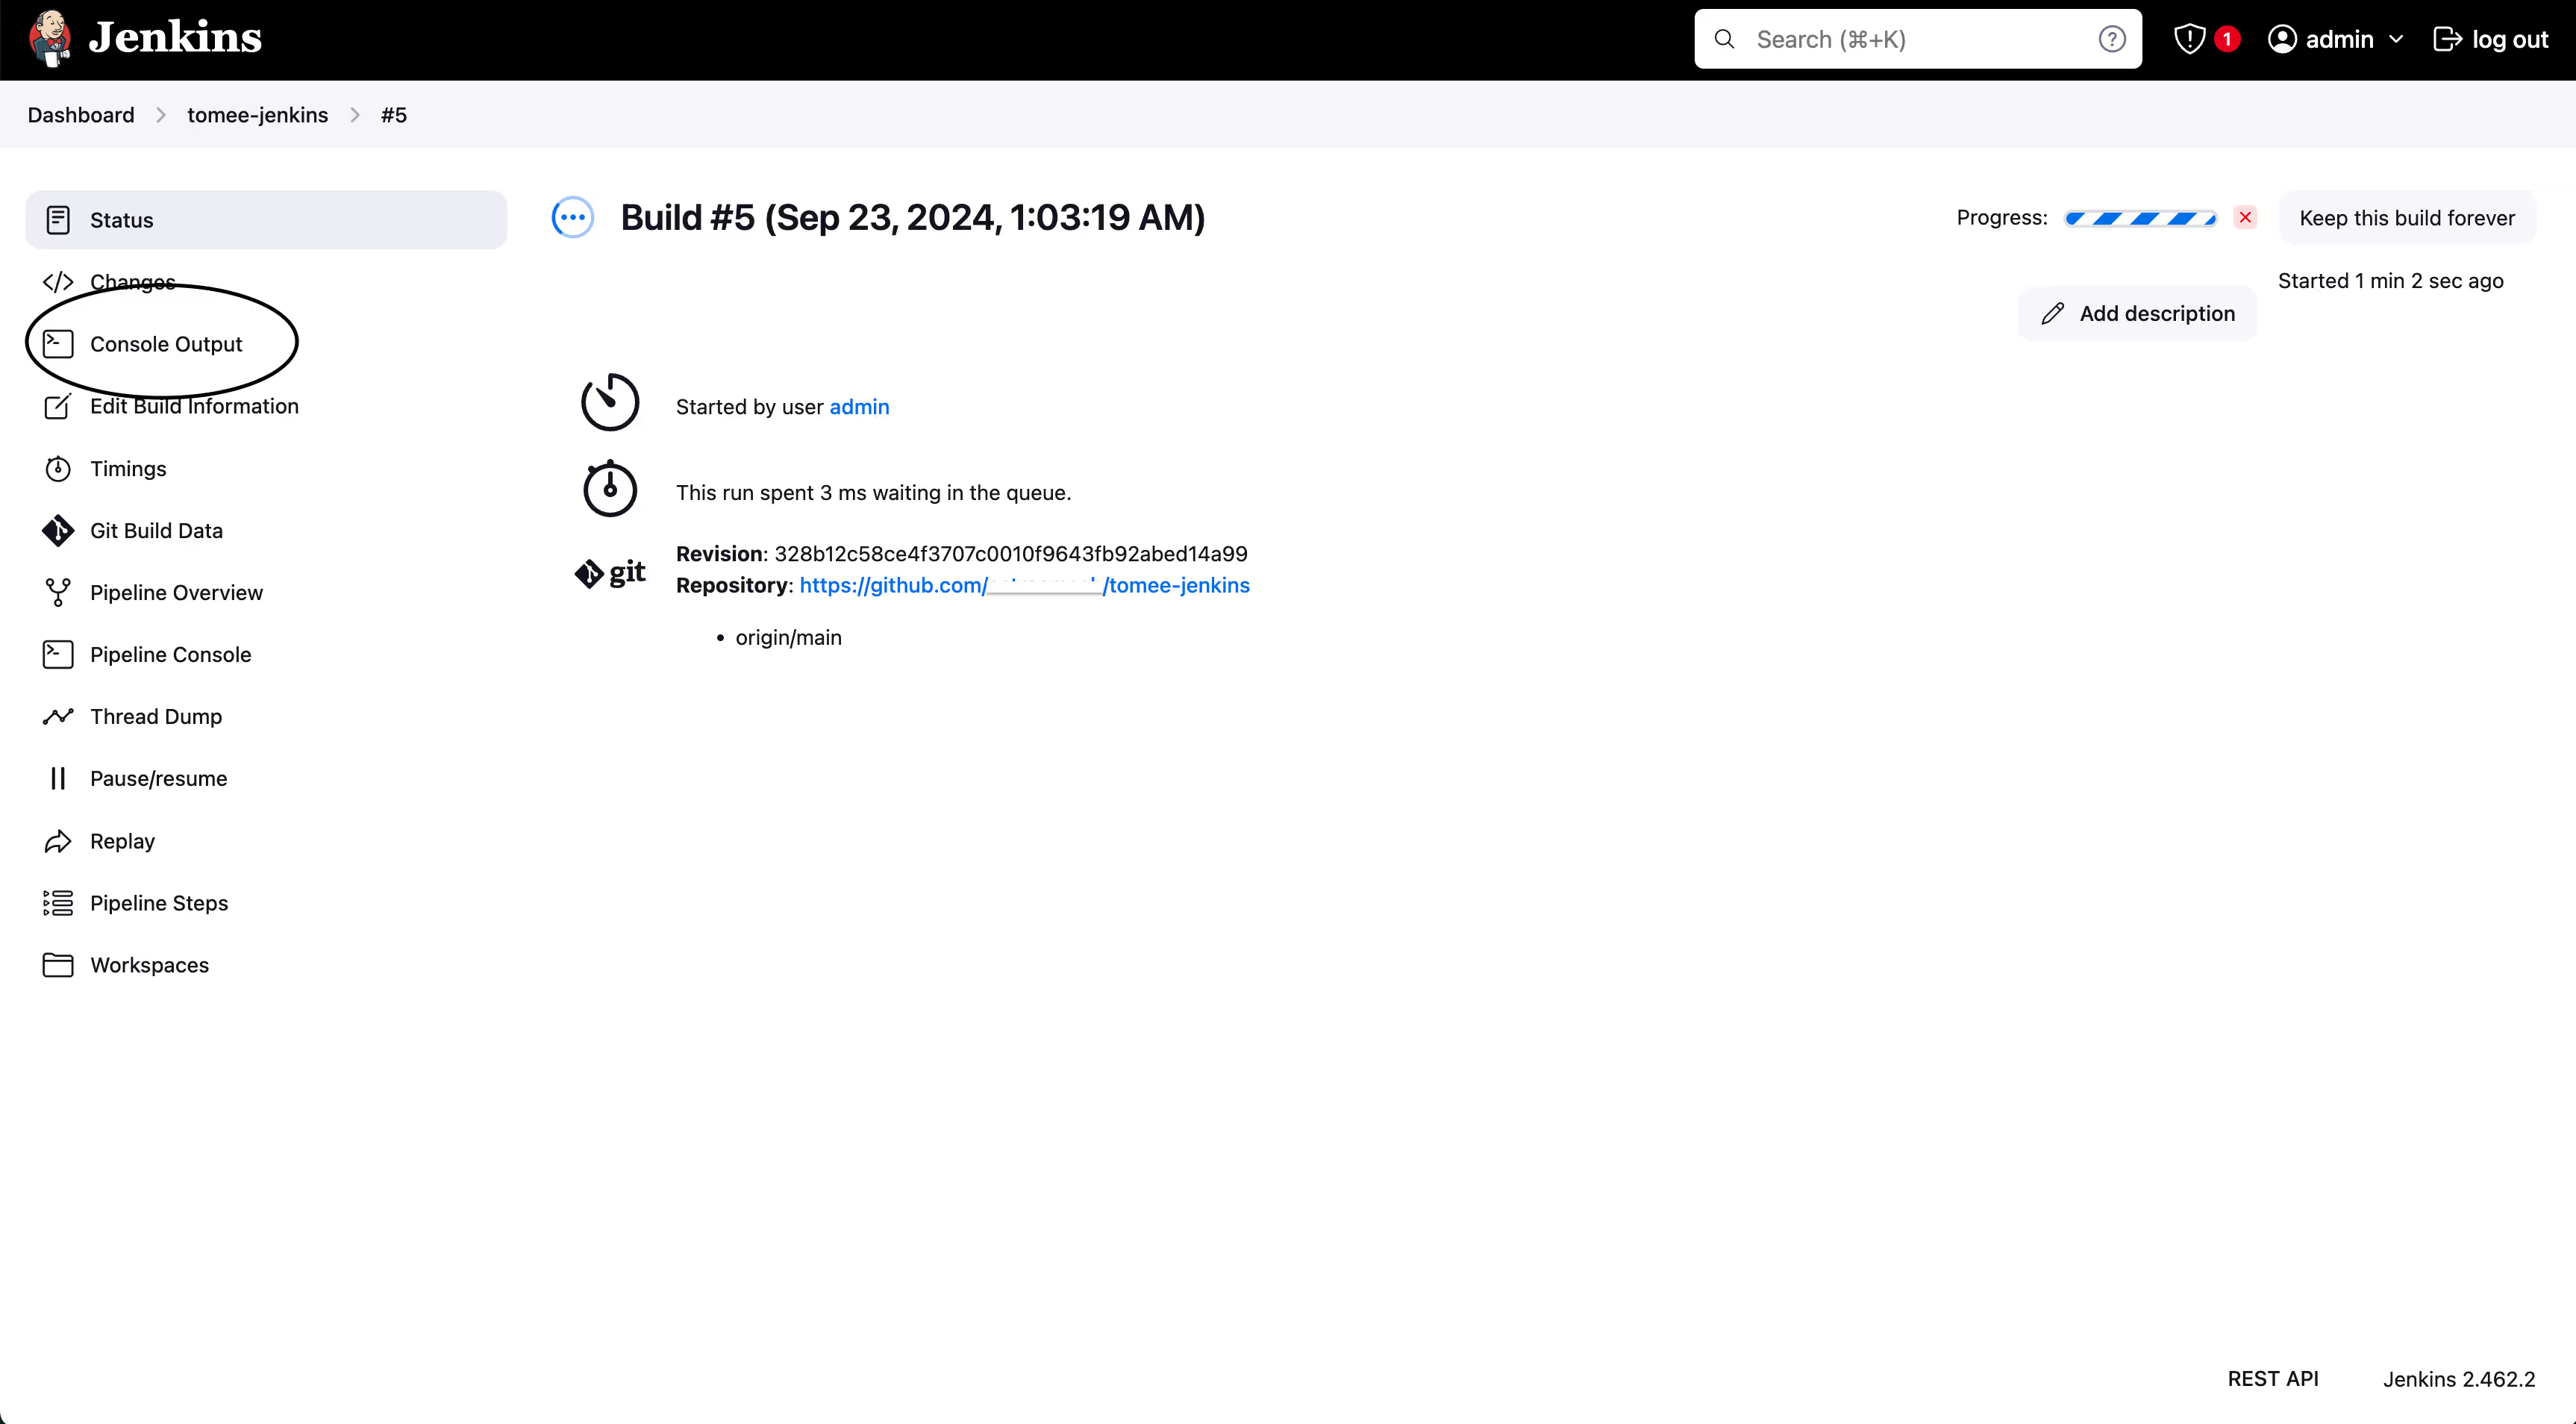
- On the left, click “Build Now” to start a build. Then in the bottom left corner, click on the build number.
- Click “Console output” on the left.
- If everything is alright, at the end of the log you should see “Finished: SUCCESS”, such as on the screenshot.
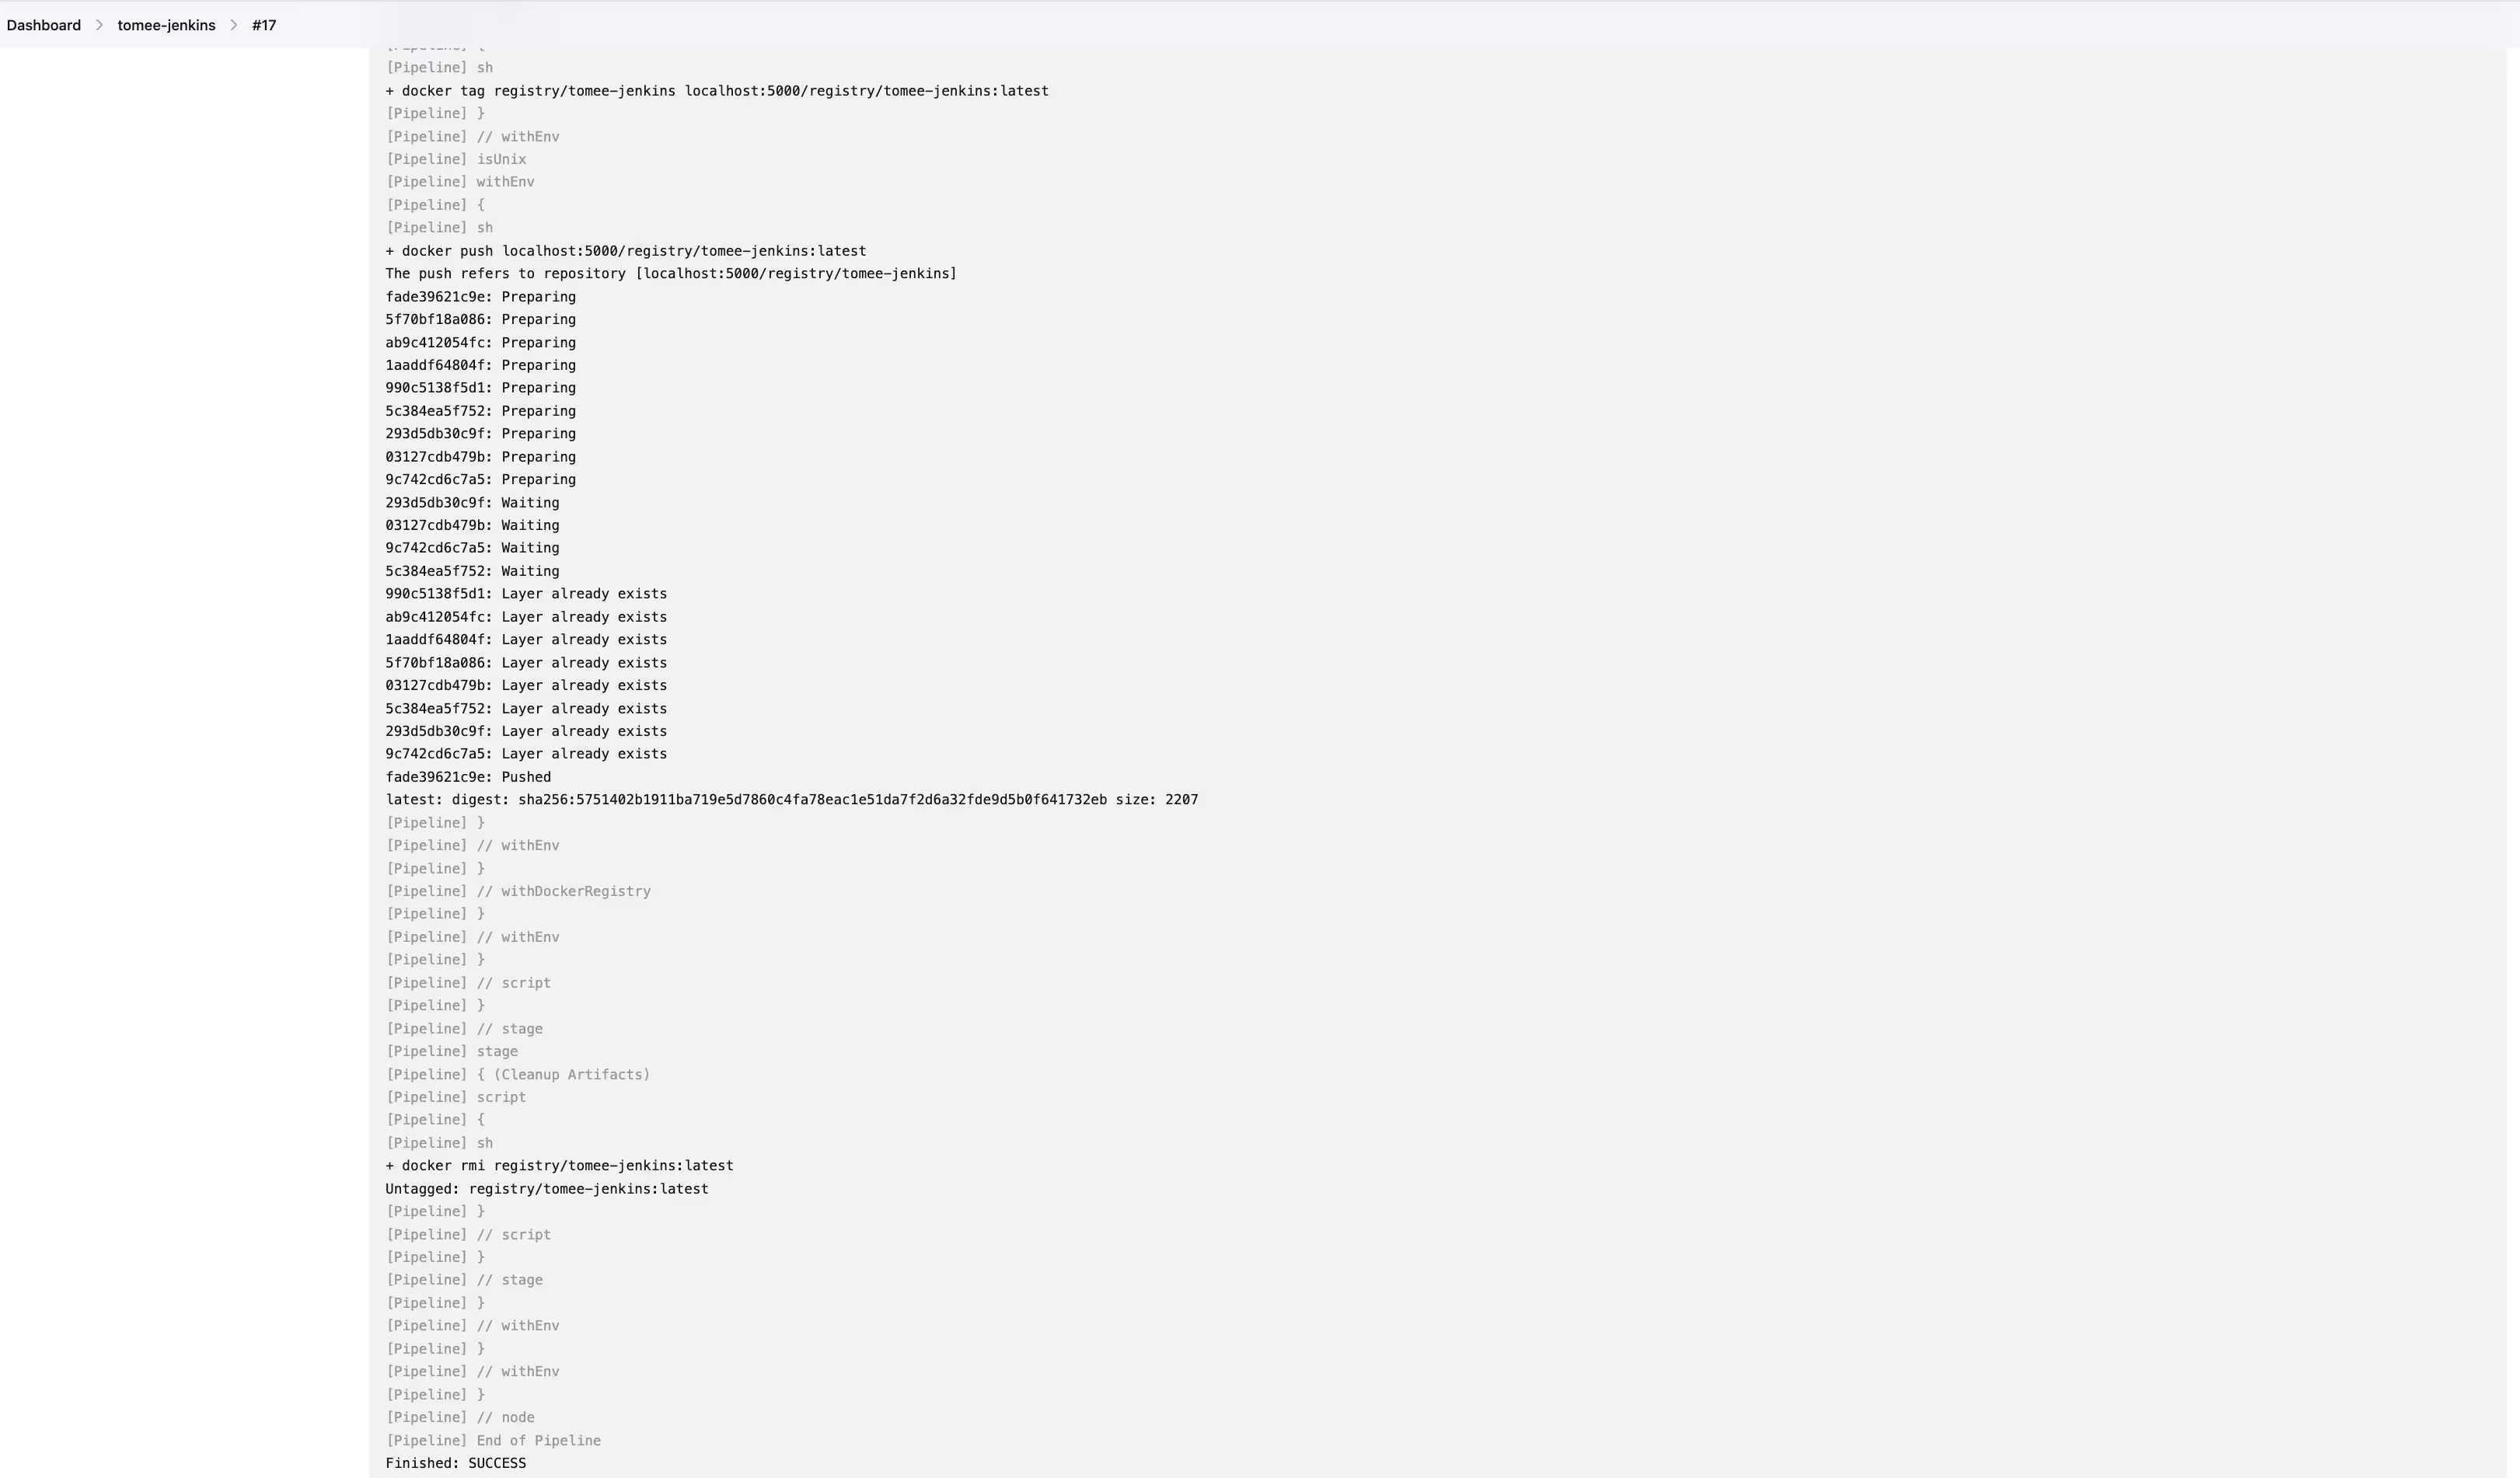
- Let’s now verify that our app runs. Login to Jenkins server and execute:
run: |
  -sudo docker run -d --restart=always --name simple-java-maven-app-jenkins-docs localhost:5000/registry/simple-java-maven-app-jenkins-docs:latest
This will pull and run the newly build image.
To verify the app logs, execute:
run: |
  -sudo docker logs -f simple-java-maven-app-jenkins-docs
You should see “Hello World!”
5. Migrating to GitHub Actions
Now let’s transfer the created workflow into GitHub Actions.
The equivalent of a Jenkins Pipeline would be a GitHub Workflow. And while Jenkins uses Groovy to define the Pipeline, YAML is used in a GitHub Workflow.
- First, we need to create a Fine-grained Access Token that is associated with our git repository to use with the git CLI tool. You will need the following permissions:
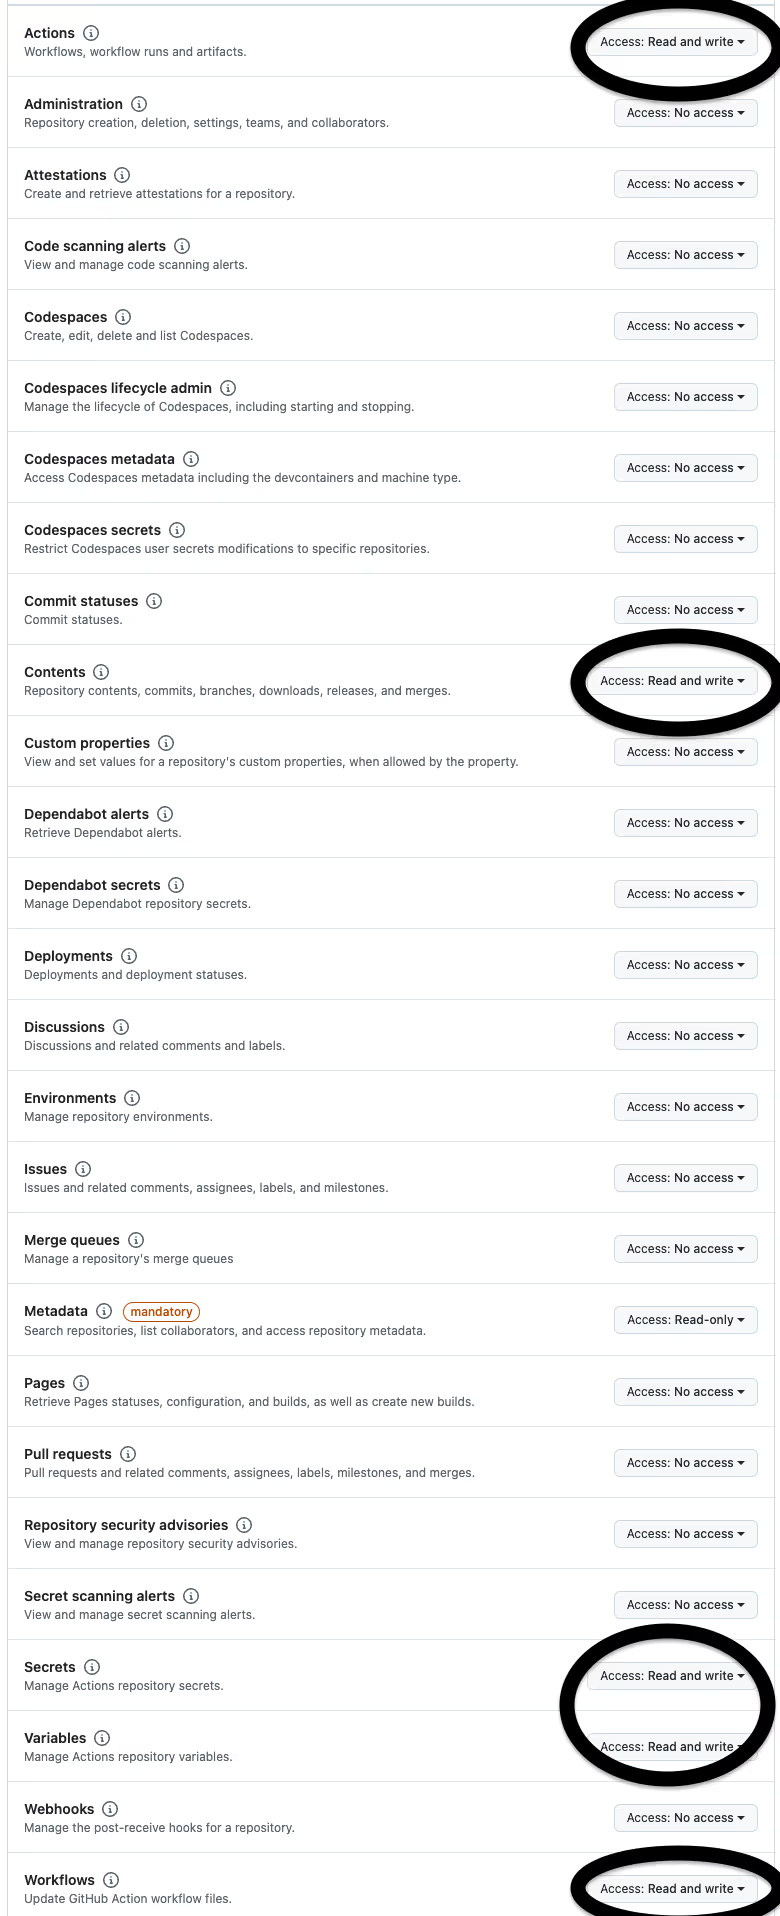
The GitHub Actions workflow should be located in the .github/workflows subdirectory of your project.
Let’s create this directory:
run: |
  -cd
mkdir -p .github/workflows
- Now, let’s create the simple-java-maven-app-jenkins-docs.yml file in .github/workflows:
run: |
  -touch .github/workflows/simple-java-maven-app-jenkins-docs.yml
And let’s rewrite the Jenkinsfile we have step by step:
run: |
  -pipeline {
  agent any

  environment {
      APP_NAME = "simple-java-maven-app-jenkins-docs"
      DOCKER_USER = "registry"
      DOCKER_PASS = 'docker' // Secret name to use to sign into Docker registry
      IMAGE_NAME = "${DOCKER_USER}" + "/" + "${APP_NAME}"
  }
}
Would be equal to:
run: |
  -jobs:
  simple-java-maven-app-jenkins-docs-build:
    env:
      APP_NAME: 'simple-java-maven-app-jenkins-docs'
      DOCKER_USER: 'registry'
      DOCKER_PASS: 'docker' # Secret name to use to sign into Docker registry
      IMAGE_NAME: ':5000/simple-java-maven-app-jenkins-docs'
See more about Workflow variables here.
run: |
  -stages {
  stage("Build") {
    steps {
      sh 'mvn -B -DskipTests clean package'
    }
  }

  stage("Test") {
    steps {
      sh 'mvn test'
    }
  }

  stage("Confirm Build Artifact") {
    steps {
      sh "ls -lah /var/lib/jenkins/workspace/simple-java-maven-app-jenkins-docs/target/my-app-1.0-SNAPSHOT.jar"
      echo "Build Step Executed!"
    }
  }
}
Would be equal to:
run: |
  -steps:
- uses: actions/checkout@v4
- uses: actions/setup-java@v4
  with:
    java-version: '17'
    distribution: 'temurin'
- name: Build
  run: mvn -B -DskipTests clean package
- name: Test
  run: mvn test
- name: Confirm Build Artifact
  run: ls -lah target/my-app-1.0-SNAPSHOT.jar && echo 'Build Step Executed!'
See more about using Java + Maven in GitHub Actions here.
run: |
  -stages {
  stage('Docker Build and Push') {
    steps {
      echo 'Docker build app'
      script {
        docker.withRegistry('https://localhost:5000', DOCKER_PASS) {
          docker_image = docker.build "${IMAGE_NAME}"
          docker_image.push("latest")
        }
      }
    }
  }
}
Would be equal to:
run: |
  -steps:
- name: Login to Docker
  uses: docker/login-action@v3
  with:
    registry: https://:5000
    username: ${{ secrets.DOCKER_USER }}
    password: ${{ secrets.DOCKER_PASS }}
- name: Build and push
  uses: docker/build-push-action@v6
  with:
    push: true
    tags: '${{ env.IMAGE_NAME }}:latest'
- We now need to define the secrets that will store username and password for the registry.

- Under Repository, click Settings > select Secrets and Vairables under Security > Actions.
- Click “New repository secret”, type DOCKER_USER in the Name field andregistry in the Value.
- Then DOCKER_PASS with the registry123 value, as we configured these for the Docker registry.
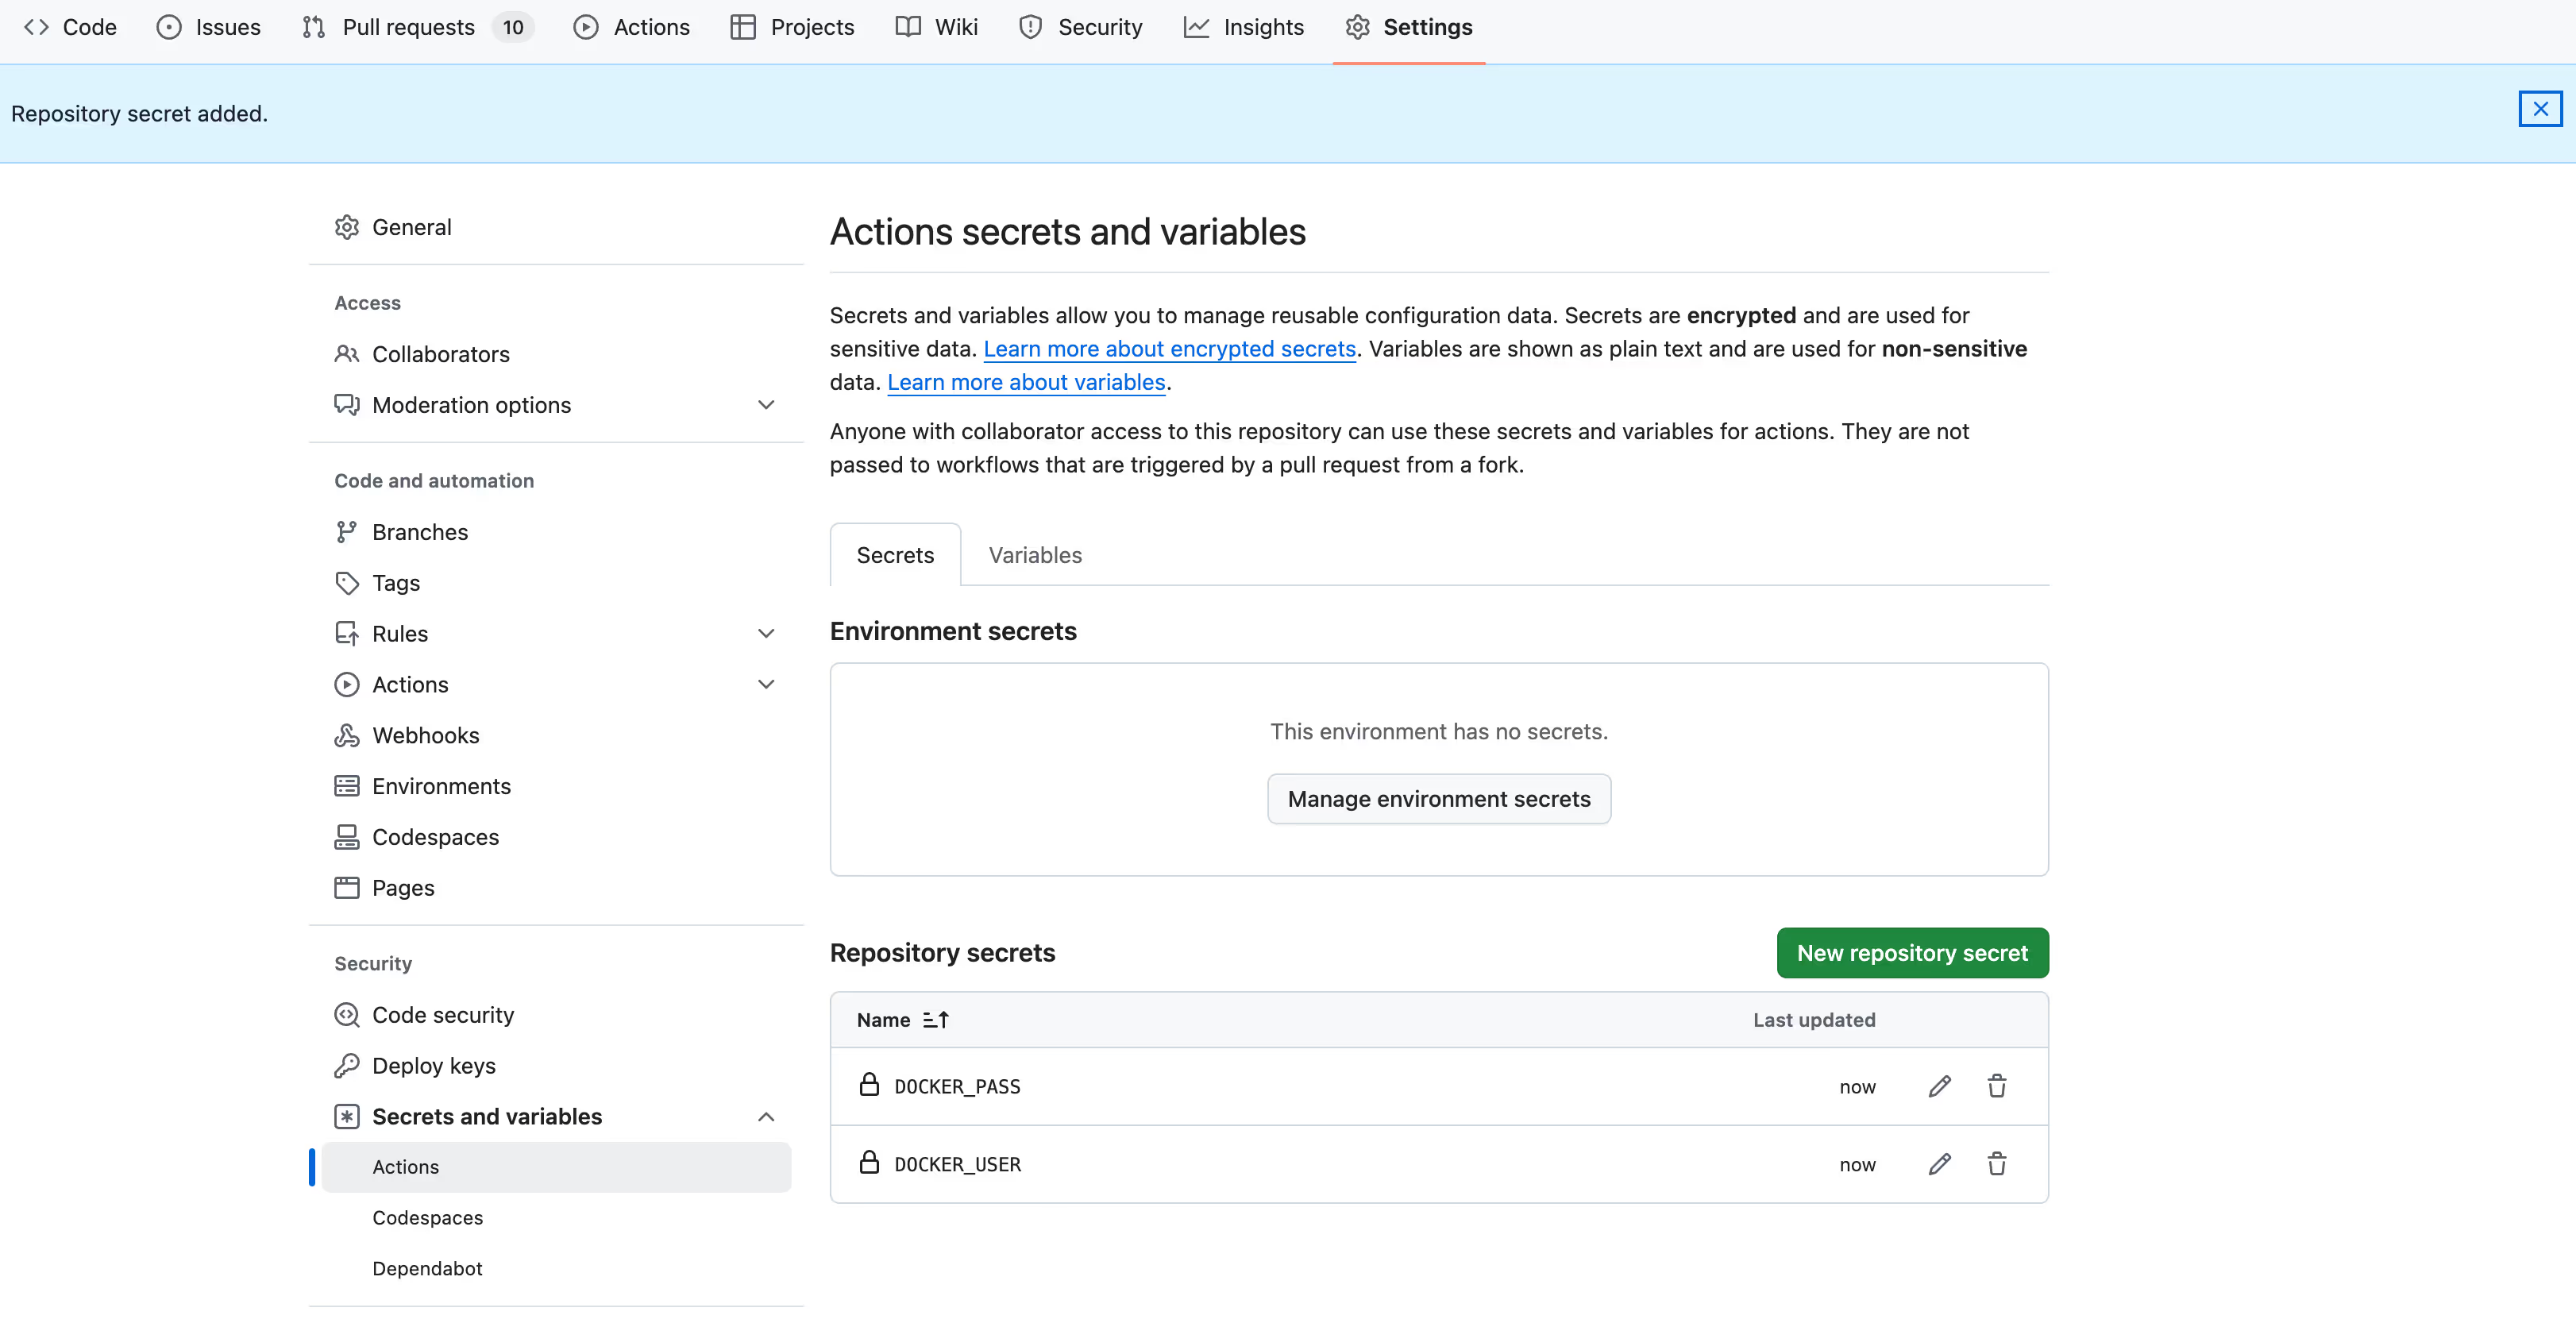
- Also add a DOCKER_CERT secret with the value of your docker_certs/domain.crt certificate. This is needed because docker login does not support self-signed certificates, and we will need to install it directly on the builder.
Notice that we changed localhost to external_ip_of_your_node - change it with the public IP of your instance where you’ve installed your Registry container. In our example it’s the Jenkins node itself.
You could define your own Docker actions such as in this example. For clarity, we’ll re-use Docker actions from the Marketplace. Also, see a great collection of official Docker-related actions here.
- So, in total the complete GitHub Actions workflow file will look like:
run: |
  -name: simple-java-maven-app-jenkins-workflow

on: push

jobs:
  simple-java-maven-app-jenkins-docs-build:
    runs-on: ubuntu-latest

    env:
      APP_NAME: 'simple-java-maven-app-jenkins-docs'
      IMAGE_NAME: ':5000/simple-java-maven-app-jenkins-docs'

    steps:
    - uses: actions/checkout@v4

    - name: Setup Maven Action
      uses: s4u/setup-maven-action@v1.7.0
      with:
        checkout-fetch-depth: 0
        java-version: 17
        java-distribution: temurin
        maven-version: 3.9.2

    - name: Build
      run: mvn -B -DskipTests clean package

    - name: Test
      run: mvn test

    - name: Confirm Build Artifact
      run: ls -lah target/my-app-1.0-SNAPSHOT.jar && echo 'Build Step Executed!'

    - name: Save Docker certificate
      env:
        CERT: ${{ secrets.DOCKER_CERT }}
      shell: bash
      run: |
          echo "$CERT" >> /tmp/ca-certificates.crt
          sudo mkdir -p /etc/docker/certs.d/:5000
          sudo cp /tmp/ca-certificates.crt /etc/docker/certs.d/:5000/ca.crt
          sudo cp /tmp/ca-certificates.crt /usr/local/share/ca-certificates/ca.crt
          sudo update-ca-certificates

    - name: Login to Production Registry
      uses: docker/login-action@v3
      with:
        registry: :5000
        username: ${{ secrets.DOCKER_USER }}
        password: ${{ secrets.DOCKER_PASS }}

    - name: Build and push
      uses: docker/build-push-action@v6
      with:
        push: true
        tags: '${{ env.IMAGE_NAME }}:latest'
Note that we used setup-maven-action instead of actions/setup-java because we need a specific maven version as per this comment.
If maven 3.8.8 that comes with actions/setup-java will work for you, then you can omit this change.
- Let’s now put the contents in the .github/workflows/simple-java-maven-app-jenkins-docs.yml file.
- Then execute the following to add the file into the repository:
run: |
  -git add .github/
git commit -m 'add workflow'
git push origin master
- If everything is alright, you should see the green checkmark on the left and success logs, similar to the screenshot.
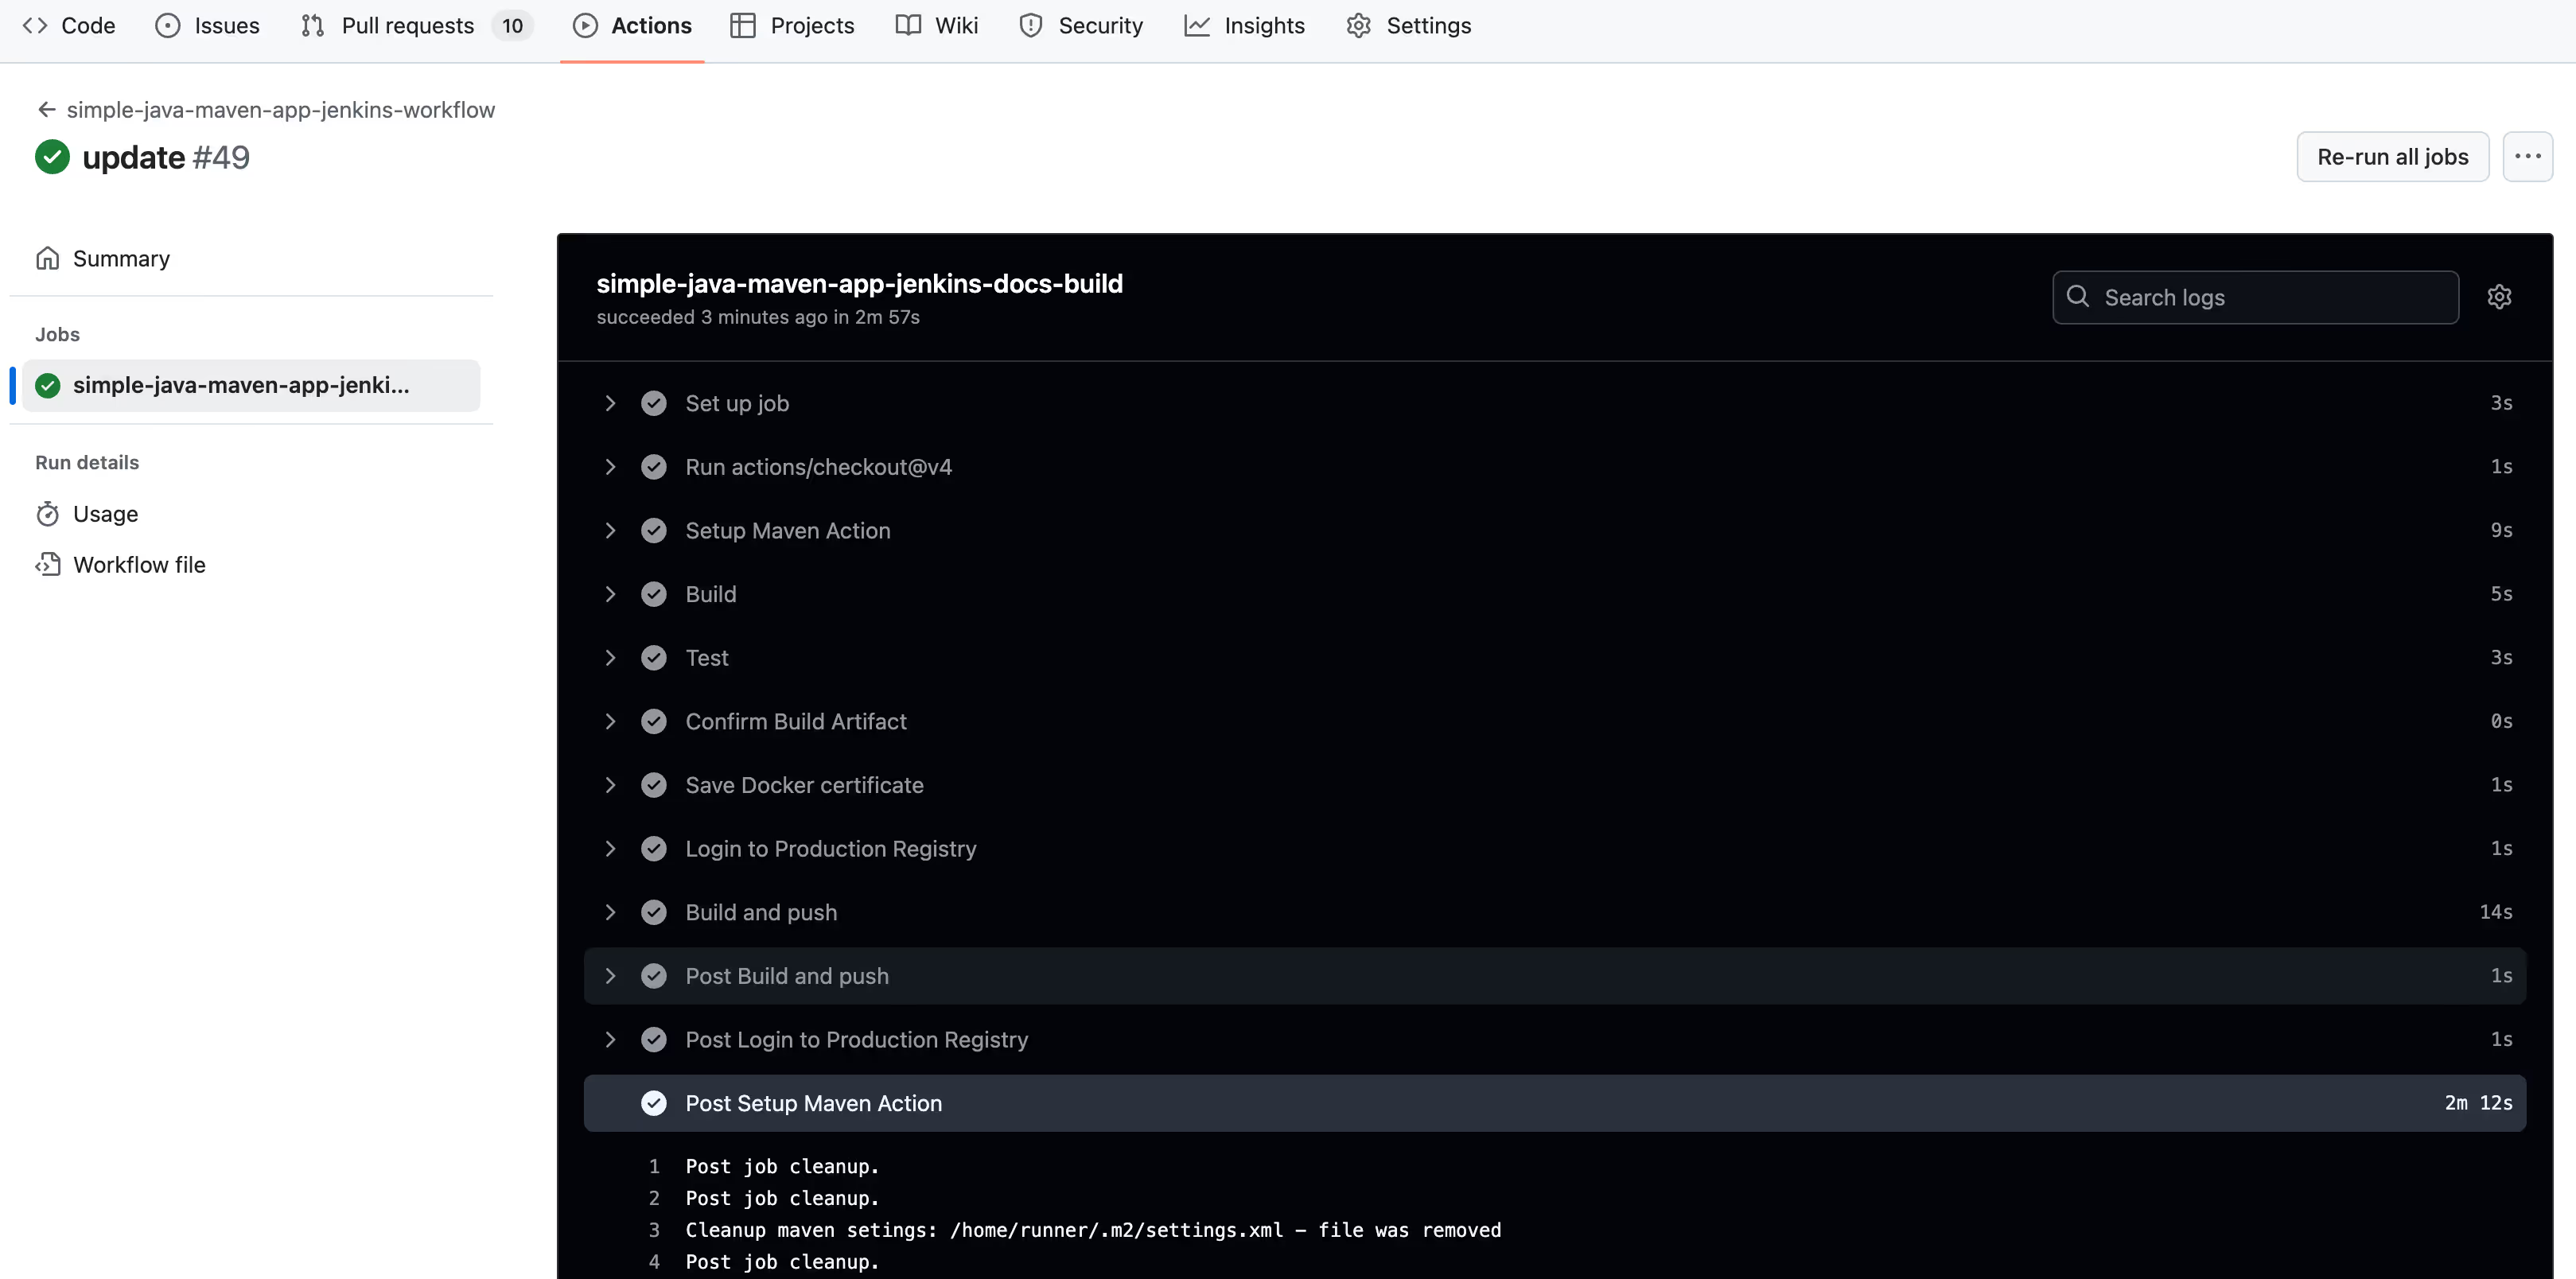
6. Using a Self-Hosted Runner
Now let’s try using a self-hosted runner instead of the hosted runner.
- Under Settings, click Actions on the right, then Runners and hit the green New self-hosted runner button. Select Linux.
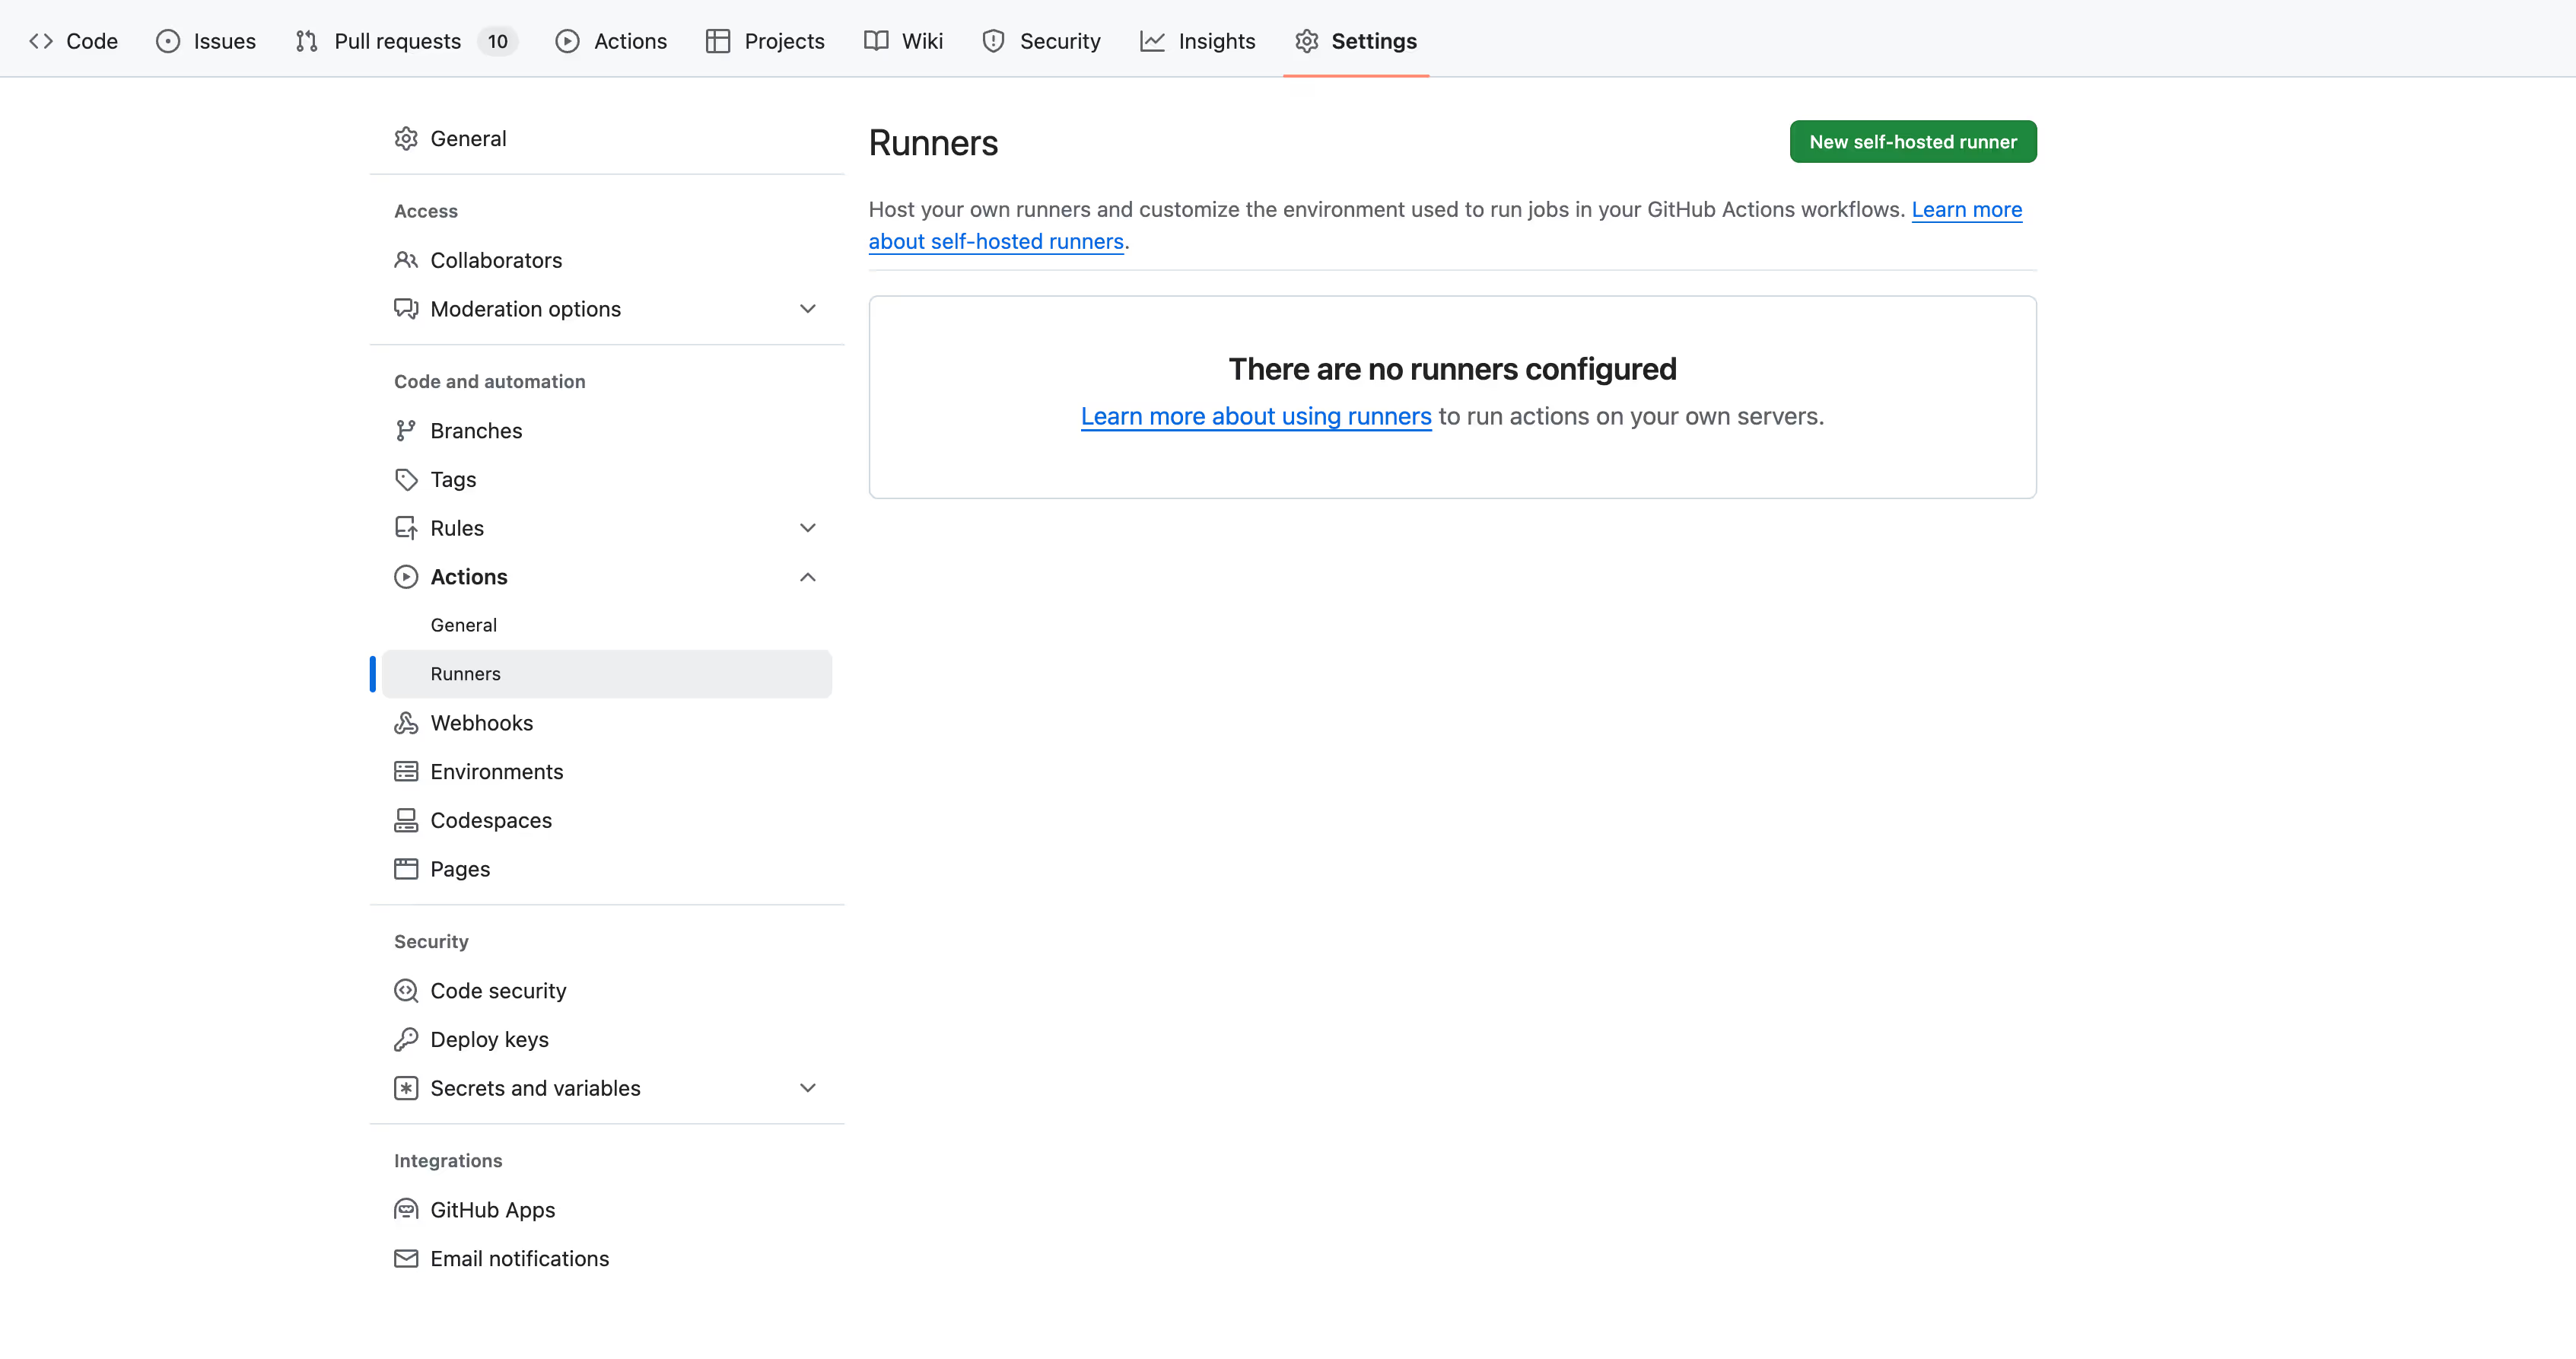
- You will be presented with the Download and Configure command windows - copy each command and execute it on your server. The command to start the runner would be ./run.sh – please note that it’s not daemonized (e.g. if you close the terminal window, it will exit).
For a persistent run, you would need either to create a system service, or run it in a screen, such as:
run: |
  -screen -dmS runner
screen -r runner
./run.sh
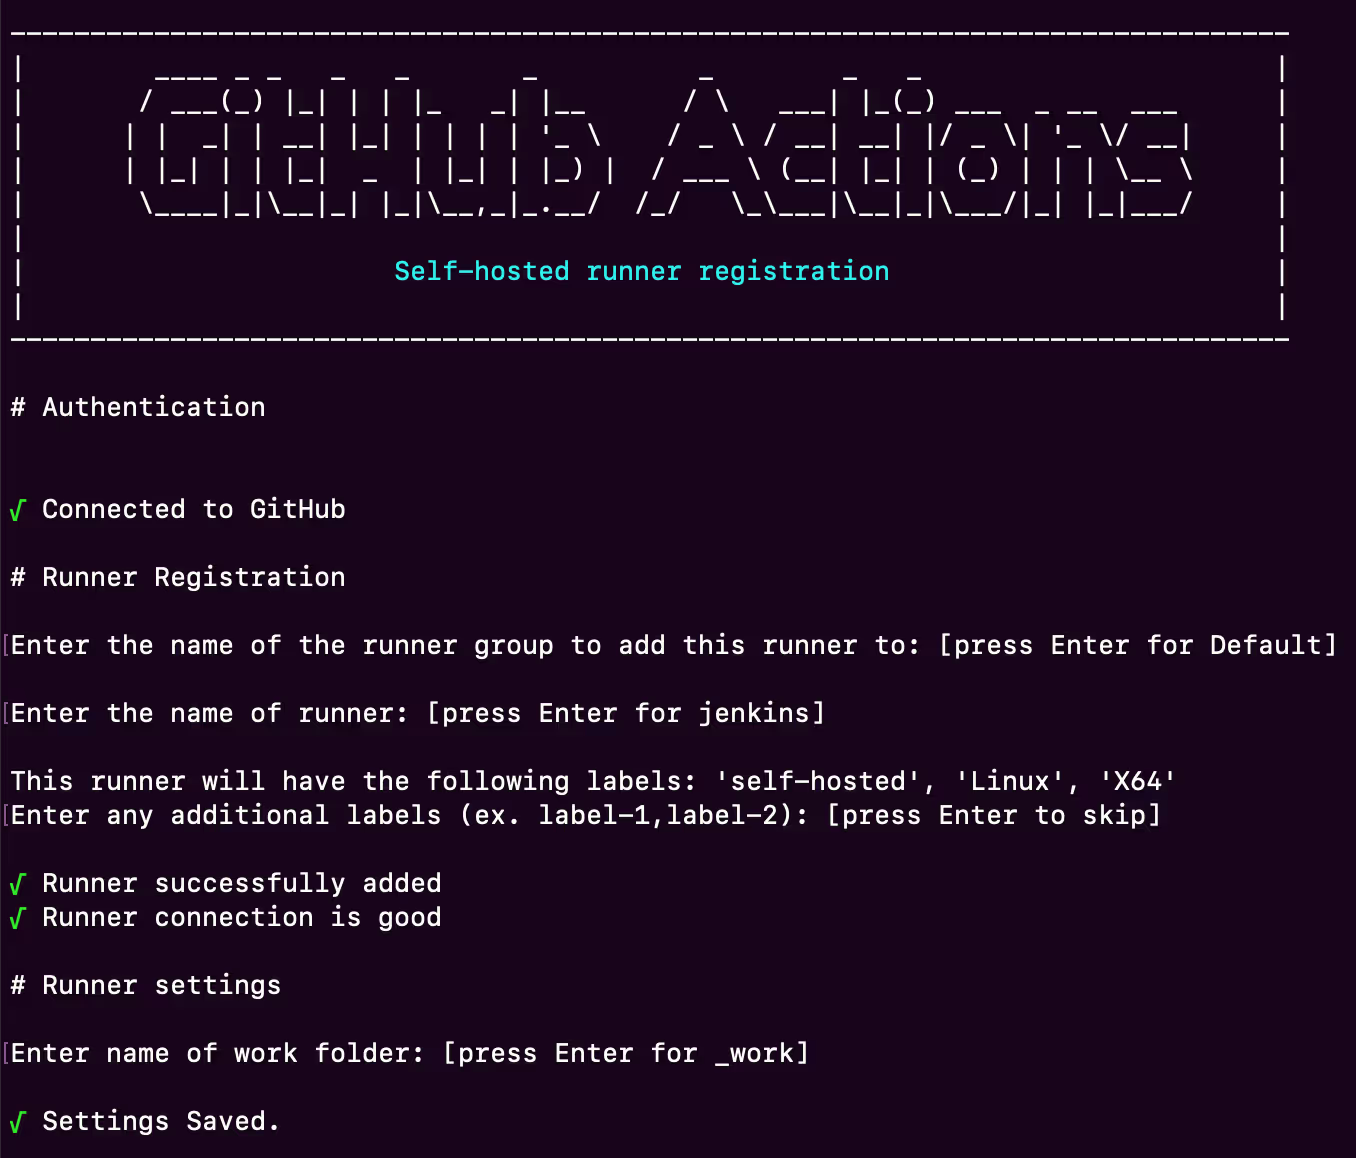
- Now, you would need to change runs-on: ubuntu-latest in your GitHub Actions workflow file to runs-on: self-hosted. Save the change, commit and push it to the repo:
run: |
  -git add .github/
git commit -m 'change the github runner to self-hosted'
git push origin master
You will see the exact same output of the job logs as previously - except that it has been now run on your server, and you will see the following logs in your runner output:

Some reasons for preferring a self-hosted runner is the security of your builds. If some of your build steps have sensitive information, you may want to use a self-hosted runner, which also may be behind a VPN.
Optimizing CI/CD Performance Post-Migration
After successfully migrating from Jenkins to GitHub Actions, it’s essential to optimize your CI/CD pipeline performance. One of the best ways to do this is by implementing caching strategies to reduce build times. Let’s take a look at how caching works in both Jenkins and GitHub Actions.
Reducing Build Times with Caching Strategies
Both Jenkins and GitHub Actions offer caching mechanisms to help speed up your builds by reusing previously built artifacts and dependencies. Here’s a breakdown of caching strategies in each platform:
- Caching in Jenkins:
- Dependencies Caching: For projects like JavaScript, you can cache dependencies (e.g., node_modules). This ensures that the same dependencies are reused across multiple builds if the dependency manifest (e.g., package-lock.json) remains unchanged.
- Application Compilation Caching: Jenkins allows you to cache the compilation directory, which can then be reused in subsequent steps if the source code hasn’t changed.
- Jenkins Job Cacher Plugin: This plugin provides caching for both dependencies and build artifacts. It’s especially useful in Jenkins environments that use ephemeral executors (like container-based ones) that start fresh for each build.
- The plugin supports configuration via the maxCacheSize parameter, which defines the maximum cache size Jenkins will store before deleting old cache files.
- It also integrates with Amazon S3 for storing cache data.
- Caching in GitHub Actions:
- Built-in Cache Action: GitHub Actions provides a built-in caching action. Here’s an example of how you can cache node_modules:
run: |
  -name: Cache node_modules

uses: actions/cache@v4

with:

  path: ~/.npm

  key: ${{ hashFiles('**/package-lock.json') }}
More information on the caching action can be found here.
- Workflow Artifacts Caching: GitHub Actions allows you to cache artifacts between GitHub workflow runs, which can significantly reduce build times. Learn more about this feature in GitHub's documentation.
- Dependency Caching: You can cache dependencies to speed up your GitHub Actions workflow, much like in Jenkins. For more details on caching dependencies in GitHub Actions, refer to this guide.
Using Matrix Builds and Job Reusability in GitHub Actions
When you're working with applications that need to be tested across different environments—whether it’s different operating systems, programming languages, or hardware platforms—Matrix Builds can help your DevOps team save a lot of time. Instead of duplicating workflows manually, GitHub Actions’ matrix strategy allows you to run jobs simultaneously across multiple configurations. This ensures your application has compatibility with a variety of environments, which is especially useful for large, complex projects.
Here’s how Matrix Builds work:
- Defining Multiple Configurations: With the matrix strategy, you can define different configurations, such as operating system versions or language versions, in your GitHub Actions workflow file. GitHub Actions will then automatically generate and run a job for each configuration. For example, here’s how you can define a matrix for different platforms:
run: |
  -yaml

jobs:
  build:
    runs-on: ubuntu-latest
    strategy:
      matrix:
        platform:
          - linux/arm64/v8
          - linux/amd64
    steps:
      - name: Create Docker image
        uses: docker/build-push-action@v4
        with:
          platforms: ${{ matrix.platform }}
This setup allows you to create Docker images for multiple architectures in parallel.
- Dynamic Matrix Generation: You can also generate a matrix dynamically, based on the output of a previous step or job. For example:
run: |
  -permissions:
contents: read
run: |
  -yaml

jobs:
  build:
    outputs:
      matrix: ${{ steps.set-matrix.outputs.matrix }}
    steps:
      - id: set-matrix
        run: |
          echo "matrix={\"include\": [{\"os\": \"ubuntu-latest\", \"node\": \"18\"}]}" >> "$GITHUB_OUTPUT"

  test:
    needs: build
    strategy:
      matrix: ${{fromJson(needs.build.outputs.matrix)}}
    runs-on: ${{ matrix.os }}
    steps:
      ...
This approach gives your DevOps team the flexibility to define your matrix based on dynamic inputs from earlier steps, to increase the efficiency of your workflows.
- Parallel Jobs: To further optimize your GitHub workflow, you can configure the max-parallel key in the strategy block. This allows you to control how many jobs run in parallel, which can significantly reduce build times when you have a large matrix of configurations.
For more details on how to set up Matrix Builds, you can refer to GitHub’s documentation on Matrix Strategy.
Enhancing Pipeline Security with Hardened Runners and Security Scans
Security is a critical concern when running CI/CD pipelines, especially when dealing with sensitive environments or public repositories. GitHub Actions offers both hosted and self-hosted runners, but each comes with its own security considerations. By properly configuring your runners and integrating security scans, you can greatly reduce the risk of security breaches and ensure that your workflows are secure.
Best Practices for Securing Your Runners:
- Use Hosted Runners for Public Repositories: Hosted runners come pre-configured with security measures to mitigate possible risks.
- Avoid Self-Hosted Runners for Public Repositories: Using self-hosted runners on public repositories can expose your environment to security risks, as multiple workflows from different repositories can be scheduled onto the same runner.
- Restrict Access to Self-Hosted Runners: Security compromising of a self-hosted runner could pose a wider impact as GitHub can schedule workflows from multiple repositories onto the same runner. To mitigate that, you can restrict what organizations and repositories can access runner groups.
- Protect Sensitive Information: Do not store any sensitive information (e.g., secrets, credentials) on the server that hosts a self-hosted GitHub Runner.
- Limit Network Access: Make sure that the server that hosts a self-hosted GitHub Runner does not have network access to any sensitive endpoints and internal network of your organization.
- Use Just-in-Time (JIT) Runners: JIT runners can be created with REST API to perform one job and then automatically be removed, adding an extra layer of security.
- Consider StepSecurity Harden Runner: You can enhance your pipeline's security further by using tools like the StepSecurity Harden Runner, which adds additional layers of protection. Learn more about it here.
In addition to these best practices, it's essential to integrate security scans into your GitHub workflow to detect vulnerabilities early. Be sure to explore tools like Dependabot and GitHub Code Scanning for proactive vulnerability management, as discussed in the Compliance and Auditing section.
Cost Optimization: Managing Actions Minutes and Self-Hosted Runners
Optimizing the cost of your CI/CD pipeline is an essential part of maintaining efficiency, especially when using GitHub Actions. Whether you're using hosted runners or self-hosted runners, managing GitHub Actions minutes and storage can have a direct impact on your budget. By taking advantage of GitHub's built-in cost management tools and making a few strategic adjustments, you can significantly reduce your expenses.
Here are some key tips to help you optimize costs:
- Understand GitHub Actions Pricing: Familiarize yourself with GitHub Actions pricing for hosted runners, as it varies based on usage and storage.
- Regularly Review Usage Metrics: Keep an eye on your usage metrics to ensure you’re not exceeding your budget. This will also help you identify areas where you can cut back.
- Tune Retention Policies: Adjust the retention policies for your artifacts and logs to the shortest time that still meets your requirements. This can help reduce storage costs.
- Limit GitHub Actions Usage: GitHub Actions is enabled by default, but you should only enable it for the organizations and repositories that need it. Disabling it where unnecessary will prevent unwanted costs.
- Disable Unused Workflows: Regularly audit and disable workflows that are no longer in use to avoid unnecessary consumption of resources.
- Track Minute and Storage Usage: Monitor the minutes and storage being used for your project by referring to GitHub’s billing page.
- Set a Spending Limit: Consider setting a spending limit on your GitHub Actions usage to avoid unexpected costs. Learn how to configure this here.
Best Practices for a Successful Jenkins to GitHub Actions Migration
Migrating from Jenkins to GitHub Actions can be a complex process, but following best practices can help you mitigate risks and ensure a smooth transition. By planning carefully, using incremental strategies, and following security protocols, you can reduce downtime and avoid disruptions during the migration.
Let’s explore some key best practices to keep in mind as you move forward with your migration.
Incremental Migration Strategy: Parallel Running for Risk Mitigation
When migrating from Jenkins to GitHub Actions, it's important to minimize the risk of breaking your workflows, especially if they are critical to your operations. One of the most effective ways to achieve this is by adopting an incremental migration strategy, where both Jenkins and GitHub Actions run in parallel.
For more details on this, refer to the Assessing Existing Jenkins Jobs: Identifying Critical Pipelines and Dependencies section
Automated Testing and CI/CD Pipeline Validation
After you have migrated the key components of the pipeline, and before you switch the Jenkins pipeline off, make sure that all the testing steps of your repository still work as expected. Start the Jenkins testing pipeline and the one in GitHub Actions and compare the testing results. Also consult with your developers to verify the correctness of the migration.
To verify the CI/CD Pipeline validation, run the pipeline on a development environment and make sure that build artifacts are deployed correctly. Test all the caching strategies, if any. Make sure that the deployed application works as expected and consult with your developers and QA engineers to verify.
Leveraging GitHub Actions Marketplace for Pre-Built Actions GitHub
One of the biggest advantages of GitHub Actions is the GitHub Actions Marketplace—a centralized space where developers can share and use pre-built actions. Think of it as GitHub’s version of the Jenkins Plugin ecosystem. The Marketplace makes it easy to extend a GitHub workflow by integrating third-party tools and automating common tasks without needing to write custom code.
💡Did you know you could also build an internal GitHub Actions Marketplace for a curated directory of vetted Actions that developers can securely maintain, approve and use in their CI/CD pipelines?
Here’s how you can get started with the GitHub Actions Marketplace:
- Explore Available Actions: The Marketplace offers a wide variety of actions that you can plug directly into a GitHub workflow. From CI/CD integrations to deployment and security tools, there’s likely an action available for almost any task. You can explore what’s available on the GitHub Actions Marketplace.
- Using a Marketplace Action: To use an action from the Marketplace, simply include it in your GitHub Actions workflow file using the uses keyword. Here’s an example that integrates Docker’s build-push-action from the Marketplace:
run: |
  -yaml
steps:   - name: Build and push
uses: docker/build-push-action@v6
When you visit the repository for this action on GitHub, you’ll notice a badge that says, “Use this GitHub Action with your project,” making it easy to incorporate into your GitHub workflow.
- Advantages of Pre-Built Actions: By leveraging pre-built actions, you save time and reduce complexity in your workflows. Instead of reinventing the wheel, you can rely on trusted, well-maintained actions shared by the developer community.
Monitoring and Observability
Monitoring and observability are critical to ensuring that your CI/CD pipelines are running smoothly, and any issues are detected early. With GitHub Actions, you can integrate popular monitoring tools like Prometheus and Grafana to gain deeper insights into your workflows. These tools allow you to track key metrics, receive alerts, and visualize pipeline performance in real-time.
Here’s how you can integrate these monitoring tools into your GitHub Actions setup:
- Prometheus Integration: Prometheus is a powerful tool for monitoring and alerting. There’s a dedicated Prometheus Exporter action available for GitHub Actions-integrated repositories. You can explore and use this action to export GitHub workflow metrics to Prometheus for real-time monitoring. Check out the Prometheus Exporter action to get started.
- Grafana Integration: If you're using Grafana for visualizing and alerting, you can easily integrate it with GitHub Actions as well. Grafana supports integration with GitHub, allowing you to create real-time dashboards and set up alerts based on the GitHub Actions workflow performance. Learn more about configuring Grafana with GitHub here.
- Deploying Prometheus and Grafana from GitHub Actions: There’s also an action available to deploy Prometheus and Grafana directly from GitHub Actions. This allows you to set up your monitoring stack as part of your CI/CD pipeline. For more information, visit the Prometheus and Grafana Deployment action.
Conclusion
Migrating from Jenkins to GitHub Actions streamlines your CI/CD process, enhancing scalability, automation, and security. While challenges like multi-branch pipelines and plugin compatibility may arise, with the right tools and planning, the transition can be smooth and efficient.
Ready to start your migration? Try StepSecurity’s Harden-Runner to secure your workflows and make the switch to GitHub Actions even safer.

Frequently Asked Questions (FAQs)
What are the best practices for migrating sensitive data?
Sensitive data should not be stored in plain text. Sensitive data such as credentials or API keys should be stored in secrets. For info on secrets, please see the Ensuring Secure and Efficient Secret Management and Compliance and Auditing section.
How to manage large and complex CI/CD workflows?
Every large system, including CI/CD workflows, could be split down into logical parts. To manage or migrate large CI/CD workflows, one could work on the system one part at a time and continue on to the next part only after ensuring that the changes for the previous part are thoroughly tested.
What are some strategies for handling workflow failures and rollbacks?
Debugging a workflow failure usually would start at reviewing the workflow logs:

As you can see, each workflow step has its own section in the logs. The offending step would be marked as failed, and execution would stop. This usually would be an indication of a problem in a particular step.
If the logs are not verbose enough, one could increase verbosity in the tools invoked by workflow steps or increase verbosity of the workflow runners itself.
Usually to revert the offending change, it is sufficient to deploy the previous successful snapshot.
How to integrate Jenkins with GitHub Actions?
While it is possible to use a Jenkinsfile Runner in GitHub Actions, such as described in the links below, in general the two serve a pretty close purpose. So, it could be considered choosing the right one between the two or migration from one to another rather than integration of the two. https://www.jenkins.io/projects/gsoc/2022/projects/jenkinsfile-runner-action-for-github-actions/ https://www.jenkins.io/doc/tutorials/using-jenkinsfile-runner-github-action-to-build-jenkins-pipeline/
Why use GitHub Actions instead of Jenkins?
Having a Jenkins build server could be considered a point of failure, because should it go down or unreachable, the build ecosystem of the project could be disrupted. - If you have your code hosted on GitHub, you may want to consider GitHub Actions as your CI/CD provider, because it is the closest one to your VCS. - Also, if you don’t need a self-hosted runner, you could have the complete CI/CD infrastructure managed for you by GitHub, as you only need to define the YAML workflows.
How to push code to Git from Jenkins?
See “Now, let’s configure a project in Jenkins with our repo” section under Step-by-Step Guide to Migrating from Jenkins to GitHub Actions. Also see the Handling Complex Multi-Branch Pipelines section. These sections describe how Jenkins is automatically polling git repositories in question for changes and automatically launches a build, should a new commit on selected branches be detected.

.png)
.png)
